Why do some artists capture a cat’s mysterious personality and fluid grace in their drawings while others create stiff, lifeless sketches that barely resemble the elegant felines they’re trying to portray?
Draw a Cat: Complete 2026 Guide for Realistic Feline Art and Expressive Portraits
Learning to draw a cat opens up one of the most rewarding and challenging subjects in animal art. Cats possess elegant proportions that shift dramatically between poses, expressive features that convey complex emotions through subtle changes, and graceful movements that defy simple representation. These qualities make feline subjects both frustrating for beginners and endlessly inspiring for artists at all skill levels who seek to capture their unique character.
This comprehensive guide teaches you everything needed to create realistic cat drawings that capture both physical accuracy and personality. You’ll progress from basic sketches using simple shapes to detailed portraits that showcase individual feline characteristics. Whether you want to immortalize your beloved pet’s personality, develop animal drawing skills that transfer to other subjects, or create professional-quality feline artwork for exhibitions and sales, mastering cat anatomy and proportions forms the essential foundation.
Unlike many drawing subjects, cats present unique challenges through their incredible flexibility, complex fur patterns, and distinctive facial structures that vary dramatically between breeds. A cat’s spine curves in ways that seem anatomically impossible, creating S-shaped poses no other common animal achieves. Their facial features—from almond-shaped eyes to delicate whiskers—require careful observation and precise rendering to avoid creating cartoon-like caricatures instead of convincing representations.
This guide covers everything from understanding skeletal and muscular structures that give cats their fluid movement, to mastering fur textures that differentiate short-haired from long-haired breeds. You’ll learn breed-specific characteristics that distinguish a flat-faced Persian from a sleek Siamese, explore dynamic poses from sitting to stretching, and discover advanced techniques for capturing the alert, mysterious, or playful expressions that make each cat unique.
Start with simple shapes and patient observation to draw a cat that captures its unique grace. Every sketch builds your understanding of feline anatomy, movement patterns, and the subtle details that transform generic cat drawings into portraits that look truly alive and individual.
Understanding Cat Anatomy and Proportions
Before you successfully draw a cat, understanding feline anatomy becomes essential for achieving accurate proportions and natural poses. Unlike dogs with their straightforward skeletal structure, cats possess remarkable flexibility that allows extreme contortions and elegant curves. This anatomical knowledge transforms your approach from guessing at shapes to making informed decisions about structure and form.
Basic Cat Body Structure
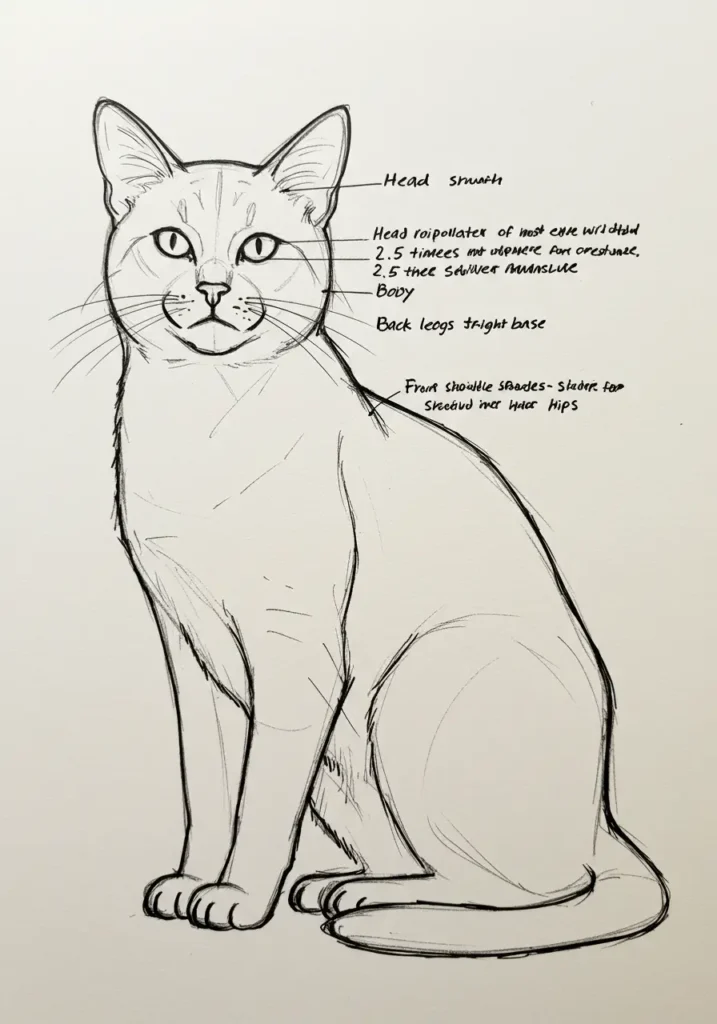
Before you draw a cat with confidence, understand its fundamental anatomy and proportional relationships that create convincing feline forms:
| Component | Detailed Description | Drawing Tips |
|---|---|---|
| Head Shape | Triangular to rounded depending on breed; measures approximately 2.5 times the width of one eye from outer corners. | Start with circle, add triangular muzzle. |
| Body Length | 4-5 head lengths from nose tip to tail base; varies with body type from cobby (short) to oriental (long). | Use head as measurement unit. |
| Front Legs | Straight columnar structure; shoulders at 45-degree angle when sitting; paws point slightly outward. | Note angular shoulder blades. |
| Back Legs | Powerfully muscular with prominent haunches; joints angle backward creating reverse-knee appearance. | Show muscle definition clearly. |
| Tail | Flexible extension of spine; length approximately equals body length; expressive position indicates mood. | Curve naturally, avoid straight lines. |
Cats possess extraordinarily flexible spines containing more vertebrae than most mammals, allowing dramatic curves impossible for dogs or humans. This flexibility enables cats to twist their bodies while keeping their heads level during falls, compress into tiny spaces, and create elegant arched poses. When you draw a cat, emphasizing these curves rather than rigid straight lines immediately suggests feline fluidity.
The shoulder blades and hip bones create distinct silhouette points that shift position dramatically with movement. In standing cats, prominent shoulder blade angles show clearly through the fur. Sitting cats display rounded haunches while front legs remain relatively straight. Understanding these skeletal landmarks helps you place features accurately regardless of pose complexity.
Cat legs appear deceptively simple but contain complex joint structures. What looks like a backward-facing knee on back legs is actually the ankle—cats walk on their toes like dancers en pointe, with actual knee joints hidden beneath body fur. Front legs lack collarbones, allowing shoulder blades to slide independently and contributing to their incredible flexibility when squeezing through narrow openings.
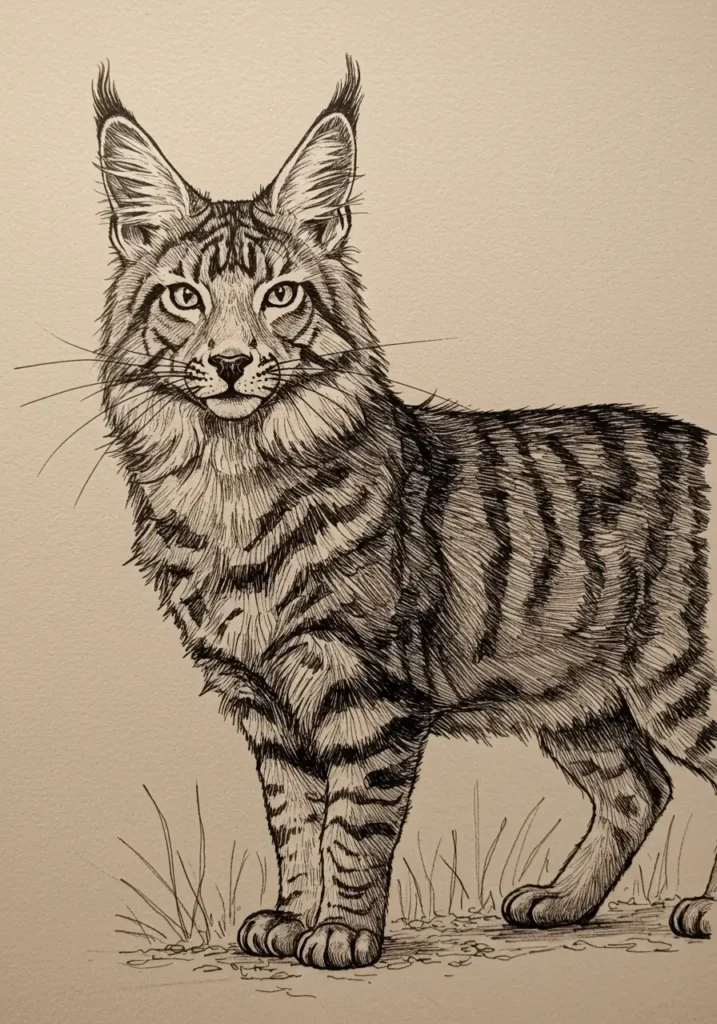
Facial Proportions and Features
Cat faces follow specific proportional rules that, when observed correctly, create convincing feline expressions. The eyes sit slightly below the horizontal midpoint of the head, spaced approximately one eye-width apart. Ears attach high on the skull, with bases aligning roughly with the top of the eyes. The nose forms an inverted triangle positioned centrally below and between the eyes, with the mouth line rarely extending beyond the outer edges of the nostrils.
Understanding these proportions prevents common mistakes like placing eyes too high (creating an alien appearance) or making ears too small (suggesting dog-like features). Whiskers emerge from distinct pads flanking the muzzle, typically 12 on each side arranged in four rows. These aren’t decorative—they’re sensory organs, so their placement matters for anatomical accuracy.
Essential Materials for Cat Drawing
Quality materials make a significant difference when you learn to draw a cat, particularly for rendering complex fur textures and subtle value shifts that define feline forms. You don’t need expensive professional supplies to start, but understanding material characteristics helps you choose tools matching your skill level and artistic goals.
Traditional Drawing Supplies

- Graphite Pencils in Multiple Grades: Use 4H or 2H for initial light construction lines that establish proportions and placement without damaging paper. HB pencils work perfect for general sketching, fur direction mapping, and medium-value shading. Switch to 2B, 4B, and 6B pencils for rich shadows in ear canals, eye pupils, and deep fur layers that create dramatic depth. Having this range allows subtle gradations from lightest highlights to deepest shadows essential for three-dimensional cat forms.
- Quality Drawing Paper: Smooth Bristol board (plate finish) provides ideal surfaces for detailed fur rendering where individual pencil strokes remain visible and crisp. Regular sketch paper works perfectly for practice studies and gesture drawings where you explore poses without commitment to finished artwork. Avoid heavily textured paper that interferes with fine detail work required for realistic cat eyes and whiskers. Paper weight should exceed 70 lb to withstand erasing and layering without tearing or pilling.
- Precision Erasers: Keep kneaded erasers for gentle graphite lifting that creates highlights in fur, eye reflections, and whisker areas without damaging paper surfaces. White vinyl erasers remove marks cleanly for major corrections. Precision eraser pens or narrow eraser strips create fine highlight lines suggesting individual fur strands catching light. Electric erasers work beautifully for large area corrections but require practice to control.
- Blending Tools for Smooth Transitions: Tortillons (blending stumps) create smooth gradients essential for short-haired cat coats and soft shadow transitions. Use different sizes—small for facial details, large for body shading. Cotton swabs blend larger areas like body masses while maintaining softer edges than paper stumps. Tissues work for overall value smoothing but offer less control than dedicated tools. Clean blending tools frequently to avoid muddying light areas with transferred graphite.
- Reference and Planning Tools: Maintain a collection of cat photographs showing various poses, breeds, and lighting conditions. A ruler or proportional divider helps measure and transfer accurate proportions from references to drawings. A white gel pen adds whisker highlights and eye catchlights on finished dark areas. Fixative spray protects completed graphite drawings from smudging during handling or framing.
Digital Drawing Options
- Drawing Tablets and Displays: Wacom Intuos provides affordable entry-level tablets with excellent pressure sensitivity for natural drawing feel. iPad Pro combined with Apple Pencil offers portable all-in-one solutions with impressive processing power and screen quality. Wacom Cintiq display tablets let you draw directly on screen surfaces, providing the most traditional drawing experience digitally. Screen tablets cost more but eliminate the disconnect some artists feel with standard tablets.
- Professional Drawing Software: Procreate dominates iPad illustration with its intuitive interface, excellent brush engine, and affordable one-time purchase price perfect for beginners and intermediate artists. Adobe Photoshop offers industry-standard tools with unmatched power for detailed rendering and editing but requires subscription and steeper learning curve. Clip Studio Paint excels for line art and detailed illustration with specialized comic and manga features. Krita provides free, open-source alternative with surprisingly robust toolsets rivaling paid programs.
- Custom Brush Libraries: Textured pencil brushes mimic traditional graphite for realistic fur rendering with natural variation in stroke darkness and width. Fur brushes designed specifically for animal art streamline the process of creating convincing coat textures. Blending brushes smooth transitions between values without muddying colors or losing detail. Most programs include default brushes suitable for cat drawing, with thousands of free custom brushes available from artist communities online.
- Digital Advantages: Unlimited undo capabilities let you experiment without fear of ruining work. Layers separate different elements (sketch, fur, whiskers, background) for independent editing. Transform tools adjust proportions and reposition elements after drawing. Color is easy to add, modify, or remove compared to traditional media. Digital files never degrade and can be reprinted endlessly at any size without quality loss.
Step-by-Step Guide: Drawing a Cat Face
Mastering cat facial features forms the foundation for all feline artwork since faces convey personality and expression that make drawings come alive. Follow these detailed steps to draw a cat face with accurate proportions and engaging character:
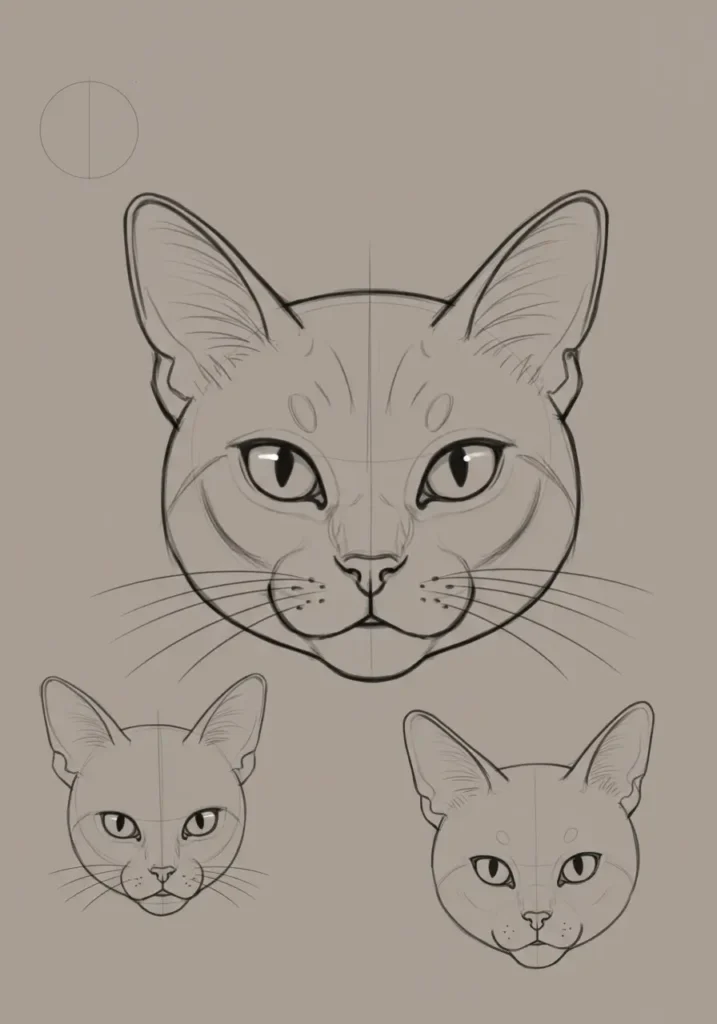
Step 1: Basic Head Shape
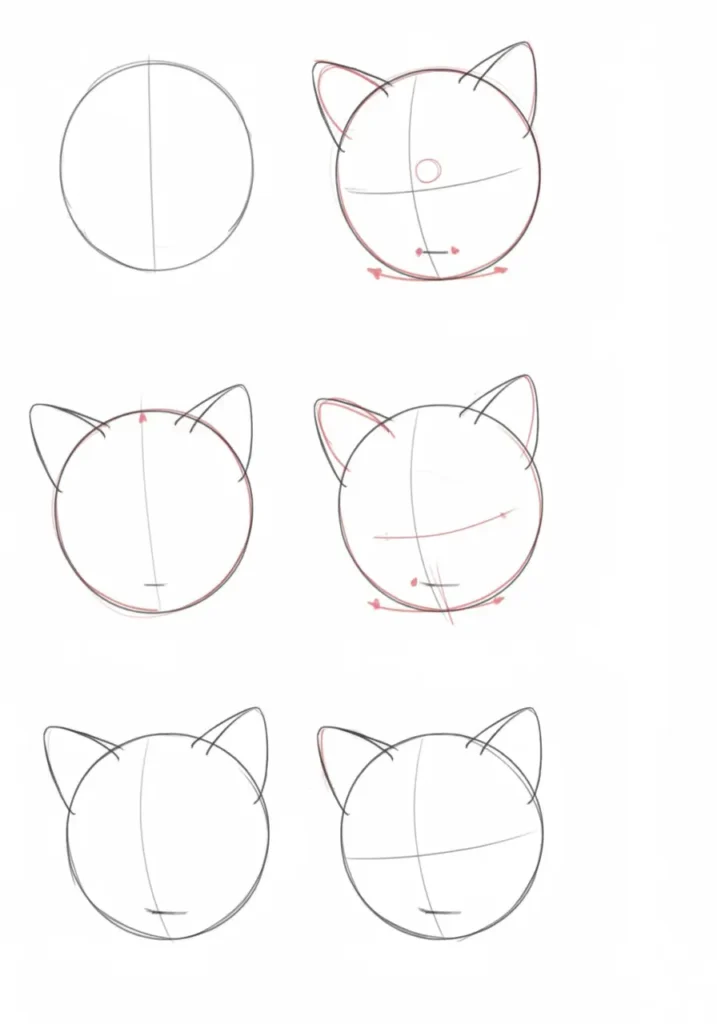
Draw a circle representing the skull’s cranium using light pencil pressure (4H or 2H). Add a smaller overlapping circle at the bottom representing the muzzle area—this second circle should be about 40% the size of the main circle. Sketch a vertical centerline through both circles to ensure facial symmetry, then add a horizontal guideline slightly below the main circle’s midpoint where eyes will sit. These construction lines remain light since you’ll erase them later.
Pro Tip: Round-faced breeds like Persians need larger muzzle circles, while Oriental breeds need smaller, more triangular muzzle shapes.
Step 2: Facial Features
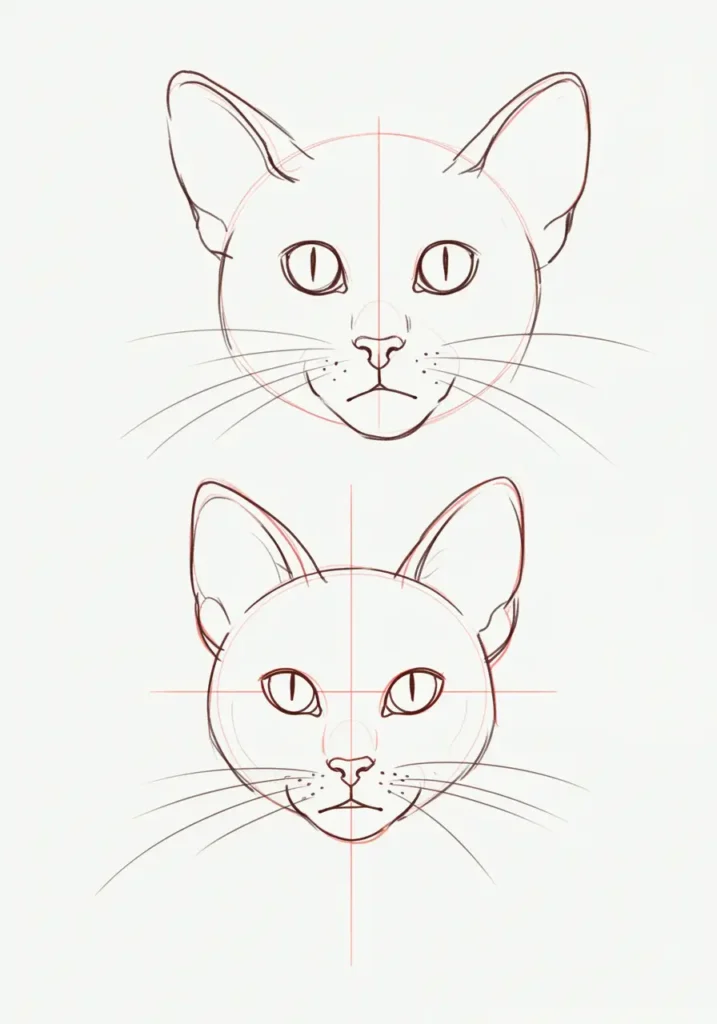
Place eye circles along the horizontal guideline, spacing them approximately one eye-width apart. Mark positions for the nose (a small inverted triangle) centered on the vertical line where the muzzle circle meets the main head circle. Add a subtle mouth curve below the nose—cat mouths are small and delicate, curving gently downward in a slight W-shape. Mark whisker pad positions on both sides of the muzzle with light dots showing where whiskers will emerge.
Pro Tip: Eyes should align with the top of the nose triangle for proper feline proportions.
Step 3: Define Eyes
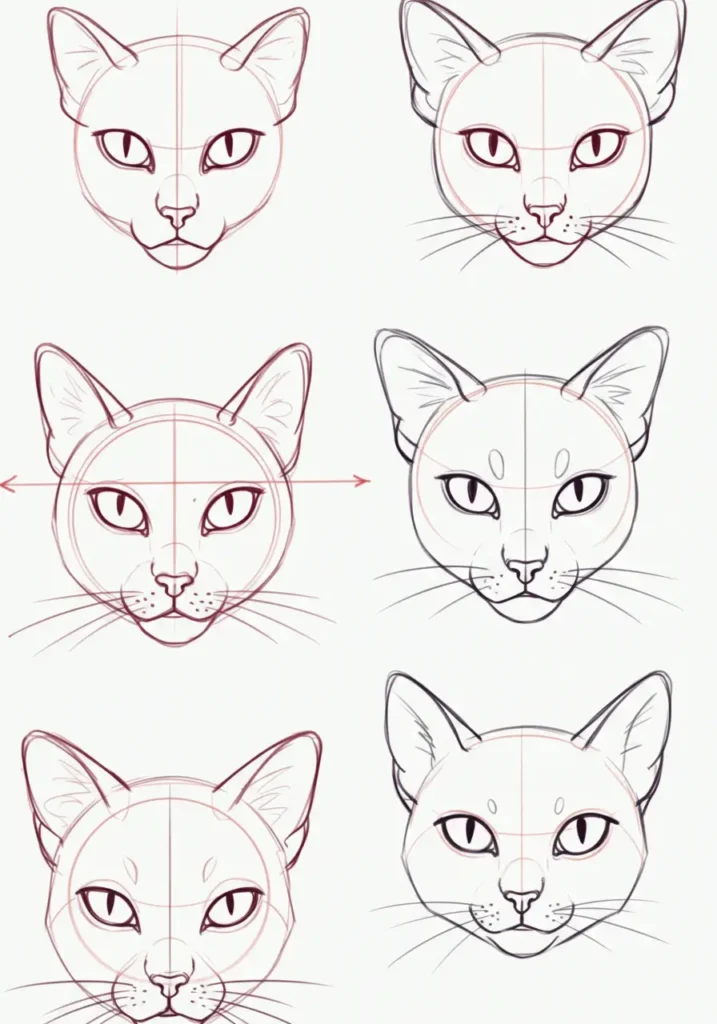
Transform eye circles into distinctive almond shapes with angled outer corners pointing slightly upward—this creates the characteristic feline expression. Draw pupils as vertical slits (for alert cats) or fully round (for dim lighting or relaxed states). Add iris patterns radiating from pupils with light lines suggesting the sunburst texture unique to cat eyes. Include small tear duct details at inner corners and subtle eyelid lines at top and bottom. Leave white catchlight spots in each eye to suggest reflection and bring eyes to life.
Pro Tip: Avoid centering pupils perfectly—slight off-center positioning creates more natural, engaging expressions.
Step 4: Nose and Mouth
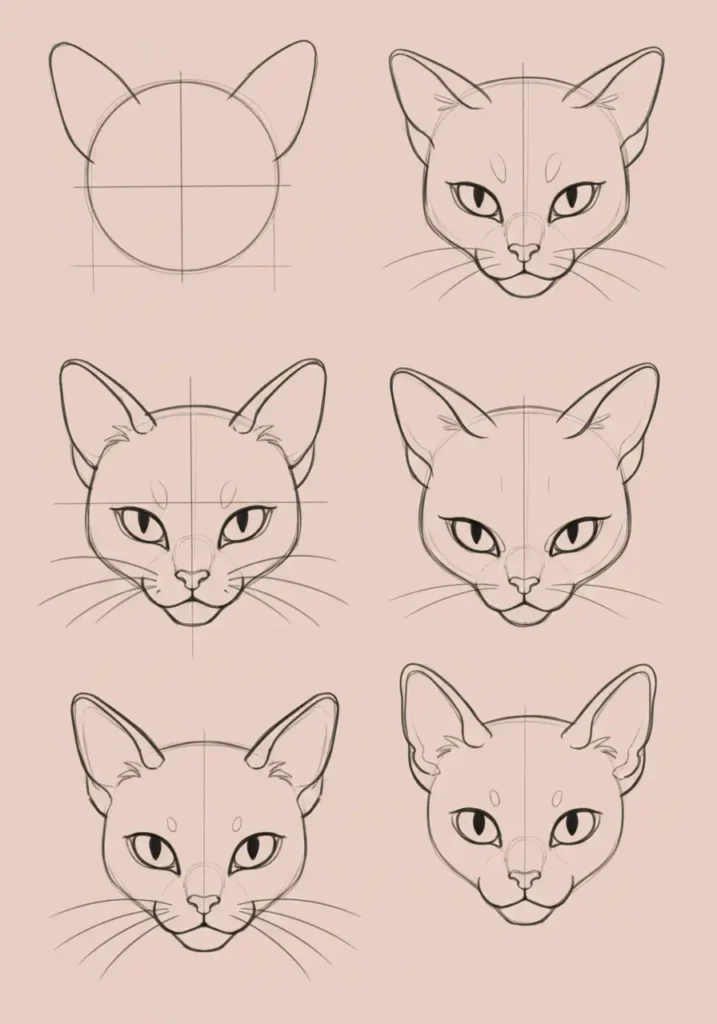
Refine the nose into an inverted triangle shape with rounded corners rather than sharp points. Add comma-shaped nostrils curving into the nose sides, creating the characteristic nostril appearance cats display. Draw the philtrum (vertical groove) extending from nose bottom to mouth. Add a gentle mouth curve below using subtle lines—avoid heavy dark lines that create cartoon effects. Cats’ mouths remain delicate features that shouldn’t dominate facial expressions.
Pro Tip: Add a highlight line across the nose bridge to suggest its slightly rounded, shiny surface.
Step 5: Ear Construction
Draw tall triangular ears with slightly rounded tips positioned high on the head, spaced approximately one ear-width apart at their bases. Ear bases should align roughly with the top of the eyes. Add inner ear curves showing the complex inner structure—include the tragus (small flap at ear base) and antihelix curves that create depth. Draw a dark canal opening at the ear base suggesting depth. Ears angle slightly outward rather than pointing straight up, creating a more natural, alert appearance. Add fine fur tufts at ear tips if drawing long-haired breeds.
Pro Tip: Ear position communicates mood—forward ears show interest, sideways ears indicate annoyance, flattened ears signal fear or aggression.
Step 6: Fur and Final Details
Erase construction lines gently with a kneaded eraser, leaving just enough to guide proportions. Begin adding fur texture using short, directional strokes that follow natural fur patterns—fur radiates outward from the nose, flows backward along cheeks, and fans outward from ear bases. Add whiskers as long, graceful curves extending from the whisker pads—typically three to four main whiskers per side, with lighter, shorter whiskers above eyes (eyebrows) and on chin. Shade around eyes to create depth, darken ear canals, and add subtle shadows under chin and along neck to suggest three-dimensional form. Leave highlight areas on forehead, nose bridge, and cheek bones to enhance dimensionality.
Pro Tip: Real cat whiskers are never perfectly straight—add slight curves and varying lengths for naturalistic appearance.
What aspect of learning to draw a cat challenges you most—getting the proportions right, creating realistic fur textures, or capturing that mysterious feline expression in the eyes? Share your specific struggles in the comments so we can help you overcome them!
Drawing Different Cat Poses
Once you master basic cat facial features, expanding into full-body poses allows you to capture the complete elegance and personality that makes felines such captivating subjects. Each pose presents unique challenges and opportunities to demonstrate your understanding of feline anatomy and movement.
Sitting Cat Profile
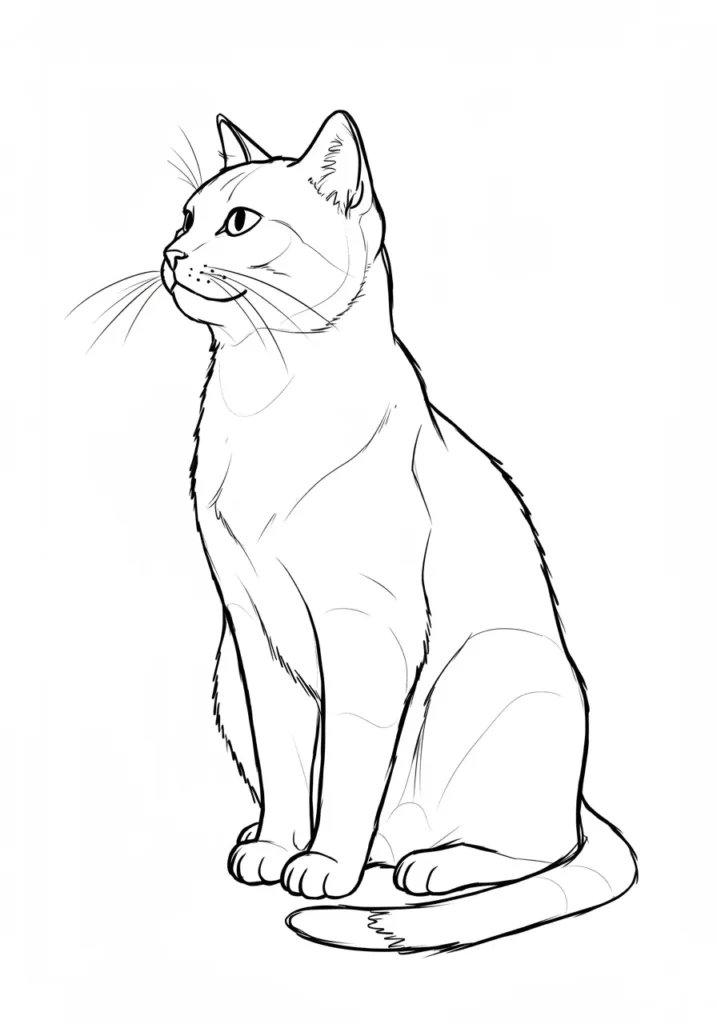
Start with a tilted oval for the body, angled approximately 60 degrees from horizontal to suggest the characteristic sitting posture. Add a smaller circle for the head, positioned above and slightly forward of the body’s front edge. Draw straight vertical front legs extending from the chest area downward—sitting cats hold front legs perpendicular to the ground, creating elegant columnar supports. Sketch folded back legs with prominent haunches showing powerful muscles compressed under the body. The visible back leg should display distinct angles at hip, knee (hidden), and ankle joints.
Wrap the tail around the paws following the body’s curve, or extend it along the body’s side—tail position varies with mood and temperature. Connect the neck with gentle curves showing how the head angles relative to the body—sitting cats often tilt heads slightly while maintaining alert, upright posture. Refine the silhouette by emphasizing the shoulder blade angle, the curved spine, and the rounded haunch that dominates sitting cat profiles. This classic pose appears in countless cat portraits and provides excellent practice for understanding how feline anatomy creates graceful sitting positions. For additional reference images and professional techniques, visit Artists Network for their comprehensive animal drawing tutorials.
Stretching Cat
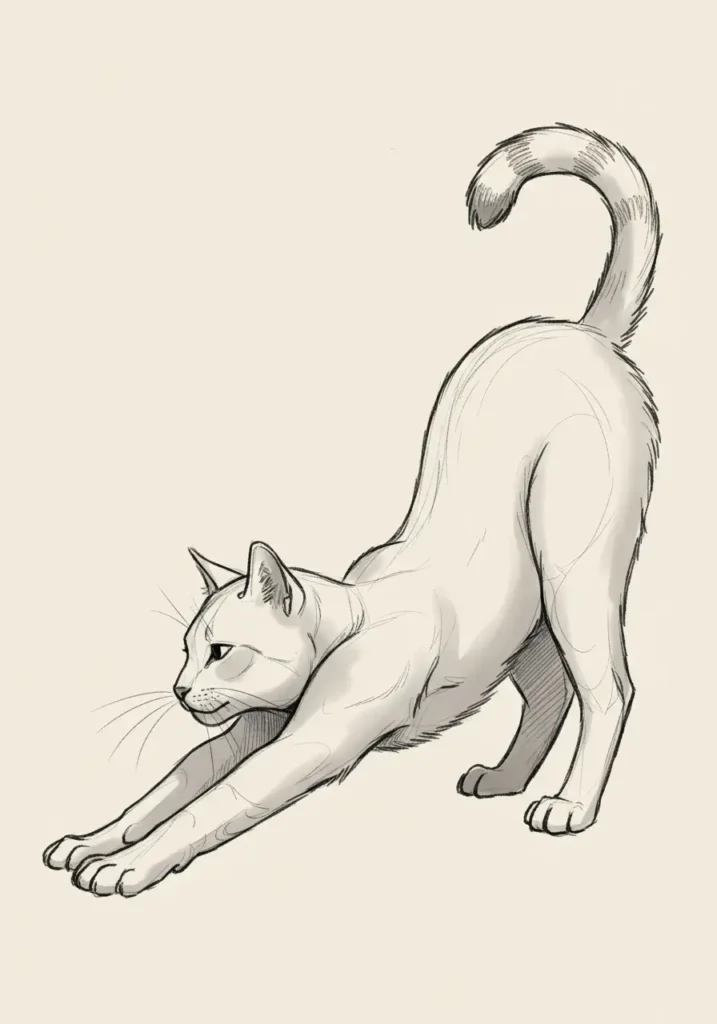
Capture the dramatic S-curve of a stretching cat’s spine by drawing a flowing centerline that curves upward at the hindquarters and downward at the shoulders. This exaggerated curve showcases the incredible flexibility that distinguishes cats from other animals. Sketch extended front legs reaching forward with paws flat against the ground, showing splayed toes and visible claws if the cat is stretching on carpet or grass. Plant back legs firmly with feet flat, creating stable anchor points for the stretch.
Show prominent shoulder blades pushing upward through the fur as front legs extend, creating distinctive angular points along the back. The chest drops low between extended front legs while the rump rises high, creating the classic “play bow” position cats adopt during stretching or play. Add an upward-curving tail for balance and expression—stretching cats often quiver their raised tails. The head typically tilts downward or angles sideways, with ears in relaxed positions. This dynamic pose demonstrates your ability to draw a cat in motion, capturing the fluid grace that defines feline movement.
Sleeping Cat
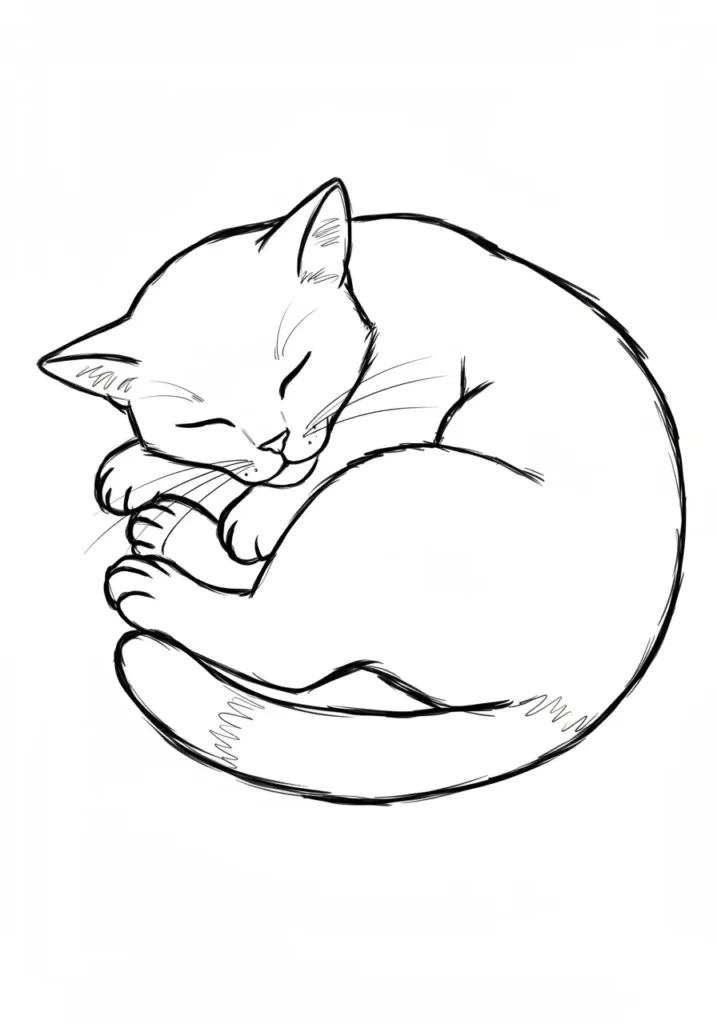
Use a large circle or oval as the foundation for the curled body, then add curves showing how the spine wraps around to create the compact sleeping ball characteristic of cold or secure cats. Tuck the head against the body or nestled into paws, with ears relaxed sideways rather than alert and upright. Position paws either under the chin, around the face, or tucked beneath the body—sleeping cats adopt various paw arrangements that contribute to the pose’s personality.
The tail typically wraps around the body, sometimes covering the nose like a fluffy scarf in cold conditions or extended loosely in warm environments. Show closed or partially closed eyes with relaxed facial muscles—sleeping cats display completely different expressions than alert felines. Add gentle fur texture following the body’s curves, with longer fur appearing fluffier and shorter fur lying smooth. This peaceful pose allows you to focus on form and texture without worrying about capturing alert expressions or tense muscle definition. Sleeping cat drawings make particularly appealing subjects for home decor and gifts.
Related Reading: How to Draw a Flower Step by Step: Complete Beginner’s Guide to Beautiful Botanical Art
Expand your drawing skills beyond animals into botanical subjects, learning complementary observation and rendering techniques that enhance all your artwork.
Mastering Cat Fur Textures
Fur texture separates amateur cat drawings from professional renderings. Understanding how fur grows, layers, and catches light transforms flat sketches into convincing three-dimensional representations that look genuinely soft and tactile. Fur direction follows body contours predictable once you understand the underlying anatomical structures.
Build texture through methodical layers rather than random strokes. Start with shadows defining form—establish where fur recedes into shadows around legs, under the body, and in ear canals. Add medium tones suggesting mid-range fur values across body masses. Finish with highlights showing individual fur strands catching light along spine, haunches, cheek bones, and ear edges. This layered approach creates depth that single-pass scribbling never achieves.
Use short, controlled pencil strokes for faces and paws where fur grows fine and dense. Longer, flowing strokes work for body areas where fur grows in distinct directional patterns. Vary stroke pressure within individual marks to create natural tapering—press harder at stroke beginnings, lifting gradually to create fine tapered ends mimicking real fur structure.
| Fur Type | Drawing Technique | Key Characteristics |
|---|---|---|
| Short Hair | Short, quick directional strokes; blend edges softly to suggest smoothness rather than individual hairs. | Sleek, close to body; muscles show clearly through fur. |
| Long Hair | Group longer strokes in clumps following fur flow; add prominent highlights on raised areas showing sheen. | Fluffy, obscures body shape; prone to tangles and mats. |
| Tabby Patterns | Vary stripe width and darkness; integrate patterns with fur texture rather than drawing them separately. | Stripes follow body contours; M-marking on forehead distinctive. |
| Color Points | Gradually darken extremities (ears, face, paws, tail) while keeping body lighter using smooth gradients. | Darker on extremities; temperature-dependent coloring. |
Drawing Different Cat Breeds
Different cat breeds display distinctive characteristics that, when rendered accurately, immediately identify them and add authenticity to your artwork. Understanding breed-specific features allows you to draw a cat that looks like a particular individual rather than a generic feline.
Persian Cat
Draw a distinctively flat face (brachycephalic) with wide-set, round eyes that dominate facial features. The nose should be extremely short and pushed in, creating an almost human-like profile when viewed from the side. Use very full, flowing fur that obscures body contours and creates a cloud-like appearance around the cat. Persian body proportions appear sturdy and cobby (short and compact) rather than long and lean. Add abundant fur around the neck creating a pronounced ruff, and a dramatically fluffy tail that plumes outward.
Persian coloring varies dramatically from solid colors to intricate patterns, but all share the extreme facial structure and luxurious coat length. Pay special attention to ear furnishings (long tufts inside ears) and toe tufts (fur emerging between paw pads). These cats appear almost spherical when sitting, with fur masking their actual body shape beneath. For breed standard references and authentic Persian characteristics, consult resources like Better Homes & Gardens pet guides that photograph purebred examples showing proper breed type.
Siamese Cat
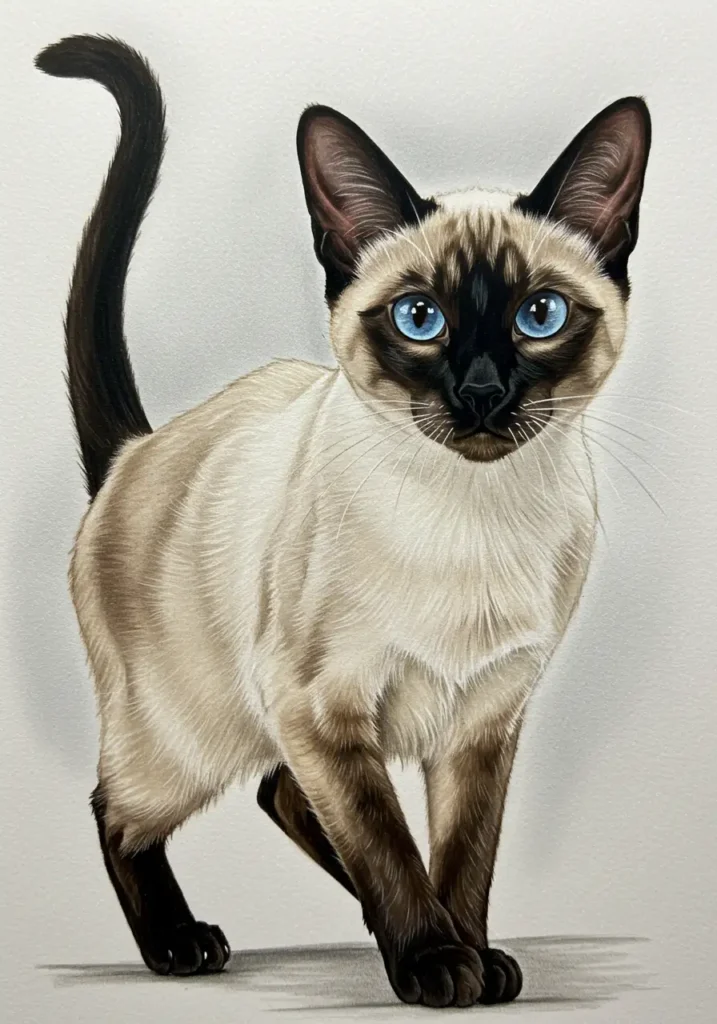
Show dramatically darker points on ears, face (especially a mask covering the face), legs, and tail contrasting with a much lighter cream or ivory body. This temperature-sensitive coloring creates striking visual patterns unique to pointed breeds. Draw a lean, elongated body with fine bone structure—Siamese cats appear elegant and athletic rather than stocky. Create large, bat-like ears sitting low on a wedge-shaped head that tapers from wide ear bases to a narrow muzzle.
Render vivid blue eyes (use colored pencils or leave white in graphite drawings) that slant slightly toward the nose, creating an exotic, alert expression. The short, fine coat lies close to the body, clearly showing muscular definition and skeletal structure. Siamese cats display long, thin tails and exceptionally long legs relative to body size. When you draw a cat of this breed, emphasize angular features and linear elegance rather than soft curves—Siamese aesthetics favor sharp angles and dramatic contrasts.
Maine Coon
Use large, substantial proportions throughout—Maine Coons rank among the largest domestic cat breeds, with males weighing 15-25 pounds. Draw prominent ear tufts (lynx tips) extending from ear points, creating a wild, lynx-like appearance. Add an impressive chest ruff (a thick collar of fur around the neck and chest) that makes the cat appear even larger and more majestic. Create a magnificently plumed tail that’s as long as the body and covered in flowing fur that fans outward.
Maine Coon faces appear more squared than triangular, with high cheekbones and a strong chin. Show tufted paws with long fur emerging between toe pads, adapted for walking on snow in their native Maine environment. The overall impression should suggest a rugged, outdoorsy appearance despite being a domestic breed. Their semi-long fur creates a shaggy, natural look rather than the carefully groomed appearance of Persian show cats. Pattern variations include brown tabby (most common), solid colors, and tortoiseshell combinations. The breed’s “gentle giant” nickname reflects their large size combined with sweet temperaments—try to capture both power and kindness in facial expressions.
Which cat breed fascinates you most as a drawing subject—the fluffy elegance of Persians, the sleek exoticism of Siamese, the majestic size of Maine Coons, or another breed entirely? Tell us what draws you to particular feline characteristics and which breed you plan to draw next!
Common Cat Drawing Mistakes
Recognizing and avoiding common mistakes accelerates your progress when learning to draw a cat. Most beginners make similar errors that, once understood, become easy to prevent through mindful observation and careful measurement.
| Common Mistake | Why It Happens | Effective Solution |
|---|---|---|
| Oversized Heads | Drawing head first without considering total body proportions. | Measure head-to-body ratio (1:4-5); sketch body outline first to establish scale. |
| Human-like Eyes | Defaulting to familiar human eye shapes instead of observing feline characteristics. | Use distinctive almond shapes with angled outer corners; avoid round or oval shapes. |
| Uniform Fur | Random scribbling without understanding fur growth patterns. | Study how fur follows body contours; use varied directional strokes matching natural flow. |
| Stiff Poses | Ignoring cats’ incredible flexibility and dynamic curves. | Emphasize spine curves and fluid lines; avoid geometric rigidity. |
| Incorrect Leg Joints | Misunderstanding digitigrade leg structure (walking on toes). | Study skeletal structure; remember visible “backward knee” is actually ankle. |
| Missing Whiskers | Treating whiskers as optional decorative elements. | Always include whiskers as essential sensory organs; position them accurately on whisker pads. |
Advanced Cat Drawing Techniques
Once you master basic cat anatomy and rendering, advanced techniques elevate your artwork from competent to exceptional. These professional approaches separate amateur efforts from gallery-quality feline portraits.
Capturing Personality Through Eyes: Cat eyes convey complex emotions through subtle changes in pupil size, eyelid position, and gaze direction. Direct eye contact creates engaging, confrontational compositions that pull viewers into the artwork. Angled gazes suggest wariness, curiosity, or distraction. Partially closed eyes indicate contentment or drowsiness. Master these subtle variations by studying cat behavior and photographing eyes under different emotional states. Add tiny highlights in precise positions—slightly off-center catchlights appear more natural than perfectly centered ones.
Ear Position for Emotional Expression: Ear positions communicate mood instantly to anyone familiar with cats. Forward-facing ears indicate alertness, interest, or confidence. Ears angled sideways suggest annoyance, uncertainty, or conflicted emotions. Flat ears pinned against the head signal fear, aggression, or submission. Independently moveable ears create asymmetric positions showing divided attention. When you draw a cat, ear position should match the intended emotional tone—playful cats display forward ears, while fearful cats flatten them protectively.
Whisker Angles and Body Language: Whiskers angle forward during curiosity or hunting behavior, creating a focused expression. Relaxed whiskers angle slightly back in neutral positions. Pinned whiskers flatten against the face during fear or aggression, reducing the cat’s profile. These subtle details add behavioral authenticity that elevates drawings beyond mere physical accuracy into true portrait capture.
Dynamic Movement and Foreshortening: For cats in motion—leaping, running, or pouncing—study weight distribution and how muscles engage during athletic movement. Use foreshortening (shortening forms moving toward the viewer) to create dramatic perspective. A cat leaping toward the viewer requires enlarged front paws and compressed body depth. Motion blur effects suggest speed without losing form definition. Reference high-speed photography to understand how cats’ bodies transform during athletic activities.
Background Integration: Simple backgrounds keep focus on the cat while providing context. Soft gradient backgrounds in neutral tones (gray, beige, soft blue) complement any cat coloring without competition. Environmental elements like window sills, cushions, or branches add narrative while maintaining the cat as primary subject. Avoid busy patterns or vibrant colors that distract from feline features. Vignette effects (darkening or fading background edges) naturally direct viewer attention toward the central cat subject.
Building Your Cat Drawing Skills
Consistent practice transforms initial struggles into confident competence when you learn to draw a cat. Structure your practice sessions to build skills systematic while maintaining motivation through variety and achievable goals.
Practice 15–30 minutes daily rather than occasional marathon sessions—regular short practice beats irregular long sessions for skill retention and muscle memory development. Begin each session with quick gesture studies capturing overall poses in 30-60 seconds each. These rapid sketches train your eye to see essential forms without getting lost in details. Progress to longer studies focusing on specific challenges like eyes (spending 10-15 minutes perfecting iris details and reflections) or fur texture (experimenting with different stroke directions and pressures).
Collect reference photos organized by pose (sitting, lying, stretching, playing) and breed characteristics. Build a digital or physical library showing cats from multiple angles in various lighting conditions. Study anatomy books and skeletal diagrams to understand the structural foundation beneath visible surfaces. The more you understand about actual feline anatomy, the more convincingly you’ll draw cats from imagination or adapt reference photos creatively.
Share your progress on visual platforms like Instagram using hashtags like #catdrawing, #felineart, #catportrait, and #animalart to connect with communities of animal artists. Post consistently to document improvement over time—looking back at early efforts compared to current work provides motivating proof of progress. Engage with other artists’ work through thoughtful comments and questions, building relationships within the cat art community.
Consider selling original drawings or high-quality prints through platforms like Etsy where cat artwork maintains steady demand from pet lovers seeking unique decor. Price work appropriately based on size, detail level, materials used, and time invested. Offer commissioned pet portraits allowing cat owners to immortalize beloved companions—this creates meaningful work while building your reputation and client base.
Have you attempted to draw your own cat or another feline friend yet? What successes or frustrations have you experienced, and what specific aspect would you like to improve most in your next cat drawing? Share your journey and let’s learn together in the comments!
Moving Forward with Your Cat Drawing Journey
Learning to draw a cat requires patience, observation, and willingness to see these elegant animals as complex assemblies of anatomical structures rather than simple shapes. Every cat drawing session builds your understanding of feline grace, from the flexible spine curves that create dramatic poses to the subtle eye expressions that convey mysterious personalities cats display so distinctively.
Start with simple poses—sitting cats in profile view—before attempting complex perspectives or dynamic action shots. Master fundamental proportions and basic fur textures, then progress gradually toward breed-specific details and expressive portrait work. Challenge yourself continuously with increasingly difficult subjects as your skills improve, but maintain realistic expectations about the learning timeline. Even professional animal artists continue discovering new techniques and refining their approaches throughout entire careers.
Remember that artistic development happens through consistent practice rather than occasional perfection. Each sketch contributes to skill building even when results disappoint. The mechanical process of drawing—hand movements, observational focus, decision-making about mark placement—creates neural pathways that strengthen with repetition. Trust the process and maintain patience with yourself during the inevitable plateaus every artist experiences.
Beyond technical skill development, cat drawing offers therapeutic benefits that extend into daily life. The meditative focus required for detailed observation and careful mark-making provides welcome respites from digital distractions and mental clutter. Many artists discover that time spent drawing cats becomes their favorite form of stress relief and creative expression, producing both finished artwork and improved mental wellbeing.
Ready to create your first stunning cat drawing or take your feline art to the next level?
Gather your pencils, find a comfortable workspace, and select a cat reference photo that inspires you. Start with the basic head construction shown in this guide, then gradually add features, refine proportions, and build fur texture through patient layering. Will you draw a beloved pet, tackle a challenging breed like a Persian or Siamese, or explore a dynamic pose that captures feline grace in motion? What aspect of cat anatomy or personality interests you most—their mysterious eyes, elegant proportions, or fluid athleticism? Share your first attempts, ask questions about specific challenges, and connect with fellow cat art enthusiasts in the comments below. Your cat drawing journey begins with a single pencil stroke—let’s start creating together!
Frequently Asked Questions About Drawing Cats
What’s the most challenging part about learning to draw a cat?
Capturing the flexible spine and natural grace while maintaining accurate proportions presents the biggest challenge for most artists learning to draw a cat. Cats possess extraordinary flexibility that creates S-curved poses impossible for most animals, yet beginners often draw them too stiffly, making them look more like statues than living creatures. The key lies in understanding feline skeletal structure—particularly the unusually high number of vertebrae that allow extreme spinal curvature. Practice gesture drawings that capture overall movement and energy in 30-60 seconds each, focusing on the spine’s curved line of action before adding details. Study reference photos showing cats mid-movement to see how their bodies compress, extend, and twist in ways that seem anatomically impossible. Start with simpler static poses like sitting or sleeping cats where proportions remain more straightforward, then progress gradually toward stretching, leaping, or twisting poses that showcase feline flexibility. Remember that understanding anatomy beneath the surface transforms guesswork into informed artistic decisions that create convincing, graceful cat drawings reflecting their true nature.
How do I make cat eyes look realistic rather than cartoon-like?
Realistic cat eyes require distinctive almond shapes with angled outer corners pointing slightly upward, never round or perfectly oval like human eyes. Place pupils slightly off-center rather than perfectly centered—this subtle asymmetry creates natural, engaging expressions that centered pupils never achieve. Add iris texture through radiating lines extending from pupils toward outer edges, mimicking the sunburst pattern unique to feline eyes. Include anatomical details like tear ducts at inner corners, subtle eyelid thickness at top and bottom, and delicate eyelashes (very sparse in cats, not heavy like human lashes). Create depth around eyes through careful shading in eye sockets, suggesting the orbital bone structure surrounding eyeballs. Leave precise white catchlight spots showing reflections—typically position catchlights in upper portions of eyes where overhead lighting naturally hits glossy surfaces. Vary pupil shapes according to lighting conditions and emotional states: vertical slits in bright light or alert states, fully round in dim light or relaxed moods, or partially dilated for intermediate conditions. Study real cat eye photographs extensively to understand how light interacts with the wet, reflective eye surface, how iris patterns vary between individuals, and how subtle muscles around eyes create different expressions through tiny position changes.
What’s the best way to practice drawing cat fur without spending hours on each drawing?
Start with focused fur studies concentrating on small areas rather than entire cats, practicing specific techniques in isolated squares measuring 2×2 inches. Draw small patches showing different fur types: short hair on faces requiring tiny controlled strokes, long flowing body fur needing grouped directional strokes, and tabby patterns integrating texture with markings. This concentrated practice builds muscle memory for proper stroke direction, pressure variation, and layering sequences without the time commitment of complete drawings. Begin each fur section by establishing directional flow following body contours—fur radiates from noses, flows backward along faces, sweeps along spines, and curves around legs and tails following anatomical forms. Layer progressively from shadows to mid-tones to highlights rather than working uniformly across entire areas. Use your darkest pencils (4B-6B) for deepest shadows in areas where fur recedes, medium pencils (HB-2B) for general fur mass, and your lightest touches or eraser work for highlight strands catching light along edges and raised areas. Practice short 5-10 minute timed exercises focusing solely on fur rendering technique, gradually increasing complexity as basic strokes become automatic. Film yourself drawing fur and review footage to identify unconscious bad habits like inconsistent stroke direction or inadequate pressure variation. These targeted practice sessions develop fur rendering skills much faster than simply drawing complete cats where fur represents just one of many competing concerns demanding attention.
How can I draw different cat breeds accurately and make them recognizable?
Study breed standards published by cat fancy associations to understand specific characteristics that define each breed and distinguish them from others. Persian cats require extremely flat faces with pushed-in noses, round prominent eyes spaced widely, and abundant flowing fur that obscures body contours completely. Siamese cats need elongated wedge-shaped heads, dramatically large ears, lean athletic bodies, and distinctive point coloring on extremities contrasting with lighter bodies. Maine Coons demand large substantial proportions, prominent ear tufts extending from ear tips, impressive chest ruffs, and magnificently plumed tails equaling body length. Focus on “signature” features that immediately identify breeds: face shape and profile (flat, wedge, rounded), ear size and placement (large, small, tufted), body type (cobby/compact, foreign/lean, substantial/large), coat length and texture (short sleek, long flowing, semi-long shaggy), and distinctive markings or color patterns (points, specific tabby patterns). Collect multiple reference photos showing the same breed from different angles and individuals to understand which characteristics remain constant versus natural variation between specimens. Measure proportions carefully using comparative measuring where you relate sizes of different features to each other—for instance, Siamese heads measure approximately three times as long as they are wide, while Persian heads approach nearly equal width and length. Practice breed-specific quick sketches focusing solely on distinctive characteristics without full rendering, building recognition of essential breed markers that make cats identifiable even in loose gesture drawings.
Should I learn to draw cats from photos or real life, and what are the advantages of each approach?
Photos offer static references perfect for beginners needing time to observe proportions, measure relationships, and render details without subjects moving constantly. Photographs freeze moments impossible to capture in real time—mid-leap action, extreme stretching poses, or perfectly composed expressions that live cats hold only momentarily. Photos also provide consistent lighting throughout entire drawing sessions, preventing the frustration of changing shadows as time passes and light shifts. However, photographs compress three-dimensional subjects into flat two-dimensional images, sometimes distorting proportions through lens effects and eliminating subtle depth information your eyes detect naturally when viewing real subjects. Starting with quality photos builds fundamental skills in controlled conditions before tackling live subject challenges. Real cats provide authentic three-dimensional information, showing how forms transition around rounded bodies and how fur texture appears under natural lighting conditions.
Drawing from life develops observational skills and speed that photo reference work never fully replicates. Live subjects teach you to capture essential gesture and character quickly before poses change, training your eye to see most important elements first. The ideal approach combines both methods: use photos initially while learning basic proportions, anatomy, and rendering techniques, then transition gradually to sketching real cats for gesture studies and direct observation. Keep brief 1-2 minute gesture sketches from life to capture movement and personality, then use longer photo reference sessions for detailed rendering and fur texture practice. This balanced approach develops comprehensive skills suited for any drawing situation, whether creating quick observational sketches or carefully planned portrait compositions.


