Why do some DIY floating shelves wood projects look professionally installed and hold heavy loads while others sag, tilt, or pull from walls within months despite following basic tutorials?
15 Genius DIY Ideas for Floating Shelves Wood: Complete 2026 Guide
Adding storage and display space to your home transforms cluttered surfaces into organized showcases while maximizing vertical wall space. Floating shelves wood projects offer a clean, minimalist aesthetic without visible brackets or supports creating visual weight. The magic lies in concealed mounting systems making shelves appear to float effortlessly against walls—a design element gaining tremendous popularity across United States homes from modern apartments to traditional farmhouses.
Crafting your own floating shelves wood projects allows complete customization matching exact dimensions, preferred wood species, desired finishes, and specific weight requirements impossible to find in generic retail options. Whether you need narrow picture ledges for hallway galleries, thick butcher block kitchen storage, rustic reclaimed barn wood bathroom shelves, or modern live edge bedroom displays—DIY construction delivers precisely what your space demands at fraction of custom carpentry costs.
DIY floating shelves wood projects remain achievable across many skill levels from beginners tackling simple pine board installations to experienced woodworkers constructing complex hollow core designs with integrated lighting or hidden drawers. The satisfaction of creating functional, beautiful storage with your own hands adds personal pride every time you admire your displayed books, plants, photos, or decorative pieces. Plus, you gain valuable carpentry skills transferring to countless future home improvement projects.
This comprehensive guide presents 15 genius DIY ideas for floating shelves wood spanning various designs, techniques, wood types, and difficulty levels you can tackle this weekend. You’ll discover essential installation principles preventing common failures, learn proper mounting methods ensuring safety and stability, explore different wood options balancing cost with aesthetics, and gain practical tips making your first (or fifteenth) floating shelf project your best yet.
Understanding Floating Shelf Construction Basics
Before diving into specific floating shelves wood designs, understanding fundamental construction principles prevents frustration and failure. True floating shelves conceal all mounting hardware behind or within the shelf structure itself, creating the illusion that shelves attach magically to walls. This clean aesthetic requires careful engineering balancing visual minimalism with structural integrity capable of supporting intended loads.
The most common floating shelf construction method uses hidden brackets, rods, or supports extending from walls into hollow shelf cavities. You build a frame anchored securely to wall studs, then create a hollow box sliding over this frame. The box completely covers mounting hardware while providing adequate strength through proper material thickness, internal bracing, and quality fasteners. Alternative methods include French cleats (interlocking beveled boards), specialized floating shelf brackets rated for specific weights, or for lighter loads, simple hidden L-brackets positioned where items naturally cover them.
Load capacity depends on several critical factors: mounting method (stud mounting versus drywall anchors), bracket or support strength, wood thickness and species, shelf span length, and weight distribution across the shelf surface. A 36-inch floating shelf properly mounted into studs using quality brackets can handle 50+ pounds, while the same shelf on drywall anchors might fail at 10 pounds. This dramatic difference makes stud mounting non-negotiable for functional floating shelves wood holding books, dishes, or heavy decor items.
Wood selection affects both aesthetics and functionality. Hardwoods like oak, maple, and walnut offer superior strength and beautiful grain patterns but cost more and require sharper tools for cutting. Softwoods like pine remain affordable, easy to work with, and adequate for most applications when proper mounting techniques compensate for lower material strength. Engineered wood products including plywood and MDF serve well for painted floating shelves wood where natural grain doesn’t matter and dimensional stability prevents warping.
15 Genius DIY Ideas for Floating Shelves Wood
Creating your own floating shelves wood opens endless design possibilities. Here are 15 inspiring ideas ranging from simple weekend projects to more involved builds requiring intermediate skills, helping you construct beautiful and functional shelves matching your home’s unique style:
1. Basic Hollow Core Shelf
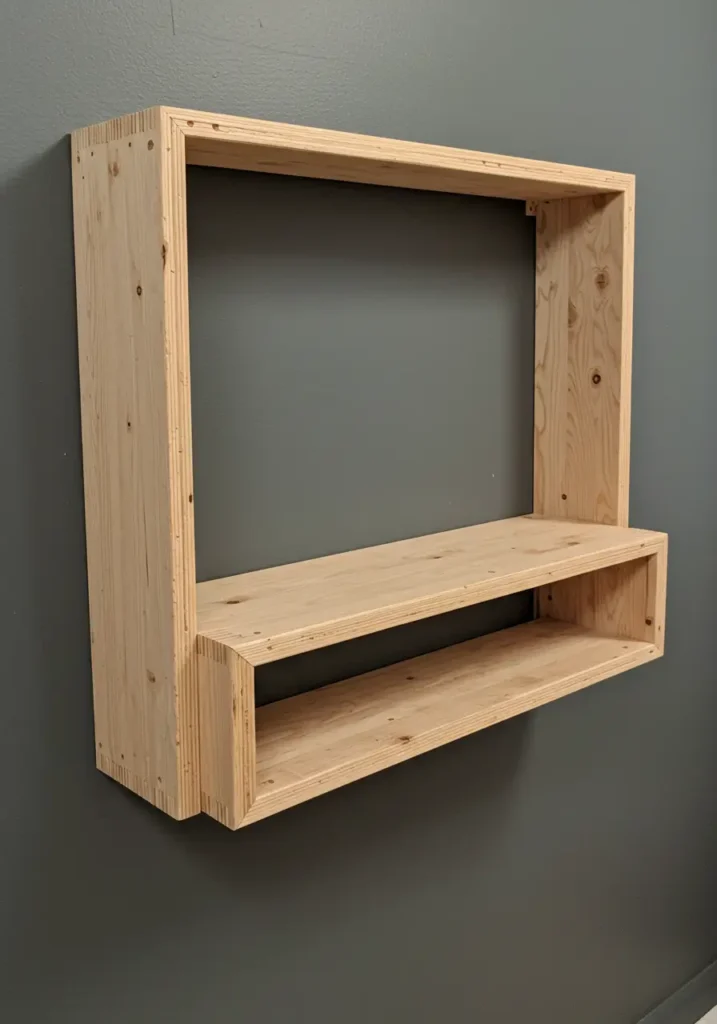
This classic DIY method represents the most popular approach for creating substantial-looking floating shelves wood without extreme weight or cost. You construct a simple wooden frame (usually 2×2 or 2×4 lumber) mounting directly to wall studs using lag screws or heavy-duty construction screws, then wrap this frame with thin plywood, project boards, or 1x lumber creating a hollow box appearance.
The outer box slides precisely over the mounted frame, completely concealing mounting hardware while giving the visual impression of a solid, thick shelf floating independently on the wall. This method remains lightweight compared to solid wood shelves yet handles moderate loads when properly anchored. Paint or stain the outer box before installation for easier finishing without wall protection concerns.
Construction tip: Build the frame 1-2 inches shorter than the finished shelf length allowing the outer box to wrap around frame ends, fully concealing all support structure. Sand all box edges smooth and use wood filler for seamless joints before finishing. This technique works beautifully for kitchen, bathroom, living room, or bedroom floating shelves wood installations.
2. Butcher Block Floating Shelf
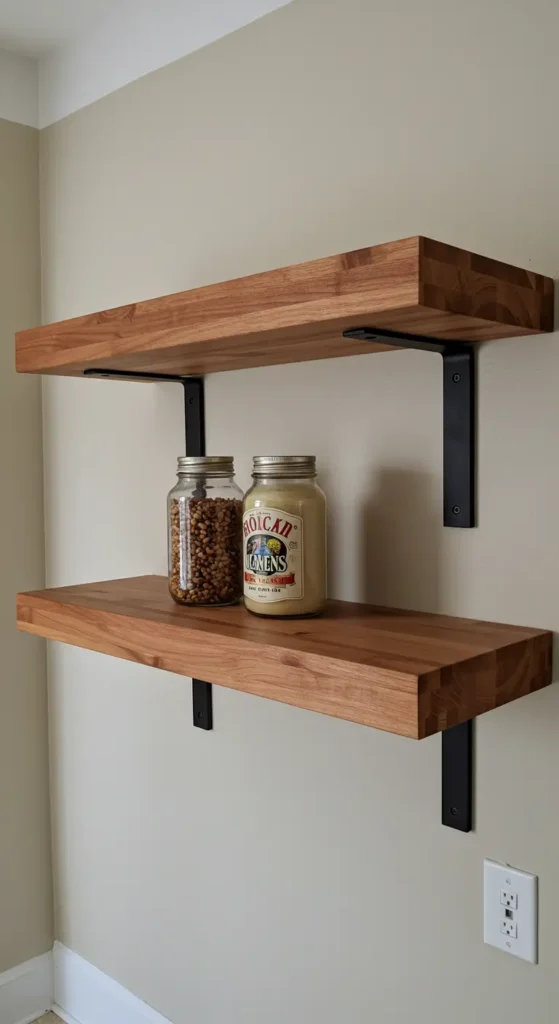
Use a piece of butcher block countertop material for a genuinely sturdy, substantial floating shelf wood perfect for kitchens, pantries, or home bars. Butcher block offers exceptional thickness (typically 1.5-2.5 inches), proven durability handling food preparation tasks, and gorgeous natural warmth showcasing multiple wood species laminated together creating distinctive grain patterns.
This approach requires heavy-duty floating shelf brackets specifically rated for solid wood weights—butcher block weighs considerably more than hollow core construction. Mount brackets securely into wall studs using lag bolts capable of handling both shelf weight and intended load. Many hardware stores cut butcher block to custom lengths, eliminating the need for specialized woodworking tools.
Finish butcher block with food-safe mineral oil for kitchen applications or standard polyurethane for decorative installations. The substantial appearance complements farmhouse, rustic, and traditional kitchen styles while providing practical workspace for small appliances, cookbook storage, or spice jar display. Consider rounded edge profiles softening the thick appearance and enhancing safety around head-height installations.
3. Reclaimed Wood Plank Shelf
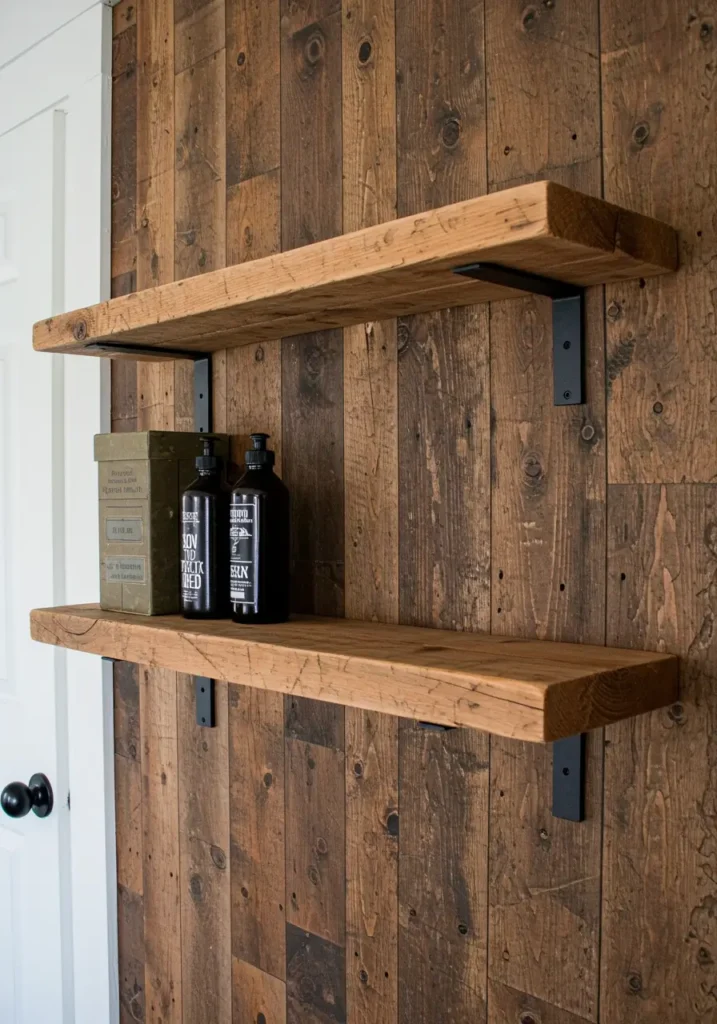
Source old barn wood, weathered fence boards, salvaged building lumber, or deconstructed pallet wood for authentic rustic floating shelf wood character impossible to replicate with new materials. Clean salvaged wood removing dirt, loose bark, and potential metal fasteners, then seal while deliberately preserving natural character including knots, grain variation, weathering patterns, checking, and color inconsistencies telling stories of the wood’s previous life.
Reclaimed wood often carries significant weight due to dense old-growth lumber and absorbed moisture over decades of exposure. Use hidden metal rods (threaded rods embedded in both wall and shelf), heavy-duty L-brackets mounted inside where contents conceal them, or commercial floating shelf hardware rated for high capacity. Always mount into studs—reclaimed wood’s weight makes drywall anchors inadequate regardless of their stated capacity.
This style perfectly complements farmhouse, industrial, rustic, and eclectic interiors throughout United States homes. The sustainability aspect appeals to environmentally conscious homeowners giving discarded materials new purpose. Each piece remains absolutely unique—your floating shelves wood will be one-of-a-kind installations impossible for anyone else to duplicate exactly.
4. Live Edge Wood Shelf

A wood slice preserving the natural edge contour creates a unique, organic floating shelf wood bringing outdoor beauty indoors. Live edge slabs showcase bark pockets, natural curves, growth patterns, and authentic wood character making dramatic visual statements in modern, rustic, or nature-inspired interiors. These pieces function equally well as functional shelves or purely decorative wall art.
Live edge slabs can be quite heavy depending on wood species, thickness, and moisture content. Mounting requires robust hardware: either specialized floating shelf brackets rated for high weight capacity, through-bolted supports drilled completely through wall studs with backing plates, or custom-welded steel supports designed specifically for your slab’s weight and dimensions. Never compromise on mounting strength—falling live edge wood poses serious safety hazards.
Source live edge slabs from local sawmills, lumber specialty stores, or online marketplaces specializing in natural wood products. Walnut, cherry, maple, and oak remain popular species offering beautiful grain and good stability. Finish with clear coat protecting wood while maintaining natural appearance, or experiment with colorful epoxy resin filling bark voids and cracks creating contemporary contrast against organic wood textures.
5. Simple Pine Board Shelf
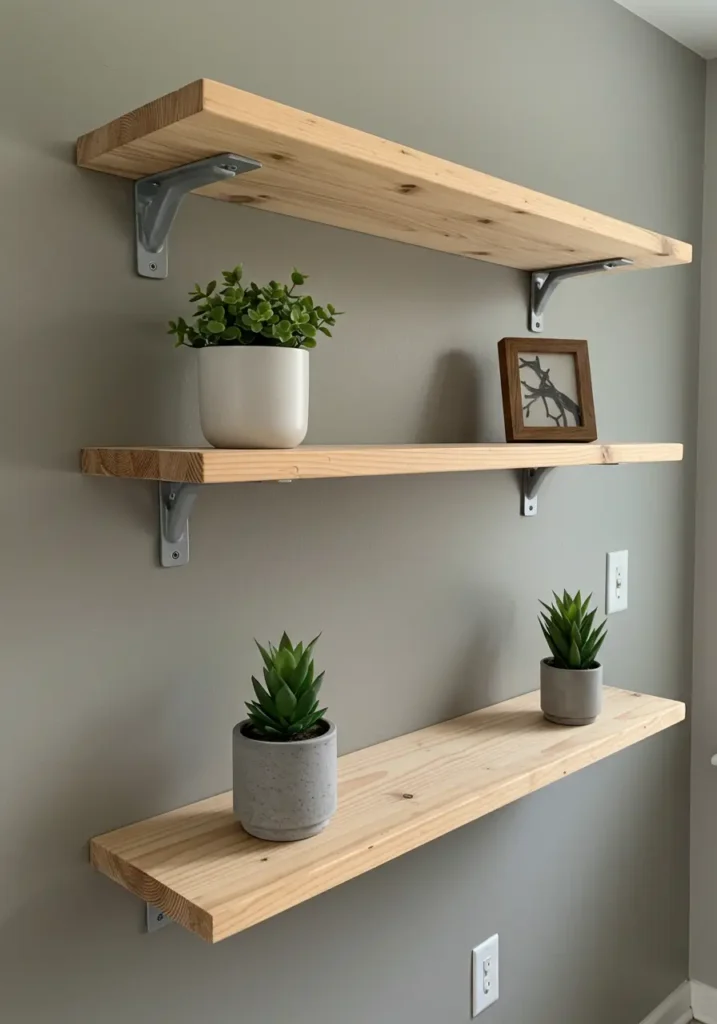
For easy and affordable options, standard pine boards from any home improvement store work beautifully. Sand boards smooth, then paint or stain in your desired color matching existing decor. While pine boards lack the thickness of hollow core or butcher block designs, you can stack multiple boards together, place them side-by-side creating wider shelves, or simply embrace the thinner profile for minimalist floating shelves wood perfect for lightweight displays.
Mount using readily available hidden floating shelf brackets sliding into routed channels on shelf backs, or use decorative L-brackets if you prefer industrial or farmhouse aesthetics where visible hardware adds character rather than detracts. This approach represents an ideal beginner project for floating shelves wood—mistakes cost little to remedy, required tools remain basic, and completion happens in single afternoons.
Common pine board dimensions include 1×6, 1×8, 1×10, and 1×12 (actual thickness about 3/4 inch). Select straight boards without excessive warping, checking end grain for minimal knots in areas where brackets mount. Paint-grade pine costs less than clear pine showing attractive grain suitable for staining. Budget $10-30 per shelf depending on length and finish requirements—remarkable value compared to retail floating shelves wood costing $50-150 each.
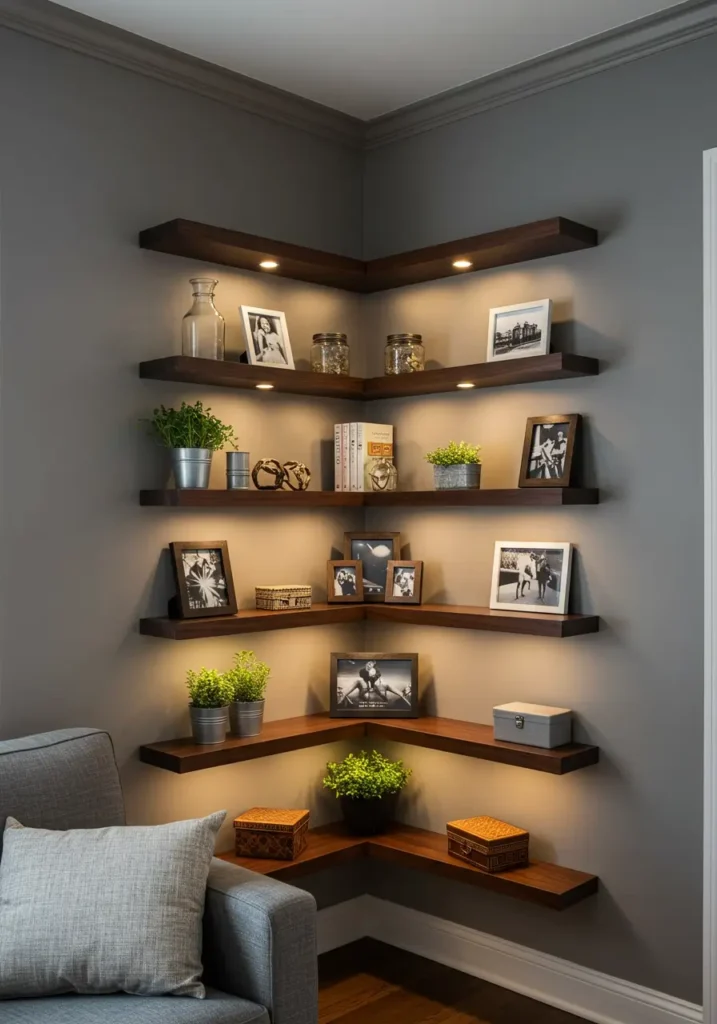
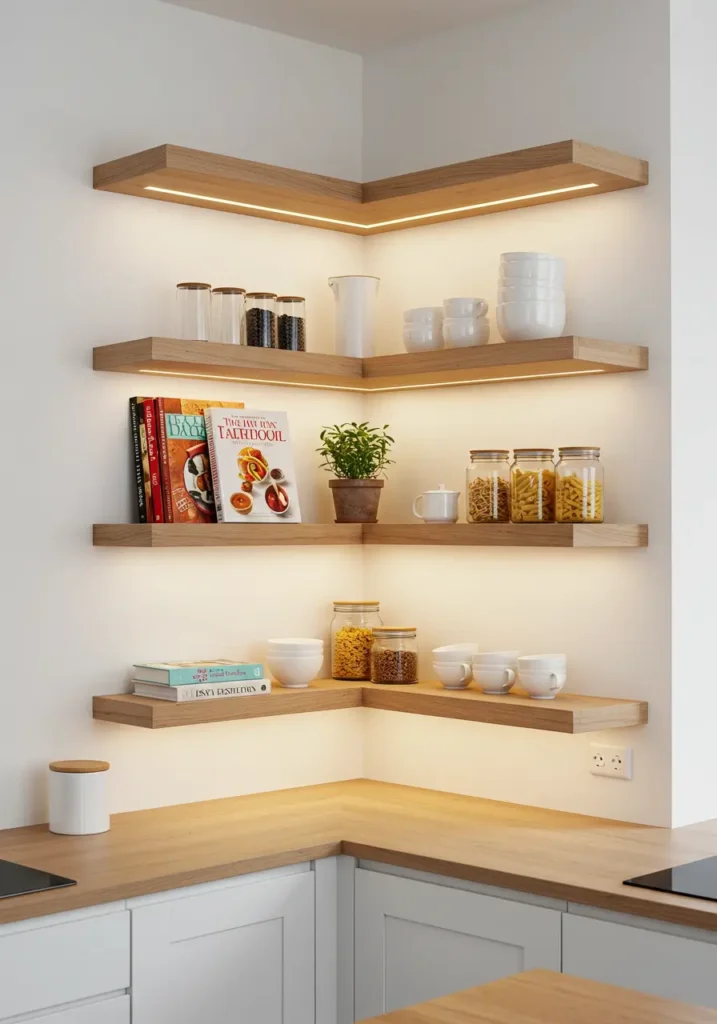
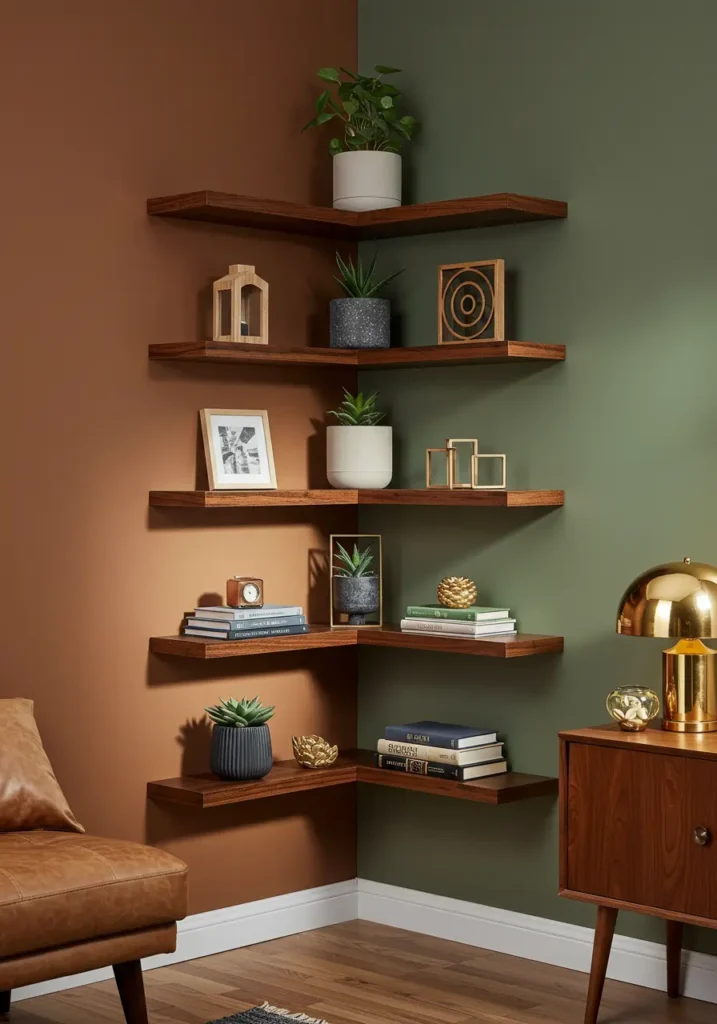
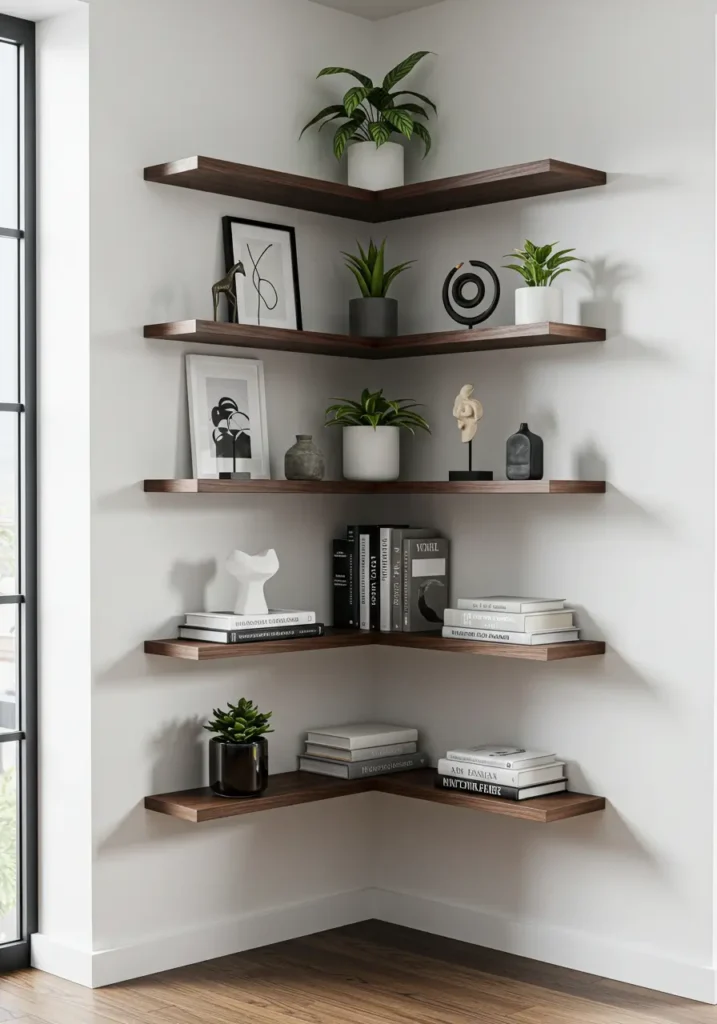
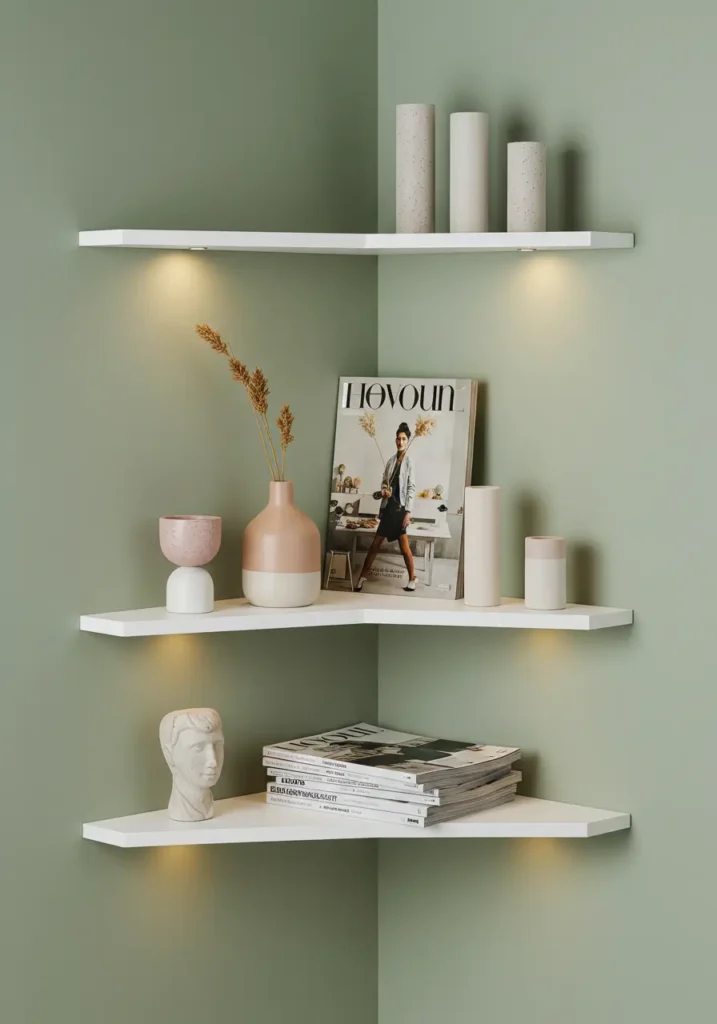
6. Corner Floating Shelves
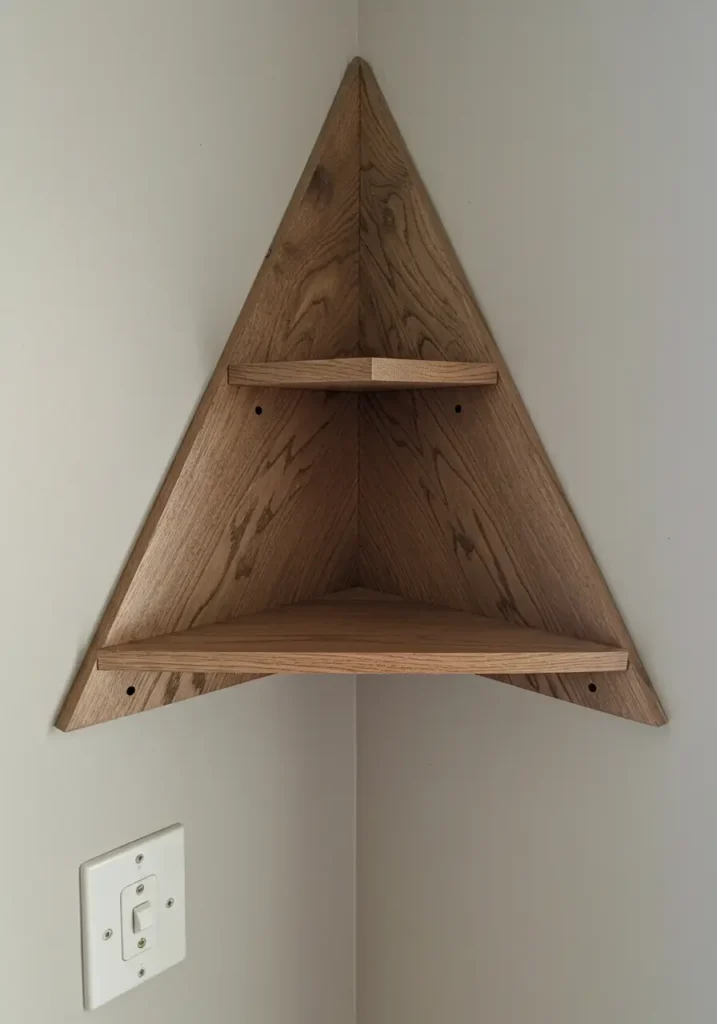
Transform awkward corner spaces into valuable storage by installing triangular, quarter-round, or multi-tiered corner floating shelves wood. Corners often remain underused in kitchens, bathrooms, living rooms, and bedrooms despite offering perfectly functional vertical space. Corner shelves maximize these dead zones creating display areas for plants, decorative items, bathroom essentials, kitchen spices, or book collections.
Specialized corner floating shelf brackets accommodate the unique angles, or you can adapt standard brackets positioning them along both walls meeting at corners. Internal mounting systems work well too—build an L-shaped support frame anchored to studs in both walls, then construct a triangular box sliding over this support. Measure corner angles carefully before cutting wood since not all room corners form perfect 90 degrees due to settling or construction variations.
Stack multiple corner floating shelves wood at different heights creating vertical towers drawing eyes upward while providing substantial storage in minimal floor space. This works particularly well in small bathrooms needing towel and toiletry storage, compact kitchens requiring extra pantry space, or cozy reading nooks displaying beloved book collections within arm’s reach of comfortable chairs.
7. Picture Ledge Floating Shelf
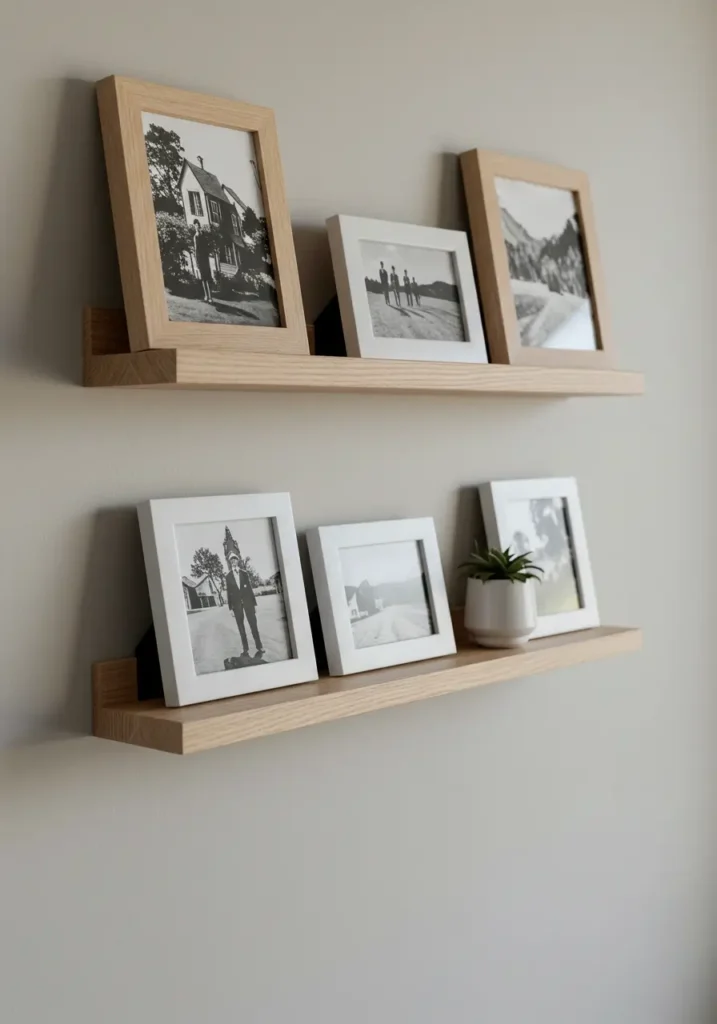
Design narrow floating shelves wood featuring small lips (1-2 inches) on front edges preventing items from sliding off. These specialized shelves perfect for displaying framed photos, small artwork, greeting cards, or lightweight decorative items without requiring items to stand independently. The lip provides security while maintaining clean horizontal lines across walls.
Build picture ledges from simple lumber combinations: a 1×4 or 1×6 base board with a 1×2 strip attached along the front edge creating the essential lip. Mount using slim hidden brackets, French cleats, or screws drilled at angles (pocket screws) through backs into wall studs. These lightweight shelves rarely require heavy-duty mounting since displayed items weigh minimal amounts.
Install picture ledge floating shelves wood at varying heights creating dynamic gallery walls easily updated without drilling new holes. Lean multiple frames of different sizes against walls on single shelves, overlap edges for depth, and switch displays seasonally without wall damage. This flexibility appeals to renters and frequent redecorators appreciating change without permanent commitment or wall repair requirements.
8. Integrated Lighting Shelf
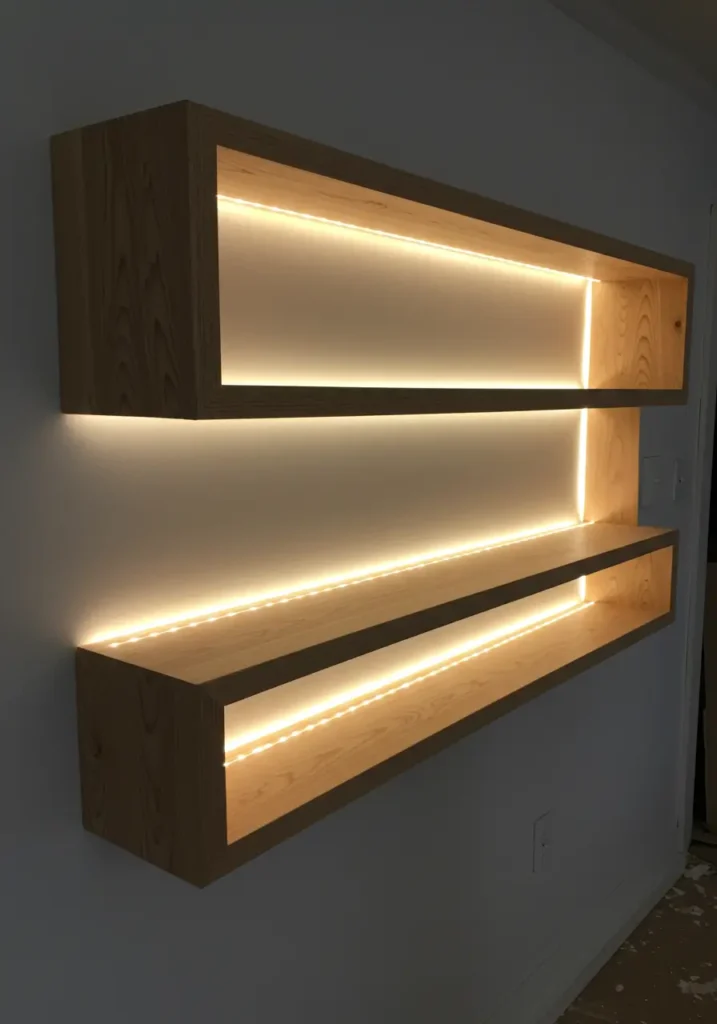
Construct hollow core floating shelves wood with channels routed along undersides or front edges embedding LED strip lighting creating functional task illumination or atmospheric ambient glow. This advanced project combines carpentry with basic electrical work producing stunning results elevating ordinary shelves into architectural lighting features enhancing entire rooms.
Plan wiring carefully before construction. Options include hiding wires within walls (requiring wall access and potentially professional electrical work), running wires discreetly along baseboards to nearest outlets using cord concealment channels, or incorporating battery-powered LED strips eliminating wiring concerns entirely. LED strips produce minimal heat making them safe for enclosed wood spaces.
This technique works beautifully above desks providing reading light, in entertainment centers backlighting television displays, beneath kitchen cabinets illuminating countertops, or throughout living rooms creating layered lighting reducing reliance on harsh overhead fixtures. Dimmable LED strips offer adjustable brightness matching mood and time of day. Color-changing options add playful elements perfect for kids’ rooms or entertaining spaces.
9. Floating Shelves with Hidden Drawers
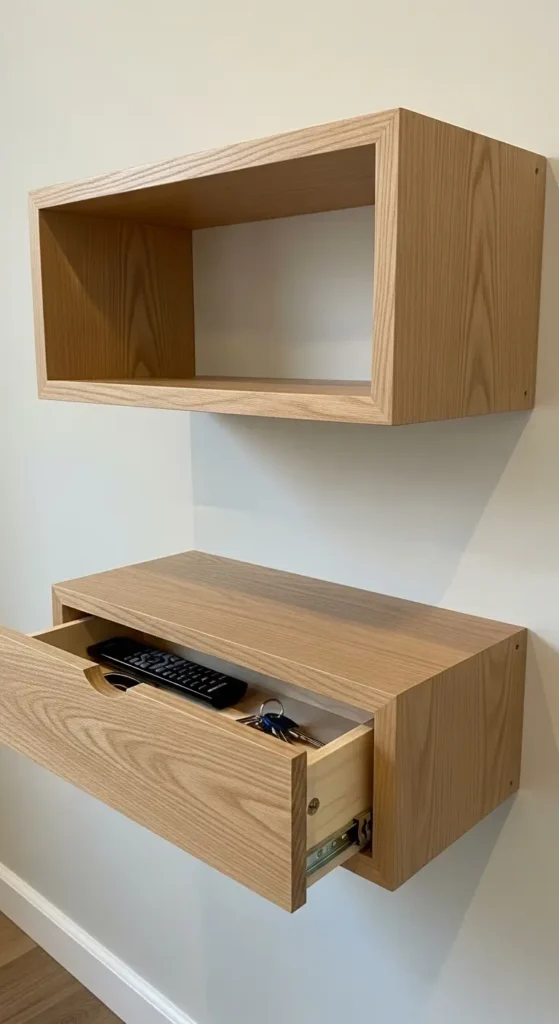
An advanced project, these floating shelves wood incorporate slim, hidden drawers beneath visible shelf surfaces concealing small items including keys, remote controls, jewelry, valuables, or personal items you want accessible yet invisible to casual observation. This clever design combines open display with closed storage maximizing functionality within single installations.
Construction requires precise woodworking skills building drawer mechanisms within hollow shelf structures and integrating them seamlessly. Drawers typically measure 1-3 inches deep preventing excessive visual bulk while providing adequate storage for flat items. Push-to-open hardware eliminates visible pulls maintaining clean aesthetic, or recess small pulls into drawer fronts matching shelf finish for nearly invisible operation.
Install these hybrid floating shelves wood near entryways for key storage, beside beds for nighttime essentials, in home offices hiding office supplies, or bathrooms concealing medications and personal care items. The secret storage delights guests discovering hidden functionality while keeping your spaces looking neat and minimalist despite storing numerous small items typically cluttering surfaces.
10. Industrial Pipe Floating Shelves
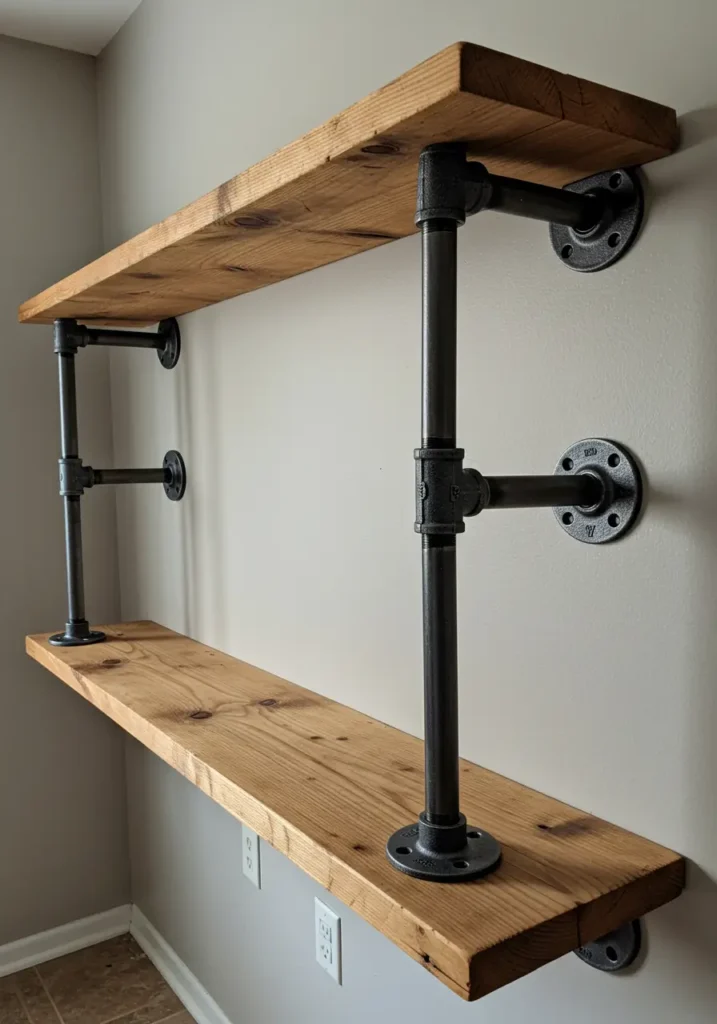
Combine wood planks with black iron pipes and fittings creating sturdy, industrial-style floating shelf wood installations where pipes serve as visible structural supports adding to aesthetic rather than detracting through concealment. This popular design bridges rustic and modern sensibilities appealing to urban loft dwellers and suburban homeowners seeking edgy character.
Secure pipe flanges firmly to wall studs using lag screws capable of handling combined weight of pipes, wood, and shelf contents. Assemble pipe structures using elbows, tees, and straight sections creating desired configurations from simple single shelves to complex multi-tier units. Attach wood planks to pipes using set screws through flanges or drilling through wood securing from underneath maintaining clean top surfaces.
This style remains enormously popular across United States homes embracing industrial, farmhouse, or eclectic aesthetics. Hardware stores stock all necessary pipe components, and assembly requires only basic wrenches and drills. Paint pipes matte black for classic industrial looks, leave raw steel for authentic patina development, or experiment with metallic finishes like copper or bronze creating unique variations on the industrial pipe floating shelves wood theme.
11. Hexagonal Floating Shelves

Build individual hexagonal box shelves from mitered wood pieces creating geometric focal points perfect for modern, contemporary, or eclectic interiors. These modular floating shelves wood can be arranged in infinite unique patterns across walls—honeycomb clusters, scattered random placement, straight lines, or gradient color transitions using multiple paint colors across different hexagons.
Construction requires miter saw cutting precise 30-degree angles ensuring six pieces fit together forming perfect hexagons. Accuracy matters here—even slight angle errors multiply across six cuts creating gaps or misaligned joints. Use wood glue and brad nails assembling hexagons, then add thin back panels completing boxes. Each hexagon mounts individually using small keyhole hangers, French cleats, or even command strips for lightweight versions.
This project offers enormous creative freedom. Build identical hexagons creating uniform patterns, or vary sizes creating visual interest through scale differences. Paint each different colors for bold statements, use natural wood stains showing grain variations, or combine painted and stained hexagons. Display small plants, collectibles, essential oils, action figures, or leave some empty for negative space contributing to overall design.
12. Rope Hung Floating Shelves
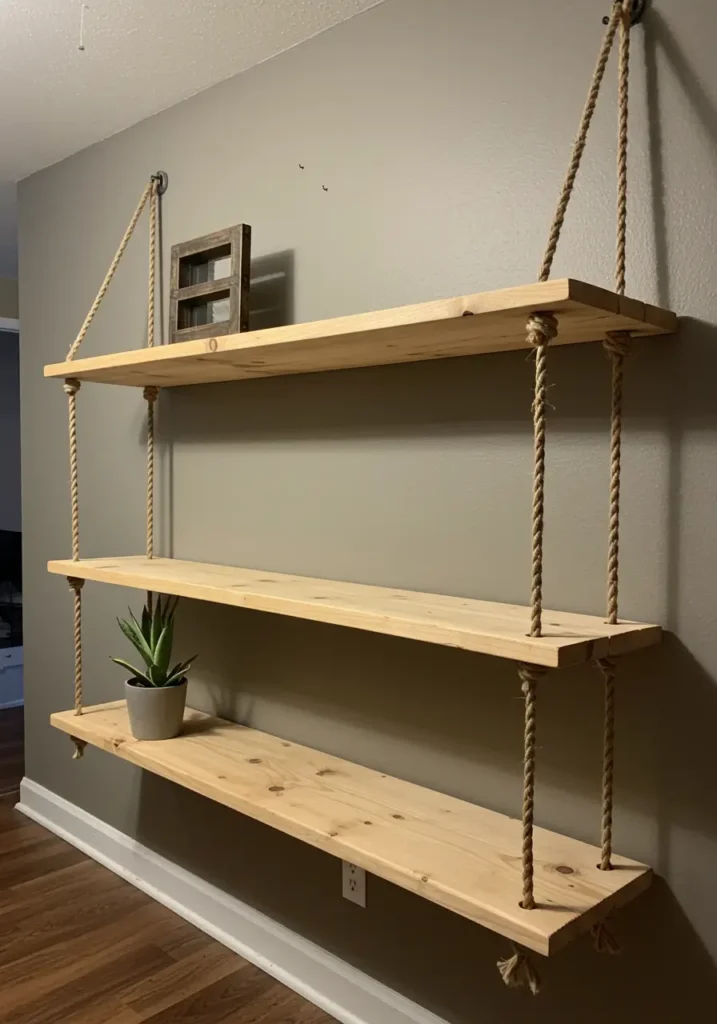
While not strictly traditional floating shelves, these designs use thick ropes or cords threaded through drilled holes in wood planks and anchored to ceiling joists or wall brackets. Shelves appear to float suspended by vertical ropes creating airy, nautical, or bohemian aesthetics perfect for coastal homes, children’s rooms, or creative spaces valuing unconventional design approaches.
Ensure anchor points secure into ceiling joists or wall studs—never rely on drywall anchors for suspended weight. Choose rope thickness appropriate for combined wood and content weight: 3/4 inch to 1 inch manila or synthetic rope handles most residential applications safely. Tie secure knots (bowline knots work well) beneath each shelf preventing downward slippage while allowing adjustment during installation for perfect leveling.
Stack multiple rope-hung floating shelves wood at different heights creating vertical storage towers. This works beautifully in corners maximizing vertical space or beside desks providing tiered organization for office supplies, books, and decorative items. The visible rope support becomes design feature rather than necessity to hide, celebrating structural honesty and adding textural interest contrasting smooth wood surfaces.
13. Thin Profile Floating Shelves
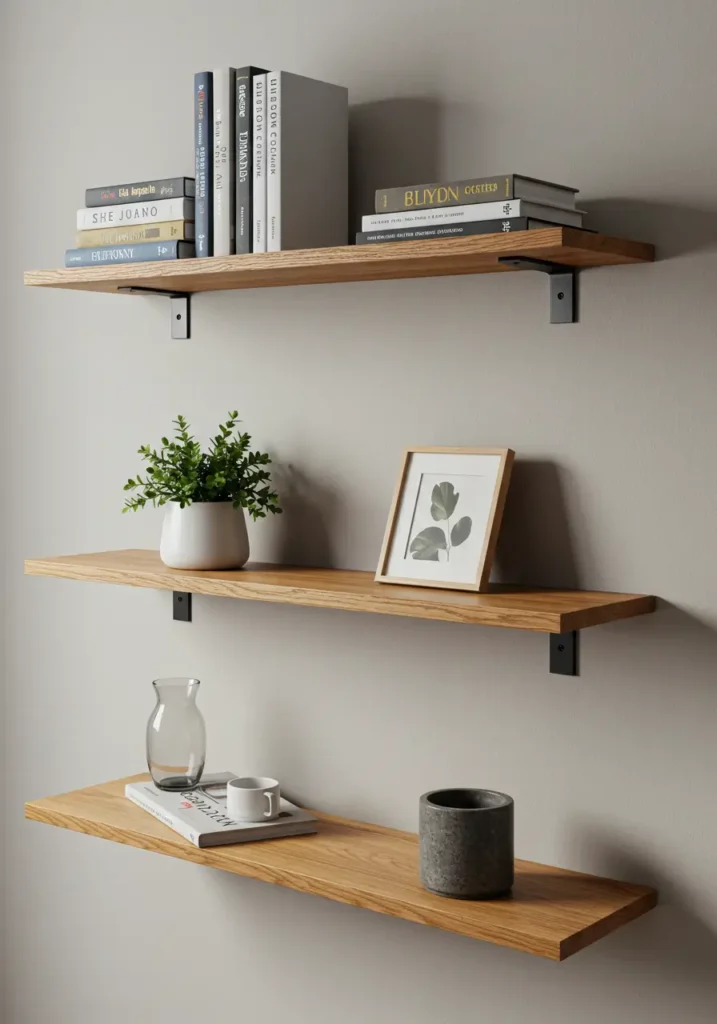
Instead of thick statement shelves, use thin finished plywood or solid wood boards (1/2 inch to 3/4 inch) creating minimalist, airy floating shelf wood installations emphasizing horizontal lines without visual weight. This approach suits modern, Scandinavian, or minimalist interiors where restraint and negative space matter as much as displayed objects.
Thin profiles require specialized mounting ensuring shelves don’t sag under loads despite minimal material thickness. Slim floating shelf brackets designed specifically for thin boards, French cleat systems distributing weight across entire shelf lengths, or closely-spaced hidden brackets every 16-24 inches provide adequate support. Mount exclusively into wall studs since thin boards offer minimal strength requiring mounting hardware to shoulder most load-bearing responsibility.
These streamlined floating shelves wood work beautifully displaying lightweight items: framed photos, small succulents, decorative objects, or book collections arranged single-file showing spines. Avoid overloading thin shelves with heavy items causing visible sagging ruining the clean, light aesthetic you installed them to achieve. When doubt exists about weight capacity, add additional hidden brackets preventing problems before they occur.
14. Radiator Cover with Floating Shelf
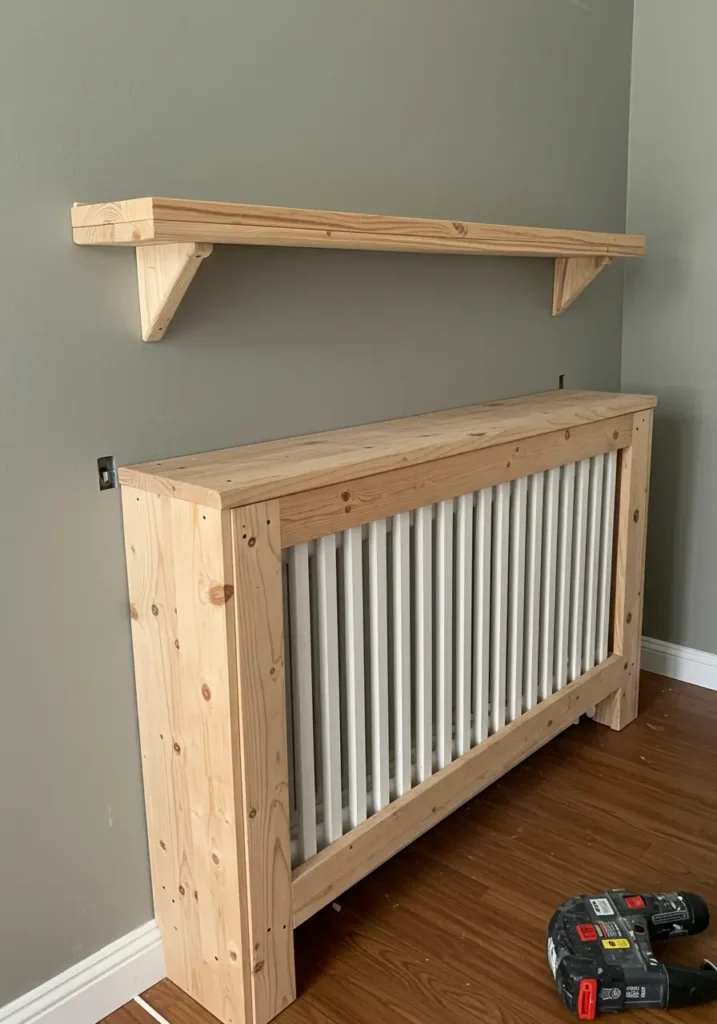
Build custom wood radiator covers incorporating floating shelves above radiator units, transforming eyesores into functional design features while maximizing space above radiators that typically sits unused. This dual-purpose floating shelves wood project adds practical surface area while improving room aesthetics by concealing dated radiator units beneath decorative wood grilles allowing essential heat circulation.
Carefully measure around radiators accounting for all pipes, valves, and irregular shapes. Design covers allowing proper heat circulation through large ventilation openings—never completely enclose radiators creating fire hazards or reducing heating efficiency. Use heat-resistant wood finishes withstanding temperature variations, and leave adequate clearances between hot metal surfaces and wood components preventing scorching or finish damage over time.
Secure both radiator cover base and floating shelf structures to walls independently—never attach floating shelves to radiator covers themselves since radiators require occasional maintenance access. The shelf above provides display space for plants (the warm rising air benefits many tropical species), photos, decorative items, or storage baskets keeping items off the floor while utilizing previously wasted vertical space above bulky heating units.
15. Multi-Tiered Floating Shelves with Hidden Support
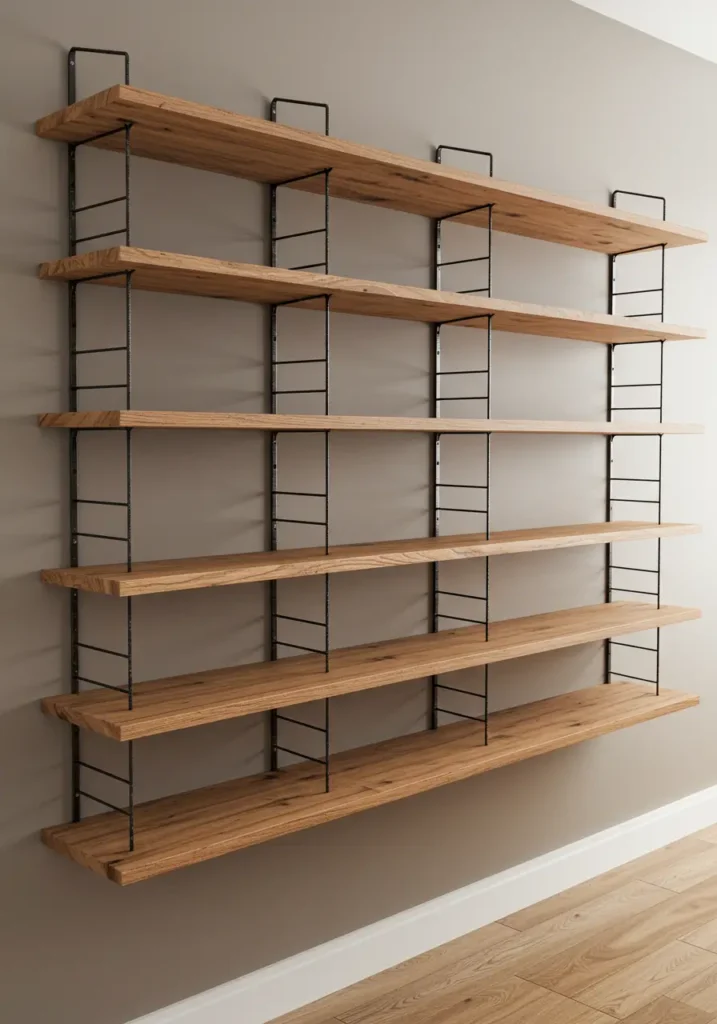
Design integrated units featuring multiple floating shelves wood where support infrastructure hides behind shelves connecting them vertically. This creates clean, stacked appearances without visible vertical supports between shelf tiers, achieving seamless wall storage looking professionally built-in despite being mounted surface structures.
This approach typically involves single mounting systems anchored robustly to walls at multiple points, with individual shelves attaching to this core support structure at different heights. Think of it as building vertical ladder-like frames mounting to walls, then sliding individual hollow-core shelves over horizontal frame members at each tier. The result appears as stacked floating shelves but shares structural support increasing overall stability.
This works wonderfully for bathroom storage towers, kitchen pantry systems, home office organization, or bedroom closet supplements. The integrated structure provides superior weight capacity compared to individual shelves since vertical supports brace against wall across multiple points distributing loads effectively. Build these systems floor-to-ceiling maximizing vertical storage in rooms where floor space remains limited but wall space offers untapped organizational potential.
Which of these 15 floating shelves wood designs speaks to your home’s style and your skill level—the beginner-friendly pine boards, the substantial butcher block, the rustic reclaimed wood character, or perhaps the challenging multi-tiered integrated systems? Share your choice and what room you’re planning to transform in the comments below!
Related Post: 17 Ideas to Make Your House Look More Expensive
Benefits of DIY Floating Shelves Wood Projects
Choosing to build your own floating shelves wood offers numerous compelling advantages over purchasing pre-made retail options or hiring professional carpenters for custom installations. Understanding these benefits helps justify the time investment and motivates you through challenging moments during construction when solutions don’t come easy.
Complete Customization Control
You exercise complete control over exact dimensions matching your specific spaces perfectly. That awkward 37.5-inch gap between windows? Build shelves fitting precisely. Need exactly 9.25 inches depth clearing baseboards while maximizing storage? You determine dimensions down to quarter-inches. Choose wood species matching existing furniture, select finishes harmonizing with wall colors, and design thickness appearing substantial or minimal based on aesthetic preferences impossible to find in limited retail selections.
Significant Cost Savings
Building your own floating shelves wood costs dramatically less than purchasing custom or even many retail options, especially for solid wood installations. A DIY butcher block shelf might cost $40 in materials compared to $150-250 for comparable retail versions. Basic pine shelves run $10-20 to build versus $50-100 purchasing equivalent products. Even accounting for tool purchases, DIY projects recover costs within 2-3 shelf installations while providing tool sets useful for countless future projects.
Genuine Sense of Accomplishment
Profound satisfaction comes from creating functional, beautiful additions to your home using your own hands and problem-solving abilities. Every time you place items on your floating shelves wood, you remember the construction process—the careful measurements, the satisfaction when pieces fit perfectly, the pride showing completed projects to family and friends. This emotional connection to your home deepens through DIY projects in ways purchasing never replicates.
Skill Development and Confidence Building
Each floating shelves wood project teaches valuable carpentry skills transferring to other home improvement initiatives: accurate measuring and marking, safe power tool operation, proper finishing techniques, and most importantly—problem-solving when plans don’t match reality. Confidence grows with each completed project, encouraging you to tackle increasingly complex renovations saving thousands in contractor fees over homeownership lifetimes.
Perfect Weight Capacity Engineering
Unlike retail shelves with generic weight ratings, you engineer DIY floating shelves wood for specific applications. Planning to display heavy book collections? Build accordingly using robust brackets, thick wood, and multiple stud anchors. Need lightweight photo displays? Simpler, more economical construction suffices. This customization ensures shelves perform exactly as needed without over-engineering (wasting money and materials) or under-engineering (risking failure and safety hazards).
Essential Tools for Floating Shelves Wood Projects
Having appropriate tools makes floating shelves wood construction dramatically easier, safer, and more enjoyable. While tool requirements vary based on chosen designs and complexity levels, certain essential tools benefit nearly all projects. You don’t need professional woodshops—basic tools plus a few specialized items handle most residential shelf building.
Basic Essential Tools
- Stud finder: Absolutely essential locating wall studs for secure mounting. Electronic models work better than magnetic ones, costing $15-50.
- Level (24-48 inches): Ensures shelves mount perfectly horizontal. Longer levels provide better accuracy across shelf spans. Digital levels add precision but cost more.
- Tape measure (25-foot): Accurate measurements prevent countless errors and wasted materials.
- Pencil and marking tools: Mark cut lines, stud locations, and mounting positions clearly.
- Power drill with bits: Drives screws, drills pilot holes, and creates mounting holes. Cordless drills offer convenience.
- Saw: Circular saw for straight cuts, handsaw for occasional cuts without power tools, or miter saw for angled cuts (hexagonal shelves).
- Sandpaper or power sander: Smooth rough edges and prepare surfaces for finishing. 80-grit for initial smoothing, 120-220 for final finishing.
- Safety equipment: Safety glasses protect eyes from wood particles and metal shavings. Hearing protection for power tools, dust mask for sanding.
Advanced Tools for Complex Projects
- Miter saw: Makes precise angled cuts essential for hexagonal shelves, picture frames, or decorative trim details.
- Router: Creates decorative edge profiles, routes channels for LED strip lighting, or cuts grooves for shelf brackets.
- Pocket hole jig: Joins boards at angles without visible screws, useful for picture ledge construction or hollow core frames.
- Clamps: Hold pieces during gluing, ensure square assemblies, and provide extra hands when working alone.
- Brad nailer: Secures thin pieces quickly during hollow core box construction or attaching decorative trim.
Many tools can be borrowed, rented, or purchased incrementally as skills progress. Start with basic essential tools handling simple projects, then expand your collection as ambitions grow toward more complex floating shelves wood installations requiring specialized equipment.
Selecting the Right Wood for Your Project
Wood selection significantly impacts both aesthetics and functionality of floating shelves wood projects. Different species offer varying characteristics balancing appearance, workability, cost, strength, and availability. Understanding wood options helps you make informed decisions producing results matching both your vision and budget.
Popular Softwoods
Pine: The most affordable option, pine offers ease of cutting, drilling, and finishing making it ideal for beginners. It accepts paint beautifully but shows less impressive grain when stained compared to hardwoods. Adequate strength for most residential shelving when properly supported. Common pine costs $2-5 per linear foot, while clear (knot-free) pine runs $5-10.
Cedar: Naturally aromatic and resistant to moisture, cedar works well for bathroom or closet floating shelves wood. Lightweight with distinctive reddish color and pleasant scent. More expensive than pine ($6-12 per linear foot) but adds character through natural properties. Avoid finishing cedar with polyurethane sealing in aroma—use natural oils maintaining scent.
Fir: Stronger than pine with attractive grain patterns, Douglas fir offers good middle-ground between softwood affordability and hardwood strength. Holds screws and fasteners securely. Accepts stains reasonably well showcasing natural grain. Costs approximately $4-8 per linear foot depending on quality grade.
Popular Hardwoods
Oak: Traditional choice offering classic grain patterns, exceptional durability, and superior strength. Red oak shows pronounced grain accepting dark stains dramatically, while white oak displays subtler grain and natural tan color. Harder to cut and drill than softwoods requiring sharp tools. Costs $8-15 per linear foot making it significant investment for larger floating shelves wood projects.
Maple: Extremely hard with smooth, consistent grain perfect for painted shelves or natural light finishes. Superior strength holds heavy loads without sagging. Difficult to stain evenly due to closed grain—gel stains work better than liquid stains. Premium material costing $10-18 per linear foot but delivers outstanding longevity and refined appearance.
Walnut: Rich dark brown color with dramatic grain patterns makes walnut the premium choice for floating shelves wood where appearance matters most. No staining needed—natural color and grain speak for themselves under clear finish coats. Expensive ($15-30+ per linear foot) but creates stunning statement pieces impossible to achieve with other woods.
Engineered Wood Products
Plywood: Stable, affordable, and available in large sheets, plywood works excellently for painted floating shelves wood or where edges get covered by trim. Birch and maple plywood show attractive face veneers suitable for staining. Cabinet-grade plywood costs $40-80 per 4×8 sheet providing material for multiple shelves. Edges require finishing or covering since layered construction shows.
MDF (Medium Density Fiberboard): Extremely smooth, stable, and affordable, MDF accepts paint flawlessly creating glass-smooth finishes impossible with natural wood grain. Heavy (requires robust mounting), and damaged easily by moisture. Perfect for painted modern floating shelves wood but avoid in bathrooms or other humid environments. Costs $25-45 per 4×8 sheet.
What’s been your biggest challenge with previous DIY projects—finding wall studs reliably, achieving perfectly level installations, selecting appropriate wood species, or perhaps choosing between staining versus painting your finished pieces? Let’s troubleshoot together in the comments!
Critical Installation Tips for Floating Shelves Wood
Proper installation determines the difference between floating shelves wood lasting decades versus failing within months causing property damage, injuries, or embarrassing collapses during gatherings. Following proven installation principles ensures your shelves perform safely and beautifully throughout their intended lifespans.
Always Locate and Mount into Wall Studs
This bears repeating because it represents the single most important factor determining shelf success or failure. Always aim to mount floating shelf brackets, cleats, or support frames directly into wall studs using appropriate fasteners. Use quality electronic stud finders locating studs reliably—cheap magnetic models miss studs frequently leading to dangerous assumptions about stud locations.
Standard wall studs space 16 inches apart in most United States residential construction, though 24-inch spacing exists in some regions or older homes. Confirm your specific spacing before assuming. When shelf lengths don’t align with stud spacing, add blocking between studs during construction, choose different shelf lengths hitting multiple studs, or use French cleat systems distributing loads across multiple studs through continuous mounting strips.
Drywall anchors—even heavy-duty versions claiming high weight ratings—remain inappropriate for functional floating shelves wood holding real loads. Anchors work acceptably only for lightweight decorative shelves displaying few ounces (artificial flowers, small framed photos), never for books, dishes, plants in wet soil, or substantial decorative items. Don’t gamble with anchor-only installations—find studs and mount properly.
Select Hardware Matching Your Application
Read and follow floating shelf bracket or mounting system weight ratings carefully. Manufacturers test products under controlled conditions providing maximum safe load specifications. Respect these limits—exceeding ratings risks failure even when mounted into studs properly. For heavy applications (books, dishes, appliances), choose brackets rated 50+ pounds per bracket minimum, using multiple brackets along shelf lengths distributing weight across several support points.
Different hardware types suit different floating shelves wood applications: hidden rod-style brackets for hollow core construction, heavy-duty L-brackets for solid wood planks, French cleats for easy installation and removal, or specialty systems for specific purposes like corner shelves or cable-suspended designs. Match hardware to your specific design rather than forcing inappropriate hardware causing weak installations or visible mounting compromises.
Ensure Perfectly Level Installation
Use quality levels throughout installation ensuring your floating shelves wood mount perfectly horizontal. Even slight tilts become glaringly obvious causing displayed items to slide toward low ends and creating unprofessional appearances screaming “DIY mistake” to every observer. Check level in multiple directions—side-to-side across shelf length and front-to-back verifying shelves don’t tilt forward dumping contents or backward creating awkward gaps against walls.
When installing multiple shelves in vertical arrangements, use levels ensuring each individual shelf sits level while also checking that shelves align vertically above one another creating clean, professional stacked appearances. Measure carefully between shelves maintaining consistent spacing—variations look sloppy and careless undermining your overall installation quality regardless of beautiful shelf construction.
Test Load Capacity Before Filling Shelves
After installation completes, test floating shelves wood capacity before loading with valuable or dangerous items. Place weight incrementally—add books or weighted bags gradually while monitoring for sagging, movement, or concerning sounds. Apply slightly more weight than you anticipate using providing safety margin. If shelves show any concerning flex, reinstall with additional supports or reduce intended load capacity appropriately.
Remember that dynamic loads (items placed forcefully or repeatedly) stress shelves more than static loads (items placed once and left alone). Consider how shelves will be used—children’s rooms endure more abuse than formal living room displays. Engineer installations for actual usage patterns, not idealized scenarios where shelves remain eternally undisturbed.
Finishing Techniques for Professional Results
Proper finishing elevates DIY floating shelves wood from obvious homemade projects to pieces rivaling professional installations. Take time with finishing steps—rushed or skipped finishing ruins otherwise excellent construction work. The finish protects wood from moisture, staining, and wear while enhancing natural beauty or providing desired colors matching your decor.
Surface Preparation
Sand all surfaces thoroughly before applying any finish. Start with 80-grit sandpaper removing rough spots, mill marks, and major imperfections. Progress to 120-grit smoothing surfaces further, then finish with 220-grit creating silky-smooth surfaces accepting stain or paint evenly. Always sand with wood grain direction—never across grain creating visible scratches.
Remove all sanding dust completely using tack cloths (sticky fabrics picking up fine particles) or vacuums with brush attachments. Even tiny dust particles ruin finish quality creating rough textures or preventing proper adhesion. For painted floating shelves wood, fill nail holes, gaps, and imperfections with wood filler matching your wood species, then sand smooth after filler dries completely.
Staining Wood Shelves
Stains enhance natural wood grain while adding color. Apply pre-stain wood conditioner on softwoods like pine preventing blotchy absorption for even color. Test stains on scrap wood pieces first—colors appear dramatically different on various wood species. Apply stain with brushes or cloths following grain direction, then wipe excess after 5-15 minutes depending on desired darkness. Multiple light coats produce better results than single heavy coats.
After stain dries completely (usually 24 hours), protect with clear topcoat finishes. Polyurethane offers durable protection withstanding daily use. Water-based polyurethane dries quickly without yellowing but provides slightly less durability than oil-based versions yellowing over time but offering superior protection. Apply multiple thin coats (3-4 coats typical) sanding lightly with 220-grit between coats for glass-smooth final surfaces.
Painting Wood Shelves
Painted floating shelves wood suit modern, contemporary, or colorful decor schemes. Start with quality primer blocking wood tannins preventing bleed-through and improving paint adhesion. For smoothest results, use foam rollers or spray paint rather than brushes leaving visible stroke marks. Apply multiple thin paint coats rather than single thick coats preventing drips and sags.
Sand lightly between paint coats with 220-grit sandpaper creating mechanical bonding for subsequent coats. For extra durability in high-traffic areas, topcoat painted shelves with clear polyurethane protecting paint from chips, scratches, and wear. Matte polyurethane maintains paint’s flat appearance, while satin or semi-gloss adds subtle sheen and easier cleaning.
Planning Your Floating Shelves Wood Project
Successful projects begin with careful planning preventing mistakes, reducing material waste, and ensuring finished results match expectations. Resist the urge to rush into construction—time spent planning saves dramatically more time avoiding errors and redoing failed attempts.
Measure Precisely and Plan Layout
Measure your installation space precisely accounting for all obstacles: light switches, outlets, windows, doors, furniture, and ceiling heights. Consider how floating shelves wood will integrate with existing room elements—avoid placing shelves where they interfere with door swings, obstruct windows, or force awkward furniture arrangements.
Create scale drawings (graph paper works beautifully) showing shelf placement, heights, and spacing. Visualize how rooms will look with shelves installed—sometimes ideas perfect in theory look crowded or awkward in practice. Use painter’s tape marking shelf positions on walls, living with these mock placements for days before committing to permanent installations.
Create Detailed Material Lists
Calculate exactly how much wood, hardware, fasteners, and finishing supplies your floating shelves wood project requires. Add 10-15% extra material accounting for cutting errors, measurement mistakes, or design changes during construction. Nothing frustrates DIYers more than stopping mid-project for additional hardware store trips because calculations underestimated needs.
Price comparison shop across multiple retailers—lumber prices vary significantly between big box stores, local lumberyards, and specialty hardwood suppliers. Sometimes spending slightly more for better quality materials prevents headaches outweighing initial savings. Buy all wood from single batches ensuring consistent color and grain patterns across multiple shelves installed in same spaces.
Consider Future Flexibility
Design floating shelves wood installations allowing future adjustments. French cleat mounting systems enable easy removal and height changes without wall damage. Modular designs (like hexagonal shelves) permit rearrangement refreshing spaces without new construction. Think about potential room use changes—children’s playrooms become homework spaces become guest rooms over years, each needing different storage solutions.
Making Your Choice and Getting Started
Review these 15 genius ideas and identify which floating shelves wood style best suits your needs, matches your skill level, and fits the intended location in your United States home. Consider available tools, time commitment, budget constraints, and desired aesthetic outcome. Start with simpler projects building confidence and skills before attempting complex designs requiring advanced techniques.
Watch video tutorials specific to your chosen mounting method if you’re new to floating shelves wood installation. Visual demonstrations clarify techniques text instructions struggle to convey. Read project reviews from other DIYers who attempted similar builds—learn from their mistakes avoiding common pitfalls. Join online woodworking communities or local maker spaces connecting with experienced builders offering advice and encouragement.
Gather all materials and tools before starting construction. Take precise measurements multiple times—the old carpenter’s saying “measure twice, cut once” prevents waste and frustration. Set up proper workspace with adequate lighting, ventilation for finishing materials, and protection for surrounding surfaces. Clear entire project days when possible rather than fragmenting work across weeks losing momentum and forgetting previous progress.
Planning remains key to successful DIY floating shelves wood projects. Rushed planning guarantees mistakes, while thoughtful preparation creates smooth construction experiences producing results that make you proud every time you see your beautiful, functional shelves showcasing your favorite items.
Transform Your Home with Custom DIY Floating Shelves Wood

Building your own floating shelves wood represents a fantastic opportunity to add customized storage and display areas transforming cluttered surfaces into organized showcases while expressing your personal style. With 15 genius ideas presented here spanning beginner-friendly pine boards to advanced live edge installations, you possess plenty of inspiration choosing projects matching your skill level, budget, and aesthetic vision.
Whether you prefer rustic reclaimed wood character telling stories of previous lives, modern minimalist thin profiles emphasizing clean horizontal lines, functional kitchen butcher block providing workspace and storage, or creative hexagonal geometric designs making bold statements—there exists a floating shelves wood project waiting for your tools and creativity. The key lies in careful planning, proper installation techniques ensuring safety and longevity, and selecting appropriate hardware rated for your specific applications.
Pay close attention to critical success factors: always mount into wall studs using quality fasteners, select brackets and mounting systems appropriate for expected loads, ensure perfectly level installations preventing items from sliding, and invest time in proper finishing protecting wood while enhancing natural beauty or achieving desired colors. These fundamentals separate professional-looking installations from obvious amateur mistakes undermining otherwise excellent construction work.
Enjoy the rewarding process of creating something functional and beautiful with your own hands. Your DIY floating shelves wood will become unique additions to your space showcasing your personal style, making your home more organized and visually appealing, and providing deep satisfaction every time you admire your displayed treasures. Start your project this weekend—your transformed spaces await!
Related Post: Room Makeovers: Transform Your U.S. Home with Style and Function
What room in your home needs floating shelves wood the most right now—the cluttered kitchen lacking pantry space, the bathroom needing towel and toiletry storage, the living room perfect for displaying book collections and family photos, or perhaps the home office requiring organized supply storage within arm’s reach? Share your plans, concerns about tackling the project, and what style speaks to your home’s aesthetic in the comments below. Let’s build a community of DIY enthusiasts helping each other create beautiful, functional spaces through shared knowledge, troubleshooting advice, and celebrating completed projects inspiring others to start their own floating shelves wood transformations!
Frequently Asked Questions About DIY Floating Shelves Wood
How much weight can DIY floating shelves wood actually hold safely?
Weight capacity depends heavily on multiple critical factors working together: the mounting method employed (stud mounting versus inadequate drywall anchors), the strength and quality of brackets or support systems, the type and thickness of wood used, the span length between supports, and most importantly—whether shelves mount directly into wall studs using appropriate fasteners. Properly installed floating shelves wood mounted into studs with quality hardware rated for high capacity can handle 20-50 pounds per linear foot or even more for robust constructions, but you must always verify specific hardware manufacturer ratings rather than guessing capacity. Hollow core shelves with internal 2×4 frames mounted into multiple studs easily support heavy book collections, while thin boards on single brackets suit only lightweight decorative displays. Never exceed hardware weight ratings even when mounting seems secure—safety margins matter for long-term reliability and preventing dangerous failures. Test capacity incrementally before loading shelves with valuable or potentially dangerous items, and remember that dynamic loads (items placed forcefully or moved frequently) stress installations more than static loads sitting undisturbed indefinitely. When doubt exists about capacity, add additional support brackets or reduce intended loads ensuring safety over optimistic assumptions that risk property damage or injuries.
What type of wood works best for floating shelves wood projects?
The best wood depends entirely on your desired appearance, available budget, required strength, and finishing plans rather than one universal “best” option. Common affordable choices include pine offering easy workability and low cost ($2-5 per linear foot) perfect for painted or lightly stained beginner projects, though it lacks impressive grain patterns and dents more easily than hardwoods. Oak provides classic appeal with pronounced grain, exceptional durability, and proven strength ($8-15 per linear foot) making it excellent for traditional or craftsman-style homes requiring substantial weight capacity. Maple delivers extremely hard, smooth surfaces perfect for painted modern floating shelves wood or natural light finishes ($10-18 per linear foot), though its closed grain resists staining evenly requiring gel stains or paint for best results. Walnut offers premium dark brown color with dramatic grain patterns ($15-30+ per linear foot) creating stunning showpiece shelves needing no stain—just clear protective finish showcasing natural beauty. Reclaimed barn wood or salvaged lumber provides unique rustic character impossible to replicate with new materials, though often heavy and requiring careful cleaning, sealing, and robust mounting hardware. For painted applications where natural grain doesn’t matter, consider plywood or MDF offering stability, smooth surfaces, and lower costs while delivering professional-painted results rivaling solid wood appearances. Consider your specific room aesthetic, whether you plan painting or staining, your budget limitations, and required strength before selecting wood species ensuring your floating shelves wood meet both functional needs and design visions.
Can I install floating shelves wood without drilling into wall studs?
Installing floating shelves wood without stud mounting is strongly discouraged for anything beyond very lightweight decorative displays holding only a few ounces. While heavy-duty drywall anchors claim impressive weight ratings (some advertise 50+ pound capacity), these ratings assume perfect installation conditions, new drywall in excellent condition, and perfectly distributed static loads—conditions rarely matching real-world residential applications where imperfect installations, aging drywall, and dynamic loading create failure risks. Drywall itself provides minimal structural strength—it serves as wall covering, not load-bearing material. Anchors work by distributing loads across larger drywall areas, but this remains fundamentally weaker than connecting directly to structural lumber studs running vertically behind drywall. For truly functional floating shelves wood holding books, dishes, plants in wet soil, small appliances, or heavy decorative items, stud mounting represents the only safe, reliable option preventing dangerous failures causing property damage, injuries, or embarrassing collapses during social gatherings. If your desired shelf location lacks conveniently positioned studs, consider these alternatives: add blocking between studs during construction providing mounting points wherever needed, adjust shelf dimensions hitting studs at different locations, use French cleat systems distributing loads across multiple studs through continuous mounting strips, or redesign shelf placement entirely choosing locations where studs exist. Electronic stud finders ($15-50) locate studs reliably making proper mounting achievable in virtually all situations. Don’t compromise safety gambling with anchor-only installations—invest effort finding studs and mounting correctly for installations lasting decades without concerns.
What basic tools do I absolutely need for a floating shelves wood project?
Essential tools enabling successful floating shelves wood construction include: an electronic stud finder ($15-50) reliably locating wall studs for secure mounting since this represents the most critical installation factor, a quality 24-48 inch level ($10-40) ensuring shelves mount perfectly horizontal preventing items from sliding and creating professional appearances, a 25-foot tape measure ($8-15) providing accurate measurements preventing errors and material waste, pencils and marking tools clearly indicating cut lines and mounting positions, a cordless power drill with assorted bits ($50-150) driving screws and creating pilot holes making fastener installation easier and preventing wood splitting, a saw for cutting wood to length (circular saw $50-100, handsaw $10-20, or miter saw $150-300 for angled cuts), sandpaper or power sander ($30-80) smoothing rough edges and preparing surfaces for finishing, and essential safety equipment including safety glasses protecting eyes from wood particles and metal shavings plus hearing protection and dust masks when appropriate. These basic tools handle simple pine board or hollow core floating shelves wood projects achievable by most DIY beginners. More complex projects might require additional specialized tools: miter saw making precise angled cuts for hexagonal shelves or decorative trim, router creating edge profiles or channels for LED lighting, pocket hole jig joining boards without visible screws, clamps holding pieces during gluing, or brad nailer speeding assembly of hollow core boxes. Many specialized tools can be borrowed from friends, rented from home improvement stores by the day, or purchased incrementally as your skills and project ambitions grow beyond basic installations. Start with essential basics handling straightforward designs, then expand your tool collection as experience builds confidence tackling more complex floating shelves wood projects requiring advanced equipment and techniques.
How should I finish my floating shelves wood for best results?
Finishing options depend on whether you want to showcase natural wood grain through staining or achieve specific colors through painting, plus the intended use location determining durability requirements. For stained floating shelves wood highlighting natural grain beauty: sand surfaces thoroughly progressing through 80-grit (removing roughness), 120-grit (smoothing surfaces), and 220-grit (creating silky finish), then apply pre-stain wood conditioner on softwoods like pine preventing blotchy absorption, test stain colors on scrap wood since appearance varies dramatically across wood species, apply stain following grain direction and wipe excess after 5-15 minutes depending on desired darkness, then protect dried stain with multiple thin coats (3-4 typical) of polyurethane sanding lightly with 220-grit between coats creating glass-smooth final surfaces. Water-based polyurethane dries quickly without yellowing but offers slightly less durability than oil-based versions yellowing over time while providing superior protection—choose based on your priorities. For painted floating shelves wood matching colorful or modern decor: prime surfaces using quality wood primer blocking tannins and improving paint adhesion, fill nail holes and imperfections with wood filler sanding smooth after drying, apply multiple thin paint coats using foam rollers or spray paint for smoothest results avoiding brush marks, sand lightly between coats with 220-grit creating mechanical bonding, then consider topcoating painted shelves with clear matte polyurethane protecting paint from chips and scratches in high-traffic areas while maintaining flat appearance. Always finish all wood surfaces including backs and bottoms preventing moisture absorption causing warping, work in well-ventilated areas when using solvent-based finishes, and allow adequate drying time between coats resisting temptation to rush finishing steps that determine whether your floating shelves wood look professionally crafted or obviously homemade.


