Why do some gallery walls feel balanced and professional while others look cluttered and unplanned—even when using the same number of frames?
Gallery Wall Layout: Your Complete 2026 Guide for Homeowners and Renters
A gallery wall layout guide covering picture hanging at 57 inches, French cleat mounting, 3000K LED picture lights, UV acrylic glazing, mat board sizing, and renter-friendly wall art solutions
A gallery wall layout creates a stunning, personalized display for your home. Start with one piece at a 57-inch center height, use French cleat mounting for stability, and enhance with 3000K LED picture lights and UV acrylic glazing. This comprehensive guide covers planning strategies, mat board sizing techniques, and renter-friendly wall art solutions that work in any space.
The 2026 approach to gallery wall layout emphasizes precise measurement, intentional spacing, and protective lighting that preserves your art investment for decades. Modern homeowners balance aesthetic appeal with practical considerations like ease of rearrangement and damage-free installation methods.
Essential Starting Point: Begin with one wall, mock up your gallery wall layout with paper templates, and maintain consistent 2-3 inch gaps between frames for a cohesive wall art arrangement that feels curated rather than random.
Gallery Wall Layout vs. Statement Piece: Choosing Your Approach
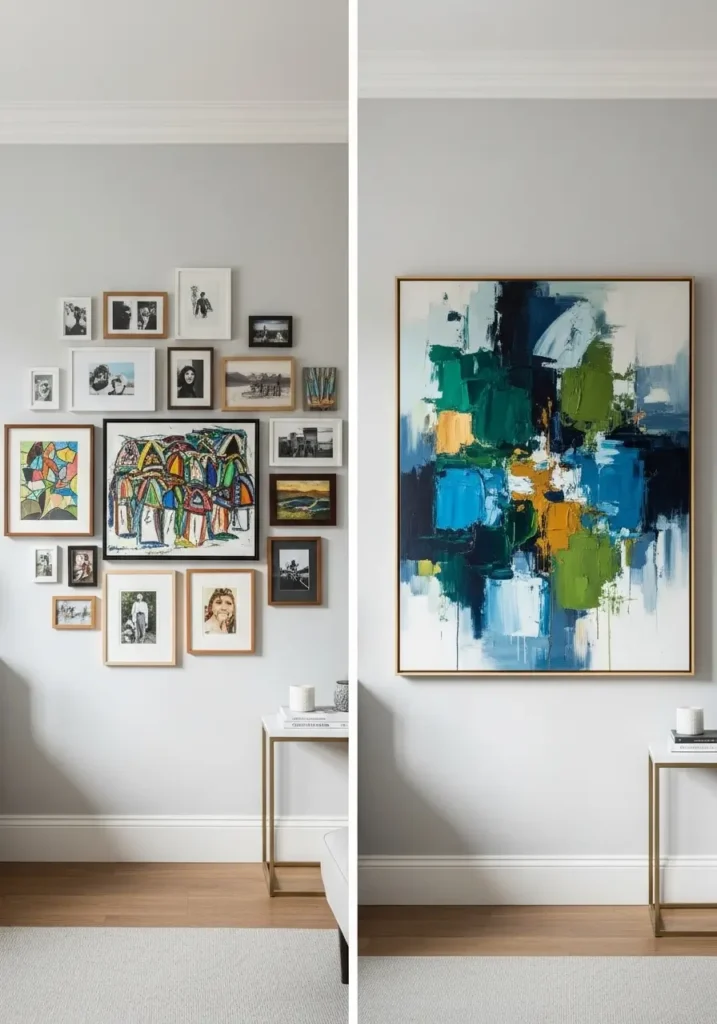
Choose a gallery wall layout for a dynamic, layered aesthetic or a single large piece for a calm focal point. Your decision shapes how the room feels and how you interact with the space over time. The 2026 trend favors flexible gallery wall layouts that evolve with your collection rather than static single-piece displays.
| Criterion | Gallery Wall | Statement Piece | What it means |
|---|---|---|---|
| Look | Layered, personal, flexible | Clean, bold, calm | Match the format to your room’s energy level |
| Planning | More measuring and spacing calculations | One major size decision | Time investment vs scale risk |
| Budget | Many small costs spread over time | One higher cost upfront | Phase a gallery or save for one piece |
| Change | Easy to swap pieces or add new ones | Stable focal point for years | Rotate collection often or keep steady |
| Best walls | Long hallways or stair walls | Over sofas or mantels | Match wall shape to display format |
A gallery wall layout proves ideal for collectors seeking flexibility and personal expression, while a statement piece anchors small spaces and makes them feel larger through visual simplicity. Consider your lifestyle: families with children often prefer gallery wall layouts because damaged frames can swap out without disrupting the entire display.
2026 Trend Insight
Mixed media gallery wall layouts gain popularity in 2026, combining framed prints, floating shelves, small sculptures, and textile pieces. This approach creates depth and breaks the flat-plane tradition of wall-only displays. Plan for weight distribution when mixing heavy shelves with lightweight frames.
Planning Your Gallery Wall Layout Step-by-Step
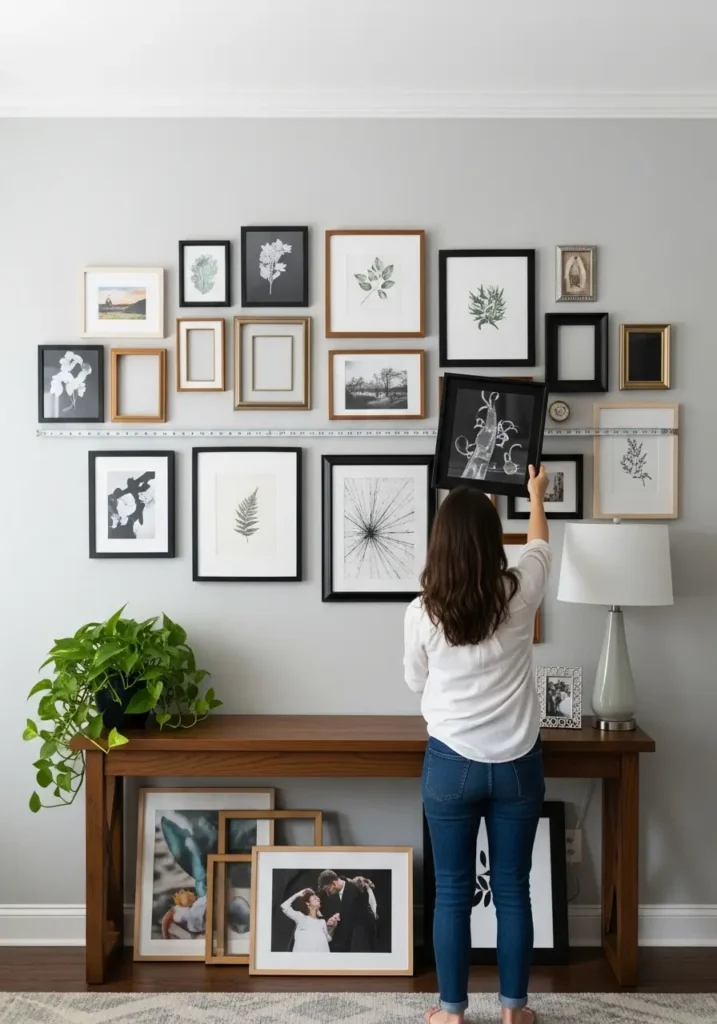
Plan a gallery wall layout with paper templates for precision and confidence before drilling the first hole. This method prevents costly mistakes and allows experimental arrangements without wall damage. Professional art installers use this approach for museum exhibitions and private collections alike.
Paper Template Method
- Trace each frame outline on kraft paper or newspaper and cut it out
- Mark the hanging point (wire or D-ring position) on each template
- Tape templates to a horizontal line at 57 inches center height
- Maintain consistent 2-3 inch gaps between all templates
- Step back from the main doorway and primary seating to check balance
- Photograph the arrangement from multiple angles for reference
- Number each template and mark the corresponding frame back
- Recheck center height and gaps before transferring marks to wall
Professional Installer Tip
Create a dedicated “spacer block” by cutting a piece of wood or cardboard to exactly 2.5 inches (or your chosen gap width). Use this physical spacer between frames during template arrangement to ensure perfect consistency. This eliminates visual measurement errors that accumulate across multiple frames.
Gallery Wall Layout Sightlines

Sightline analysis determines which pieces get visual priority in your gallery wall layout. Stand at key positions and note what catches your eye first—that spot demands your strongest work.
- Stand at the main entry and mark where your eyes land first
- Sit on the sofa, dining chairs, and desk to test seated views
- Aim the largest or most compelling work at the primary sightline
- Avoid positioning important pieces behind furniture backs or lamp shades
- Account for air vents, return grilles, and light switch clusters
- Confirm table lamp heights won’t create glare on glass surfaces
- Consider traffic flow—people shouldn’t brush past fragile frames
The 2026 approach emphasizes dynamic sightlines for homes with open floor plans. Your gallery wall layout may have multiple primary sightlines from kitchen, dining, and living areas. Anchor each sightline with a visually strong piece that reads well from that specific angle.
Essential Gallery Wall Layout Tools
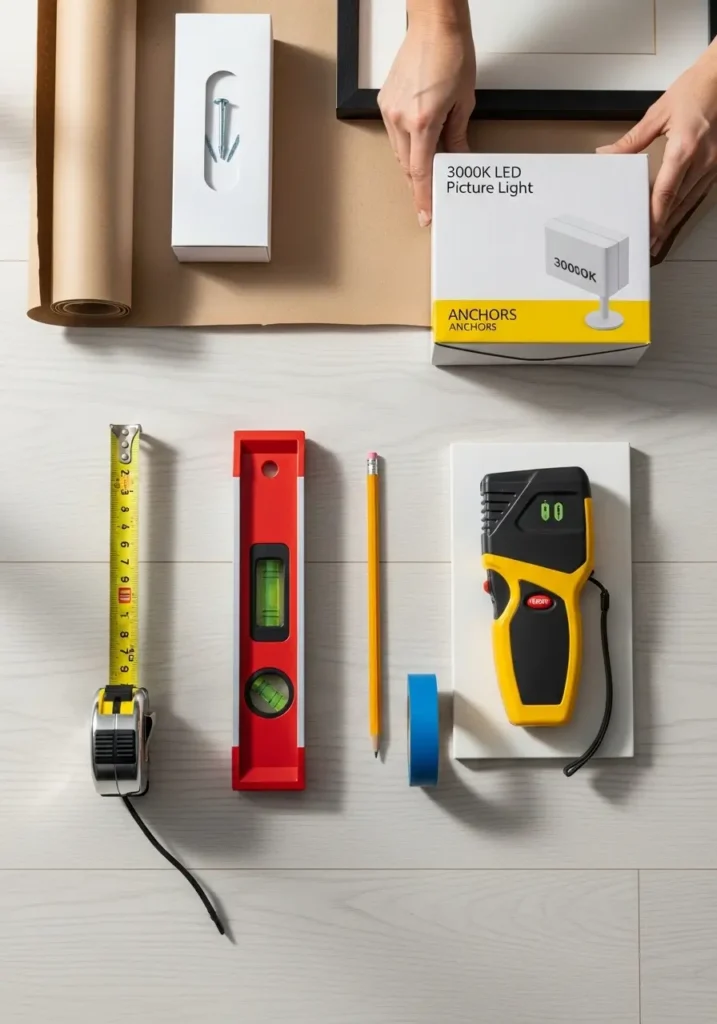
Required Tools and Materials
- Measuring tools: 25-foot tape measure, 4-foot level, pencil, painter’s tape
- Wall detection: Electronic stud finder with deep-scan mode
- Paper supplies: Kraft paper or newspaper, scissors, masking tape
- Hardware: Appropriate anchors for wall type, screws, picture wire
- Lighting: 3000K LED picture lights (discussed in lighting section)
- Safety: Safety glasses, step stool, work gloves for wire handling
Time and Cost Expectations
- Planning time: 60-120 minutes for template creation and arrangement
- Installation time: 90-180 minutes for drilling and hanging (9-piece layout)
- Hardware cost: $10-30 for anchors, screws, and wire
- Lighting cost: $40-150 per 3000K LED picture light fixture
- Helper value: Second person essential for leveling and holding templates
Gallery Wall Layout Framework: Choose format (grid or salon) → Mark 57″ center line → Mock with paper templates → Lock 2-3″ gaps → Find studs → Install appropriate anchors → Hang frames → Add 3000K LED picture lights → Adjust and level.
Height and Scale for Perfect Gallery Wall Layout
Picture Hanging Height Standards
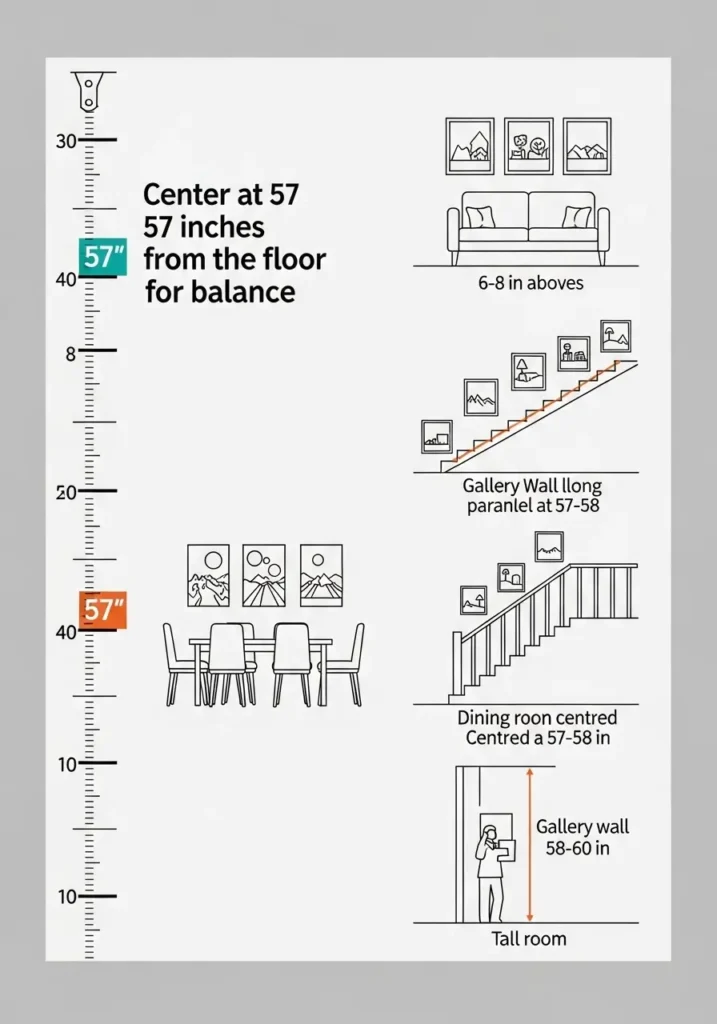
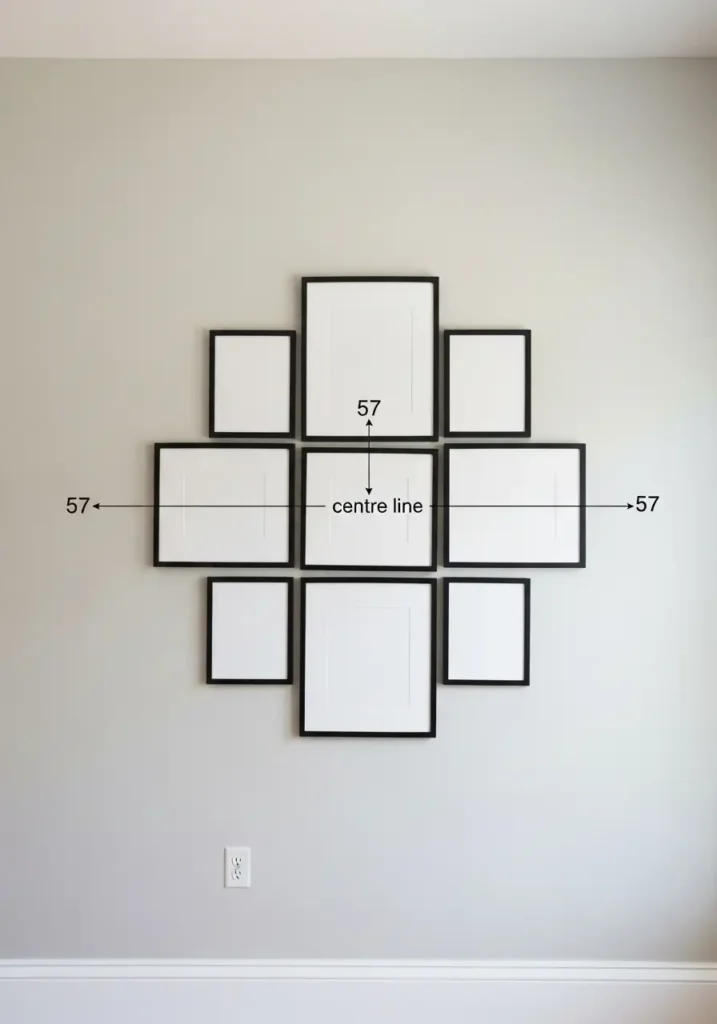
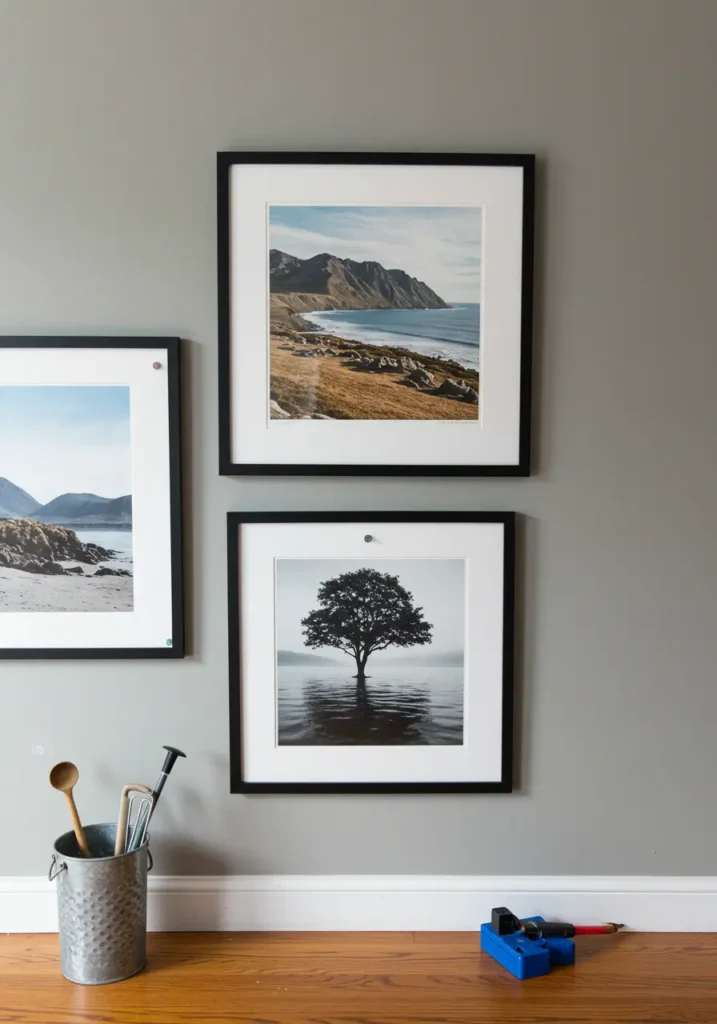
Center your gallery wall layout at 57 inches from the floor to the center point of your arrangement. This measurement derives from museum standards where average adult eye level falls at 57-60 inches, creating comfortable viewing without neck strain.
The 57-inch rule applies to the mathematical center of your entire gallery wall layout, not each individual frame. Calculate this by adding the highest point and lowest point of your arrangement, then dividing by two. That result should land at 57 inches from the floor.
Height Adjustments for Different Spaces
- Tall rooms (10+ foot ceilings): Raise center to 58-60 inches to prevent the layout from feeling anchored to the floor
- Over sofas or consoles: Keep the bottom edge 6-8 inches above furniture top, then work upward while maintaining proportions
- Stairway walls: Align centers parallel to the handrail angle for visual harmony as you ascend
- Dining rooms: Favor 57-58 inches to optimize viewing from seated positions during meals
- Bedrooms: Consider 56-57 inches since you view from bed and standing positions
- Hallways: Stick to 57 inches exactly; narrow spaces amplify height errors
Common Height Mistakes
Mistake #1: Measuring 57 inches to the frame top rather than the center—this pushes the entire gallery wall layout too low.
Mistake #2: Ignoring furniture relationships and hanging at 57 inches even when a sofa sits below—this creates awkward visual gaps between furniture and art.
Scale and Spacing Principles
Scale determines how your gallery wall layout relates to surrounding furniture and room dimensions. Proper scaling creates visual balance where art enhances the space rather than overwhelming or disappearing within it.
Sizing Guidelines by Location
- Over sofas: Total gallery wall layout width should equal approximately two-thirds of sofa width (60-70% range acceptable)
- Bare walls: Keep 4-8 inches clear from side edges; more space reads intentional, less feels cramped
- Between windows: Maintain equal margins on both sides; center the layout precisely
- Dining room walls: Scale to table length rather than chair width for proper proportion
- Entryway walls: Leave breathing room at top and sides to prevent claustrophobic feel upon entering
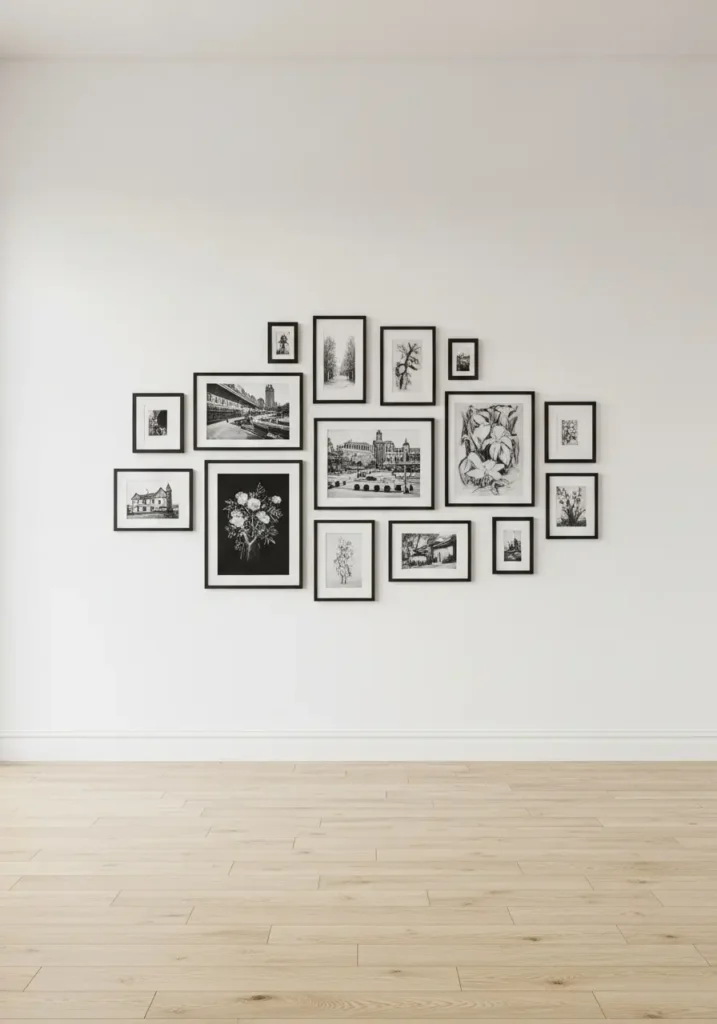
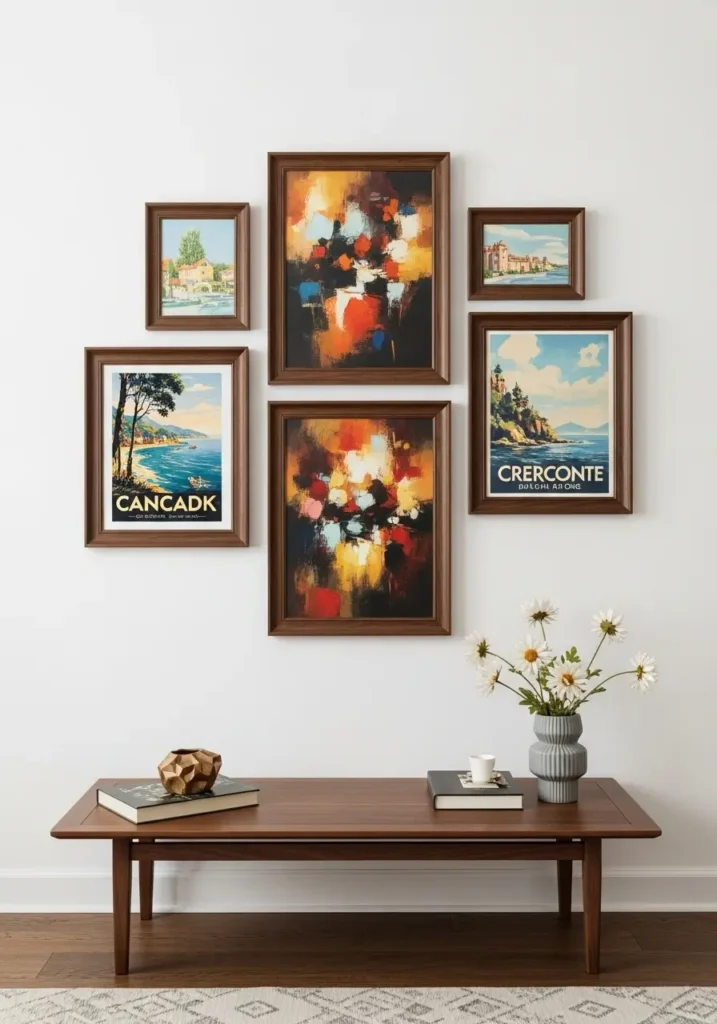
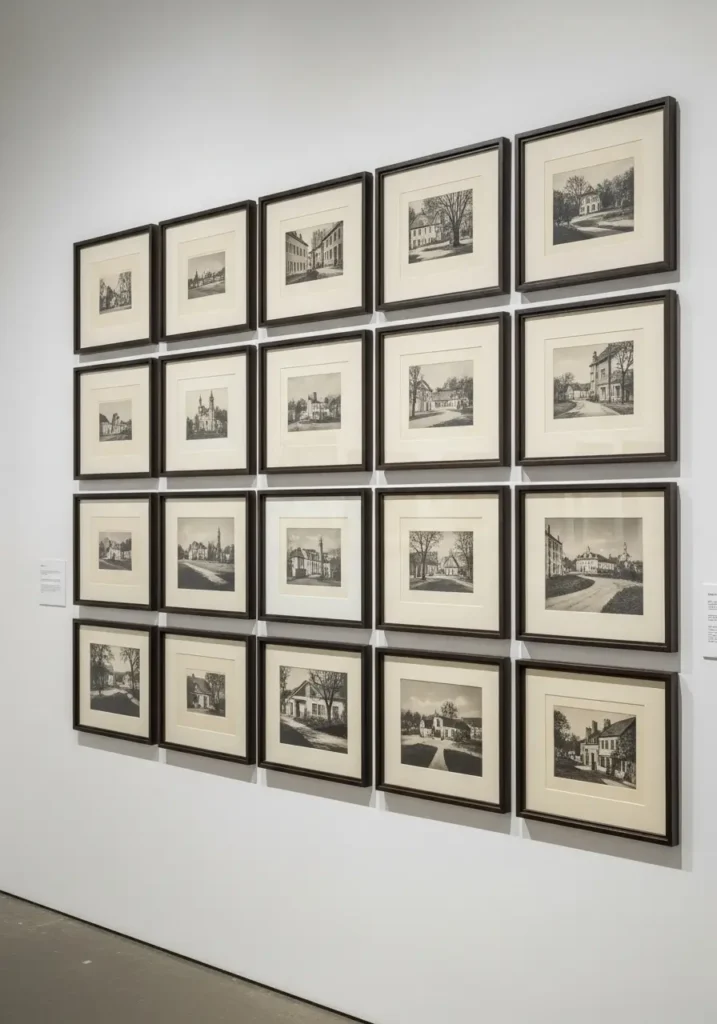
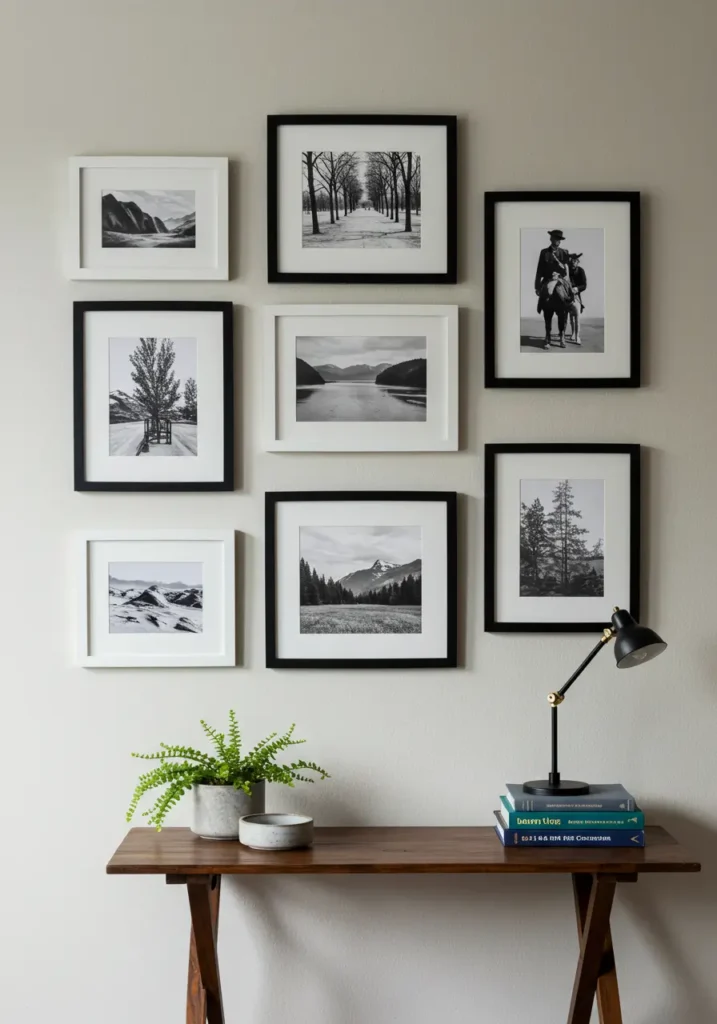
Layout Format Options
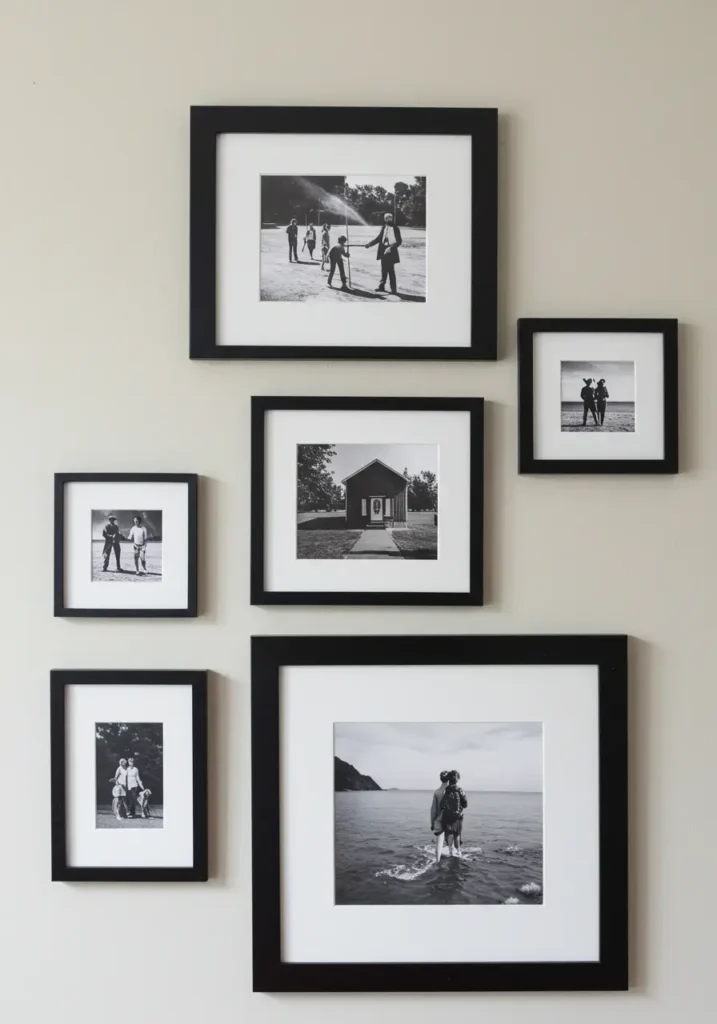
- Grid layouts: Use identical frame sizes and perfectly aligned rows/columns for modern, ordered aesthetic
- Salon-style mixes: Combine various frame sizes aligned around one horizontal center line for eclectic charm
- Organic clusters: Group frames in loose, unstructured arrangements that feel spontaneous yet balanced
- Symmetrical pairs: Mirror arrangements on either side of a center axis for formal, traditional rooms
Spacing Consistency
- Standard spacing: Maintain 2-3 inch gaps between all frames for cohesive gallery wall layout
- Spacer trick: Cut a wood block to your chosen gap width and use it physically between templates
- Visual weight: Heavier, darker frames may need 3 inches; lighter frames work at 2 inches
- Grid precision: Grids demand exact spacing—even 1/4 inch variation becomes obvious
- Salon flexibility: Salon-style arrangements tolerate slight spacing variation better than grids
Stability and Security
- Use two hooks per frame for stability—single hooks allow rotation over time
- Attach clear rubber bumpers to bottom frame corners to prevent wall marks and tipping
- Shorten picture wire so frames hang taut rather than swinging loose
- In earthquake-prone regions, add security clips over frame tops or museum putty under corners
- Avoid hanging heavy pieces (over 20 pounds) above beds or cribs for safety
What’s your biggest challenge when planning a gallery wall layout—determining the right scale, maintaining consistent spacing, or choosing between grid and salon styles? Share your gallery wall frustrations in the comments!
Frames and Mat Board Sizing for Gallery Wall Layout
Frame and mat choices shape your gallery wall layout aesthetic more than art selection itself. Cohesive framing unifies diverse artwork while mat board sizing determines visual impact and preservation quality.
Frame Styles and Material
Frame selection establishes your gallery wall layout tone. Choose one dominant frame style and stick with it across 70-80% of pieces for visual cohesion.
Black metal frames: Crisp edges perfect for photography and graphic prints; reads modern and gallery-like
Natural oak frames: Soft warmth suits airy, Scandinavian-inspired rooms with light walls
Walnut frames: Rich depth enhances mid-century modern and classic traditional spaces
White frames: Clean simplicity elevates coastal themes and minimal aesthetics
Gold or brass: Elegant formality adds luxury to vintage prints and heirloom pieces
Frame profile impact: Thin rails (0.5-1 inch) read modern; thicker rails (1.5-2.5 inches) read traditional. Mix profiles sparingly—consistency matters more than variety in most gallery wall layouts.
Mat Board Sizing
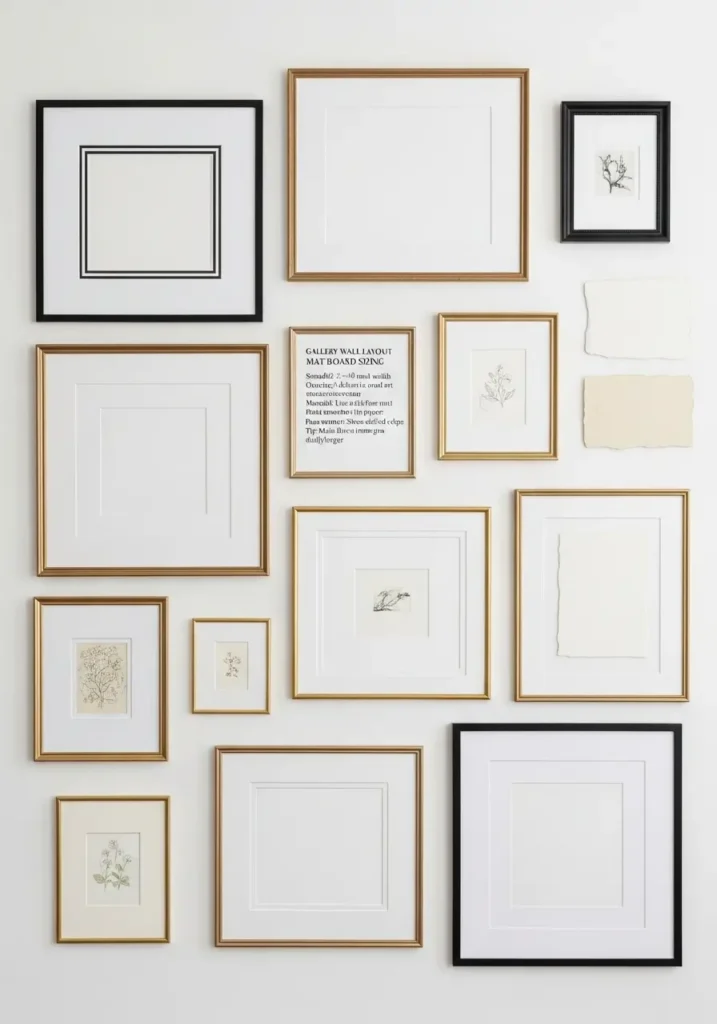
Mat board sizing controls how artwork breathes within its frame and protects valuable pieces from contact with glass or acrylic glazing.
Standard width: 2-3 inch mat borders suit most prints and photos under 16×20 inches
Oversize mats: 4-6 inch borders add drama to small artwork (8×10 or smaller) and create gallery gravitas
Acid-free requirement: Use conservation-quality, acid-free mat board and backing for all paper-based art to prevent yellowing
Float mounting: Displays artwork with visible edges and deckled borders; popular for watercolors and handmade paper
Double mats: Layered mats in complementary colors add depth; outer mat typically 1/4 inch wider than inner mat
Professional trick: Make the bottom mat margin 1/4 to 1/2 inch larger than the top and sides—this optical adjustment prevents artwork from appearing to sink in the frame.
UV Acrylic Glazing
Glazing protects your gallery wall layout from UV damage, dust, and physical contact. Choose based on value and location of displayed art.
UV-filter acrylic: Lightweight, shatter-resistant option ideal for children’s rooms and high-traffic areas; blocks 99% of UV rays
Museum glass: Premium clarity with UV protection and anti-reflective coating; expensive but worth it for valuable art
Non-glare glass: Etched surface cuts reflections but softens fine detail; best for high-glare locations
Standard glass: Acceptable for shaded walls away from direct sun; budget-friendly for less valuable prints
Cleaning protocol: Use dry microfiber cloths on acrylic; spray glass cleaner on cloth (never directly on glass) and avoid ammonia-based products near artwork edges.
2026 Framing Trends
Mixed-finish gallery wall layouts gain traction in 2026, combining 70% frames in your primary material (black metal, for example) with 30% in a complementary finish (brass or natural wood). This ratio provides visual interest without chaos. Avoid mixing more than two frame finishes in standard-sized gallery wall layouts under 15 pieces.
Related Post: How Your Small Backyard Deck Could Feel This Peaceful
French Cleat Mounting and Hardware for Gallery Wall Layout
Select hardware for your gallery wall layout based on wall construction type, art weight, and permanence requirements. Wrong hardware choices lead to damaged walls, fallen frames, and broken glass.
Hardware Selection by Wall Type
- Wood studs (most common): Use 2-3 inch wood screws with D-rings or picture hooks rated for frame weight; screws must penetrate stud at least 1 inch
- Drywall between studs: Install weight-rated anchors appropriate for frame weight; toggle bolts for 20+ pounds, plastic anchors for under 10 pounds
- Heavy or wide pieces (30+ pounds): French cleat mounting provides secure, professional installation; distributes weight across multiple studs
- Brick or concrete: Use masonry anchors with pilot holes drilled with carbide bits; avoid mortar joints for maximum strength
- Plaster walls (pre-1950s homes): Find lath backing or use specialized plaster anchors; plaster cracks easier than drywall
- Metal studs (apartments): Require special toggle bolts designed for metal; lighter weight limits than wood studs
French Cleat Mounting System
French cleat mounting excels for heavy artwork, wide pieces over 36 inches, or gallery wall layouts you plan to rearrange over time. This interlocking system provides rock-solid support while allowing easy removal and repositioning.
French Cleat Advantages
- Distributes weight across multiple studs for maximum security
- Allows easy removal and replacement without damaging walls
- Prevents tilting and keeps frames perfectly level automatically
- Accommodates future gallery wall layout changes without new hardware
- Provides adjustable horizontal positioning after wall cleat installation
Installing French Cleats
- Cut two matching pieces of hardwood or plywood with 45-degree bevels
- Mount wall cleat horizontally into at least two studs with 3-inch screws
- Attach frame cleat to back of artwork with screws into solid frame material
- Hook frame cleat onto wall cleat—gravity locks them together
- Test security by gently pulling frame forward at bottom edge
Renter-Friendly Mounting Options
Renters need gallery wall layout solutions that avoid permanent damage while maintaining security. Several modern products address this challenge with varying degrees of success.
- Removable adhesive strips: Work for frames under 8 pounds; follow weight ratings strictly and test on hidden wall area first
- Lean-to arrangements: Large frames lean safely on consoles, mantels, or floor against wall without mounting
- Tension rods: Between bookshelves or in window frames support lightweight fabric pieces or small frames on S-hooks
- Gallery ledges: Mounted shelves hold multiple frames without individual mounting holes; easier patching when moving
- Picture rail systems: Professional track installed once at ceiling; cables drop down to hang multiple pieces
Safety and Security Measures
- Use two hooks or mounting points per frame—single points allow rotation and instability
- Attach short picture wire taut across frame backs rather than loose drooping wire
- Apply clear rubber bumpers to bottom frame corners—prevents wall scuffs and forward tipping
- In earthquake zones, add security clips over frame tops or apply museum putty under corners
- Log frame weight and hardware type on frame back with pencil for future reference
- Test each installation by gently pulling frame bottom forward—resistance indicates secure mounting
Critical Safety Warning
Never exceed anchor weight ratings—a 10-pound-rated anchor with a 12-pound frame will fail eventually. Add a 25% safety margin to all weight calculations. In children’s rooms and above beds, avoid glass-front frames over 15 pounds regardless of mounting security. Use acrylic glazing for all high-risk locations.
3000K LED Picture Lights for Gallery Wall Layout
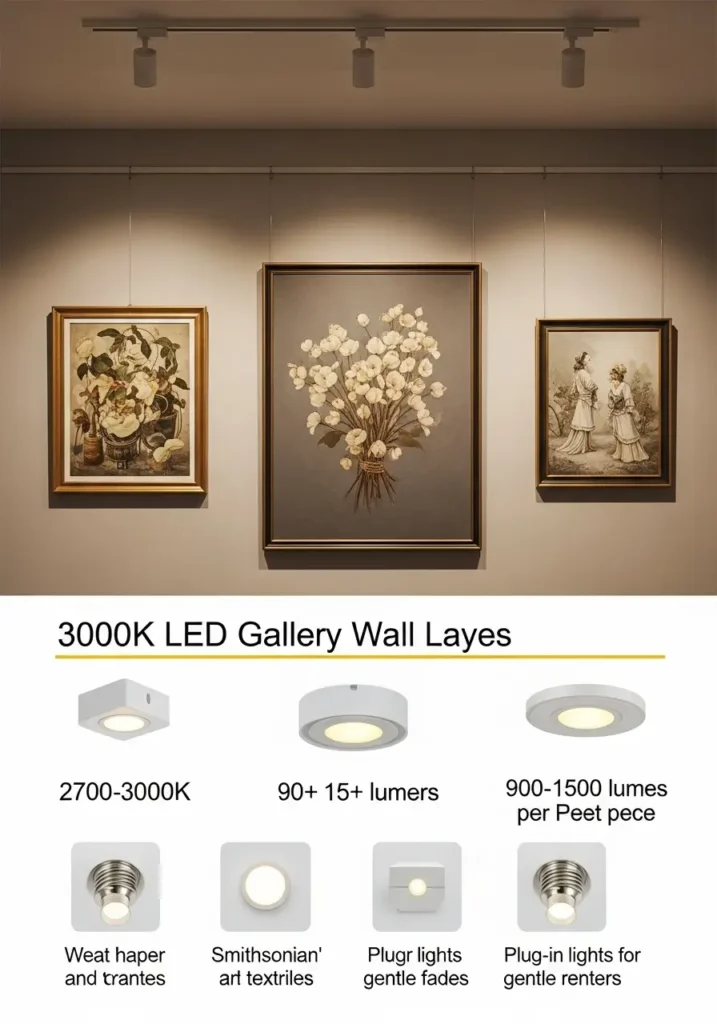
Illuminate your gallery wall layout with 3000K LED picture lights to protect art while enhancing visual impact. Proper lighting makes the difference between a flat collection and a dynamic, museum-quality display. Heat and UV radiation from incorrect lighting fade paper, textiles, and photographs irreversibly over time.
The Smithsonian Institution provides comprehensive guidance on lighting and art care that informs these recommendations.
LED Picture Light Specifications
- Color temperature: 2700-3000K produces warm white light that flatters most artwork; avoid 4000K+ cool whites that create harsh, clinical appearance
- Color Rendering Index (CRI): 90+ CRI essential for accurate color reproduction; 95+ CRI ideal for valuable art
- Light output: 900-1500 lumens per fixture depending on frame size; larger pieces need more lumens
- Beam angle: 30-40 degrees focuses light on artwork without spill onto surrounding walls
- Dimming capability: Essential for adjusting light levels based on time of day and ambient room lighting
- UV output: Quality LED fixtures emit negligible UV; verify “museum-quality” or “zero UV” specifications
Picture Light Fixture Types
Dedicated Picture Lights
Mounted directly to wall or frame top, these fixtures angle downward at 30 degrees to illuminate artwork evenly from top to bottom.
- Hardwired models: Professional appearance, no visible cords, requires electrical box behind wall; $80-$300 per fixture
- Plug-in models: Renter-friendly option with visible cord; easier installation; $40-$150 per fixture
- Battery-operated: Most flexible placement but requires battery changes every 3-6 months; $30-$80 per fixture
Track Lighting Systems
Ceiling-mounted tracks with adjustable heads provide flexible lighting for entire gallery wall layout. Excellent for arrangements that change periodically.
- Position track 24-36 inches from wall for optimal angle
- Use one light head per 2-3 feet of gallery wall length
- Aim lights to prevent glare in primary viewing positions
- Choose white or black track to match ceiling color
Recessed Accent Lights
Built into ceiling, these adjustable fixtures create clean, architectural appearance. Best for new construction or major renovations where ceiling access allows installation.
Lighting Control and Automation
- Dimmer switches: Essential for adjusting light intensity based on ambient room lighting throughout the day
- Smart bulbs: Program gentle fades at sunrise/sunset; control via phone app; create lighting scenes for different occasions
- Motion sensors: Automatically illuminate gallery wall layout when you enter room; save energy when space unoccupied
- Timer systems: Limit daily exposure to 8-12 hours for valuable art protection
Professional Lighting Tip
Test lighting placement with temporary clamp lamps before permanent installation. View your gallery wall layout from all seating positions at different times of day. Adjust angle and intensity until reflections disappear and colors appear true. Photograph the arrangement to document optimal positioning before drilling.
For detailed bulb selection guidance and energy efficiency information, consult Energy.gov’s LED lighting basics.
Have you noticed color shifting or fading in your displayed artwork? What lighting do you currently use for your gallery wall? Share your lighting setup and any issues you’ve encountered in the comments!
Renter-Friendly Gallery Wall Layout Strategies
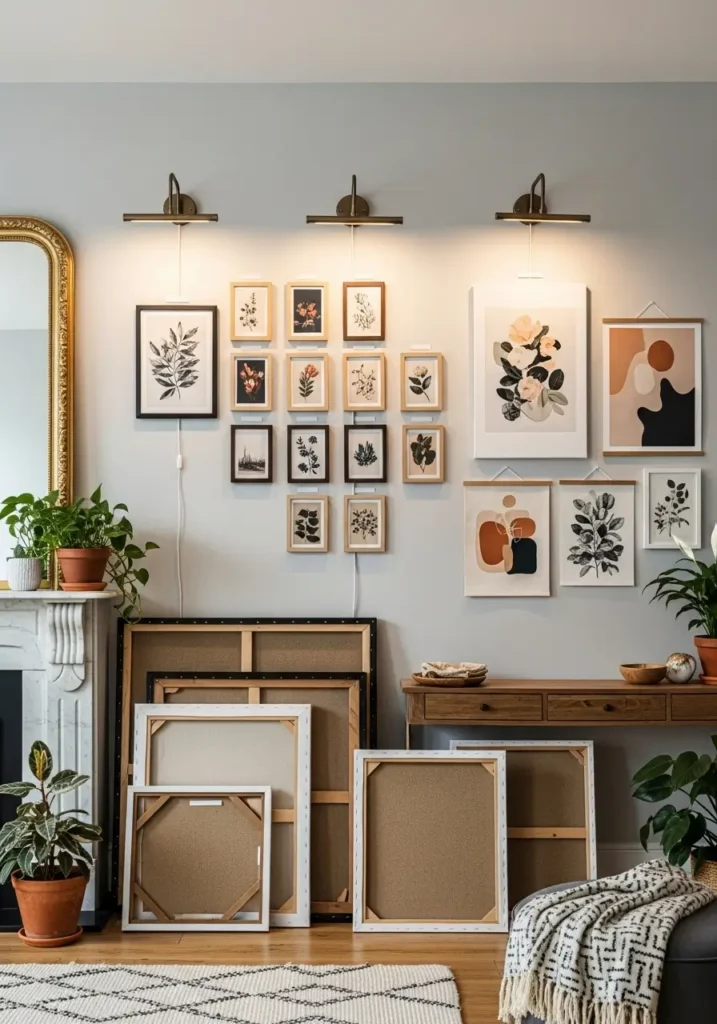
Design a renter-friendly gallery wall layout without permanent damage to walls while maintaining visual impact and security. Modern rental agreements often prohibit nail holes or require professional patching upon move-out, making damage-free solutions essential.
Damage-Free Display Methods
- Lean larger frames: Prop substantial pieces (16×20 or larger) on consoles, mantels, or directly on floor against wall; layer smaller frames in front for depth
- Removable adhesive strips: Use command strips within strict weight limits; prep wall surface properly and remove slowly at 90-degree angle to minimize paint damage
- Tight grid with small frames: Build cohesive arrangement using many small, lightweight frames (5×7 or 8×10) that stay within removable strip weight ratings
- Canvas or fabric pieces: Choose stretched canvas or fabric prints that hang from adhesive strips more successfully than glass-front frames
- Gallery ledges: Install floating shelves with minimal mounting holes; display multiple frames on shelves without individual wall penetrations
- Freestanding easels: Large tabletop or floor easels hold statement pieces without wall contact
- Tension rods: Install between bookcases or in window frames; hang lightweight pieces with S-hooks
Strategic Patching for Move-Out
If you choose traditional mounting despite rental status, plan for professional-quality patching that passes move-out inspections.
- Photograph wall condition before hanging gallery wall layout for damage documentation
- Use smallest appropriate anchor size to minimize hole diameter
- Cluster multiple frames in one area rather than scattering holes across entire wall
- Save paint chips or touch-up paint from landlord for color-matched repairs
- Fill holes with spackling compound, sand smooth, and touch up with matching paint
- Consider hiring professional patcher for complex repairs—often $50-150 total, less than deposit loss
Renter-Friendly Lighting
- Use plug-in 3000K LED picture lights with adhesive clips rather than hardwired fixtures
- Install track lighting with minimal ceiling penetrations—two anchor points support 4-6 foot track
- Position floor lamps with adjustable heads to illuminate gallery wall from below or side
- Use battery-operated puck lights with adhesive backing for accent lighting
- Choose warm white LED strip lights with adhesive backing for ambient gallery wall glow
Renter Success Story
Chicago renter Maria created a stunning 12-piece gallery wall layout using only removable strips and leaned frames. She limited individual pieces to 4 pounds or less, used canvas prints without glass, and leaned three large pieces (20×24) on a console below the hung collection. Total wall damage: zero. Her deposit returned in full, and she moved the entire arrangement to her new apartment in under 30 minutes.
Real-World Gallery Wall Layout Experience
I installed a nine-piece gallery wall layout in a 1920s bungalow with wavy plaster walls and settling that made everything crooked. The trim looked straight to the eye, but a level revealed the ceiling line drifted down two inches across the 12-foot wall.
Rather than fighting the architecture, I mapped a true horizontal line at 57 inches center height across the entire wall using a laser level. I aligned my entire gallery wall layout to that mathematically level line, completely ignoring the visually “straight” but actually tilted trim and ceiling.
The result: The gallery wall reads perfectly level to anyone standing in the room, even though it appears to drift relative to the wonky trim. Using two hooks per frame, French cleats for the heavier 24×30 pieces, and rubber bumpers on all bottom corners kept everything stable.
Five years later, that gallery wall layout still looks perfect. The lesson: Trust your level and your measurements, not your eyes or existing architectural elements. In old houses especially, nothing is actually straight—create your own level reference and commit to it.
Quick Fixes for Common Gallery Wall Layout Problems
Even well-planned gallery wall layouts encounter issues over time. These solutions address the most common problems without complete reinstallation.
Crooked Frames
- Replace single hooks with two hooks spaced 8-12 inches apart on frame back
- Apply clear adhesive bumpers to bottom frame corners—creates friction against wall
- Shorten picture wire by wrapping excess around itself—reduces swing distance
- Level frames at the top rail rather than bottom—gravity settles correctly afterward
- Dust frame backs and wall surface so bumpers grip properly—dust reduces adhesion
- For persistent tilting, add small adhesive foam strips to bottom frame back corners
Weak Anchors or Damaged Drywall
- Match anchor type and weight rating exactly to frame weight plus 25% safety margin
- Move failed anchor location 1-2 inches horizontally and patch old hole with spackling
- Upgrade to French cleat mounting for heavy pieces (over 20 pounds) or wide pieces (over 36 inches)
- Find nearby studs at corners, beside outlets, and beside light switches—mount into solid wood
- Log anchor type and weight rating on frame back with pencil for future reference
- For crumbling drywall, cut out damaged section and install backer board before remounting
Busy or Off-Center Gallery Wall Layout
- Reset entire arrangement to a fresh 57-inch center line—measure and mark before moving anything
- Standardize all gaps to consistent 2-3 inch spacing using physical spacer block
- Unify appearance by matching frame color or rail thickness across 70-80% of pieces
- Remove the weakest or most jarring piece and rebalance remaining frames—often subtracting improves more than adding
- Align entire arrangement to center of furniture below (sofa, console) rather than wall center
- Take photo from main viewing position—camera reveals balance issues eyes miss in person
Safety Reminder
In earthquake-prone regions (California, Alaska, Pacific Northwest), add security hooks or clear acrylic clips over frame top lips. Avoid hanging pieces heavier than 15 pounds above beds, cribs, or frequently occupied seating. Use acrylic glazing instead of glass for all overhead positions.
What’s the most frustrating problem you’ve encountered with your gallery wall layout—crooked frames that won’t stay level, damaged drywall, or an arrangement that just doesn’t look right? Let’s troubleshoot together in the comments!
Frequently Asked Questions About Gallery Wall Layout
What height should I use for a gallery wall layout?
Use 57 inches to the mathematical center of your entire arrangement for most rooms. This measurement aligns with average adult eye level and museum standards for comfortable viewing. In rooms with ceilings over 10 feet tall, raise the center to 58-60 inches to prevent the layout from feeling anchored too low. When hanging over furniture like sofas or consoles, keep the bottom edge 6-8 inches above the furniture top surface, then build upward from there while maintaining proper proportions. For stairway walls, align centers parallel to the handrail angle for visual harmony as you ascend or descend.
How wide should art be over my sofa?
Your gallery wall layout width should measure approximately two-thirds of your sofa width for proper visual balance. Measure the sofa from arm to arm, multiply by 0.66, and use that result as your target width. A 90-inch sofa pairs best with a 60-inch wide gallery wall arrangement. The acceptable range spans 60-70% of sofa width—narrower looks lost in space, wider overwhelms the furniture. This proportion ties the art to the seating area and reduces empty visual space at the ends. For sectional sofas, measure only the main seating section rather than the entire L-shape length.
How do I reduce glare in a gallery wall layout?
Use matte UV acrylic glazing or museum glass with anti-reflective coating instead of standard glass to cut surface reflections. Position 3000K LED picture lights at a 30-degree downward angle from frame top—this angle illuminates artwork while directing light away from primary viewing positions. Test lighting placement before permanent installation by sitting in your most-used seat and adjusting light angle until reflections disappear. For strong window glare, consider moving the gallery wall layout to a perpendicular wall or adding window treatments that diffuse direct sunlight. Non-glare glass works but softens fine detail, so reserve it for high-glare locations where other solutions fail.
What anchors work best in drywall for gallery wall layout?
Match anchor type to frame weight for secure, long-lasting installation. For frames under 10 pounds, plastic expansion anchors work fine in 1/2-inch drywall. Frames weighing 10-20 pounds require threaded drywall anchors that bite into drywall and resist pull-out. For pieces over 20 pounds, use toggle bolts that spread load across back of drywall—these support up to 50 pounds per anchor when installed properly. Heavy or wide pieces over 30 pounds need French cleat mounting systems attached to wall studs, not drywall alone. Always install anchors perpendicular to wall surface and tighten until snug but not over-tightened, which crushes drywall and reduces holding power.
Is a gallery wall layout hard to keep straight over time?
No, gallery wall layouts stay level when you use proper installation techniques from the start. Lock all gaps at consistent 2-3 inch spacing, use two hooks or mounting points per frame instead of single points, and attach clear rubber bumpers to bottom frame corners. Create paper templates and mock up your arrangement before drilling to ensure proper spacing and alignment. Cut a physical spacer block to your chosen gap width and use it between frames during template arrangement—this eliminates measurement errors. Shorten picture wire so frames hang taut rather than loose and swinging. These techniques prevent the gradual shifting and tilting that occurs with quick, careless installations. Frames installed with two-hook systems and bumpers typically maintain perfect level for years without adjustment.
Create Your Perfect Gallery Wall Layout
Gallery wall layouts transform blank walls into personal museums that reflect your style and experiences. Follow this checklist for success: set a 57-inch center line, create paper templates, maintain 2-3 inch gaps, mount with French cleats for heavy pieces, choose 3000K LED picture lights, and protect valuable art with UV acrylic glazing.
Adjust these guidelines for your specific space, renter status, and art collection. Remember that perfect gallery wall layouts evolve over time—start with core pieces and add to your arrangement as your collection grows.
We want to hear from you! What’s your gallery wall layout story? Have you created a stunning arrangement you’re proud of, or are you struggling with a specific challenge like uneven walls, heavy frames, or finding the right spacing? Share your gallery wall photos, questions, and tips in the comments below—your insights help fellow decorators tackle their own wall art projects with confidence!


