Why do some people create stunning flower drawings that look gallery-worthy while others struggle to make petals look natural despite using the same materials and following similar instructions?
How to Draw a Flower Step by Step: Complete 2026 Guide for Beautiful Botanical Art
Learning how to draw a flower step by step opens up a world of artistic possibilities that extend far beyond simple sketches. Whether you want to create personalized greeting cards for loved ones, produce detailed botanical illustrations for scientific documentation, or simply enjoy a relaxing creative hobby that reduces stress, flower drawing provides endless opportunities for artistic expression and skill development.
This comprehensive guide walks you through every stage of the flower drawing process, from choosing the right materials and understanding floral anatomy to mastering advanced shading techniques that bring depth and realism to your artwork. Drawing flowers might seem intimidating when you first look at the complex petal arrangements and delicate structures, but with the right systematic approach and dedicated practice, anyone can create beautiful floral artwork that captures nature’s elegance.
The key to success lies in understanding basic geometric shapes that form flower structures, mastering proper proportions between different floral components, and developing observation skills that transform simple pencil lines into lifelike petals, stems, and leaves. You don’t need expensive art supplies or years of training to start—just patience, practice, and willingness to learn fundamental techniques that build upon each other progressively.
This guide covers everything from absolute beginner techniques to intermediate skills, ensuring artists at every level find valuable insights. You’ll discover how professional botanical illustrators approach flower drawing, learn troubleshooting strategies for common mistakes, and gain confidence to tackle increasingly complex floral subjects as your abilities grow.
Start your floral art journey with simple shapes and patient practice. Every petal you draw builds your observation skills, hand-eye coordination, and artistic confidence. The flowers you create today lay the foundation for the masterpieces you’ll produce tomorrow.
Essential Materials for Drawing Flowers
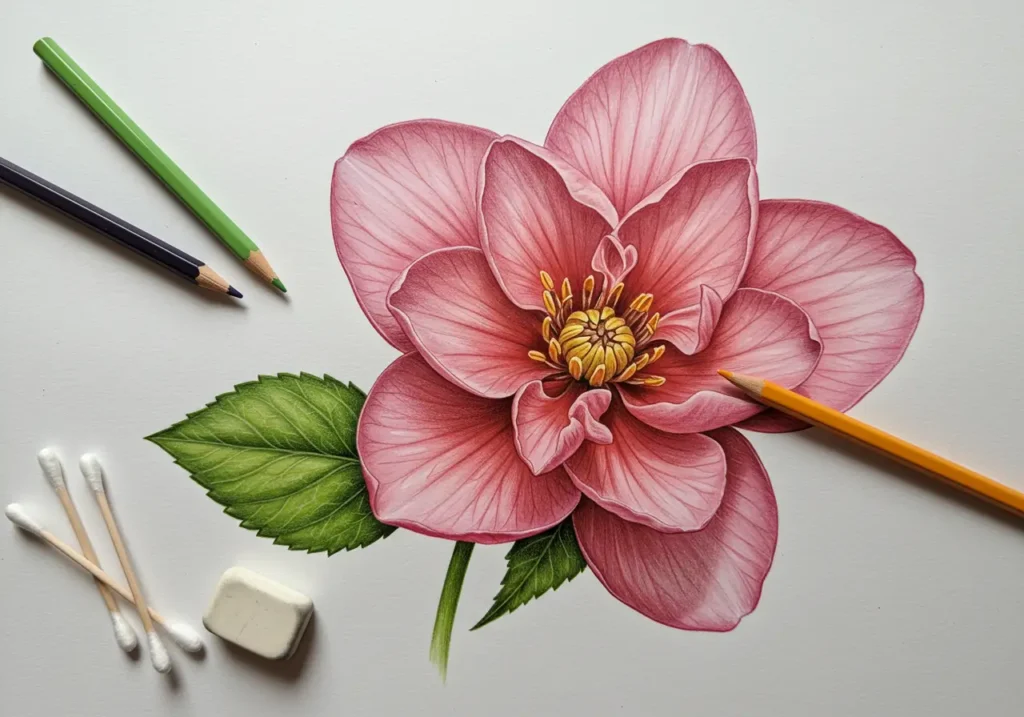
The right tools make a significant difference when you learn how to draw a flower step by step. Quality materials help you achieve better results while making the drawing process more enjoyable and less frustrating. You don’t need to purchase every art supply available, but investing in a few key items sets you up for success from your first sketch.
Basic Drawing Supplies
Start with these fundamental materials to draw a flower with confidence and control:
- Pencils in Multiple Grades: Use a range from 2H (creates light, precise lines for initial sketching) to 6B (produces dark, rich shadows for depth). The HB pencil sits in the middle range and works perfect for general sketching, outlines, and medium-value shading. Hard pencils (H grades) maintain sharp points longer, while soft pencils (B grades) smudge easier for blending effects.
- Quality Drawing Paper: Choose smooth drawing paper or sketch pads with at least 70 lb weight to prevent tearing during erasing. Bristol board provides excellent texture for detailed botanical work with its smooth surface that captures fine lines beautifully. Regular copy paper works fine for practice sketches when you’re experimenting with new techniques before committing to final artwork.
- Multiple Eraser Types: Keep kneaded erasers for gentle corrections that lift graphite without damaging paper fibers. White vinyl erasers remove marks cleanly for major corrections. Precision eraser pens create highlights by removing graphite from small areas, perfect for adding light touches to petal edges.
- Blending Tools for Smooth Gradients: Blending stumps (also called tortillons) create smooth transitions in shading across petals and leaves. Their pointed tips reach tight spaces between petals. Cotton swabs work as affordable alternatives for larger blending areas, while tissues soften overall values for atmospheric effects.
- Sharpener and Ruler: A quality handheld sharpener maintains pencil points for detail work. Metal rulers help draw straight stems and measure proportions when planning compositions with multiple flowers.
These basic supplies cost between $15-30 total when purchased as beginner sets from art stores or online retailers. This modest investment provides everything needed to start learning how to draw a flower step by step while developing fundamental skills that transfer to other drawing subjects.
Optional Advanced Supplies
Expand your flower drawing capabilities with these professional-grade tools:
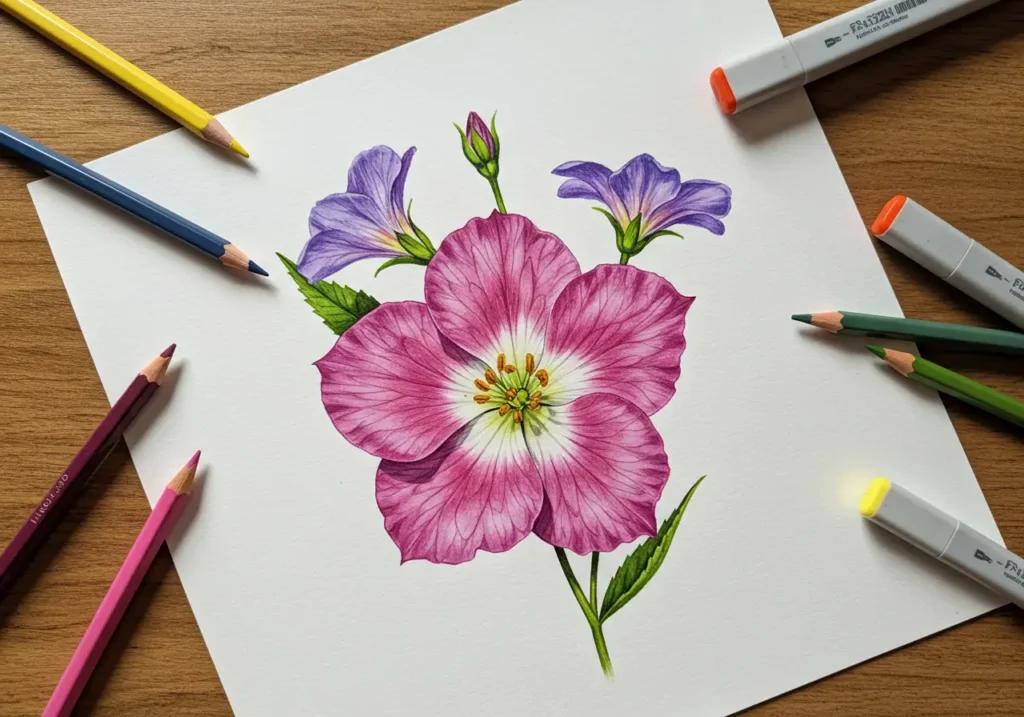
- Professional Colored Pencils: Brands like Prismacolor Premier, Faber-Castell Polychromos, or Caran d’Ache Luminance offer excellent pigmentation and smooth application for realistic flower colors. Wax-based pencils blend beautifully, while oil-based versions prevent waxy buildup on paper surfaces.
- Fine-Tip Markers and Pens: Technical pens create bold, consistent outlines for stylized botanical illustrations. Alcohol-based markers like Copic provide vibrant colors that layer and blend smoothly. Water-based markers offer easier cleanup and work well for beginners exploring color.
- Reference Materials and Inspiration: Real fresh flowers provide the best references, showing true colors, textures, and three-dimensional forms. High-quality photographs work when fresh flowers aren’t available. Botanical guides and illustrated field guides offer anatomical accuracy for scientific illustration projects.
- Fixative Spray: Workable fixative protects finished graphite drawings from smudging while allowing additional layers. Final fixative seals completed artwork permanently for framing and long-term preservation.
- Drawing Board and Clips: A portable drawing board provides firm support when working away from desks. Binder clips secure paper edges, preventing shifting during detailed work that requires precision.
Advanced supplies become worthwhile investments once you’ve mastered basic techniques and want to explore more sophisticated flower drawing approaches. Many artists build their supply collections over time, adding new tools as skills and interests expand into specialized areas like colored botanical illustration or scientific documentation.
Understanding Basic Flower Structure
Before you learn how to draw a flower step by step, understanding basic botanical anatomy helps you see flowers as structured forms rather than random shapes. This knowledge transforms observation from casual looking into purposeful analysis that informs better drawing decisions.
Every flower, regardless of species, contains similar fundamental components arranged in predictable patterns. Recognizing these universal structures allows you to draw any flower with confidence, even unfamiliar varieties encountered for the first time. The four main components include petals, reproductive centers, stems, and leaves—each with specific characteristics worth examining closely.
| Component | Description | Drawing Approach |
|---|---|---|
| Petals | Colorful outer parts that attract pollinators; shapes vary from rounded to pointed or ruffled depending on species. | Start with simple oval or teardrop shapes, then refine edges and texture. |
| Center (Reproductive Parts) | Contains stamens and pistils for reproduction; render as dots, lines, or small detailed structures. | Use stippling or small circles; add darker values for depth. |
| Stem | Cylindrical support structure connecting flower to plant; thicker near flower head, tapering downward. | Draw parallel lines with slight curves; add dimension through shading. |
| Leaves | Attached to stems in specific patterns (alternate, opposite, or whorled); show visible vein structures. | Sketch central vein first, add leaf outline, then secondary veins. |
Most flowers break down into simple geometric shapes that artists use as building blocks. Circles form the basis for roses, daisies, and many frontal flower views. Ovals create tulip buds, elongated petals, and side-view flower structures. Triangles define pointed leaf tips and certain petal shapes. Lines construct stems, leaf veins, and stamen filaments. By seeing complex flowers as combinations of these basic shapes, you simplify the drawing process into manageable steps.
Petal arrangement patterns follow mathematical principles in nature. Many flowers display radial symmetry with petals arranged evenly around central points, like daisies with their wheel-spoke pattern. Others show bilateral symmetry, appearing the same on left and right sides, like orchids and snapdragons. Understanding these patterns helps you place petals accurately and create balanced compositions.
Step-by-Step Guide: Drawing a Simple Daisy
Follow these detailed steps to learn how to draw a flower step by step, starting with a classic daisy. Daisies make perfect beginner flowers because their simple radial structure and distinct petals allow you to focus on fundamental techniques without overwhelming complexity. Take your time with each stage, and remember that your first attempts build the muscle memory and observational skills needed for more advanced flowers.
Step 1: Create the Basic Framework
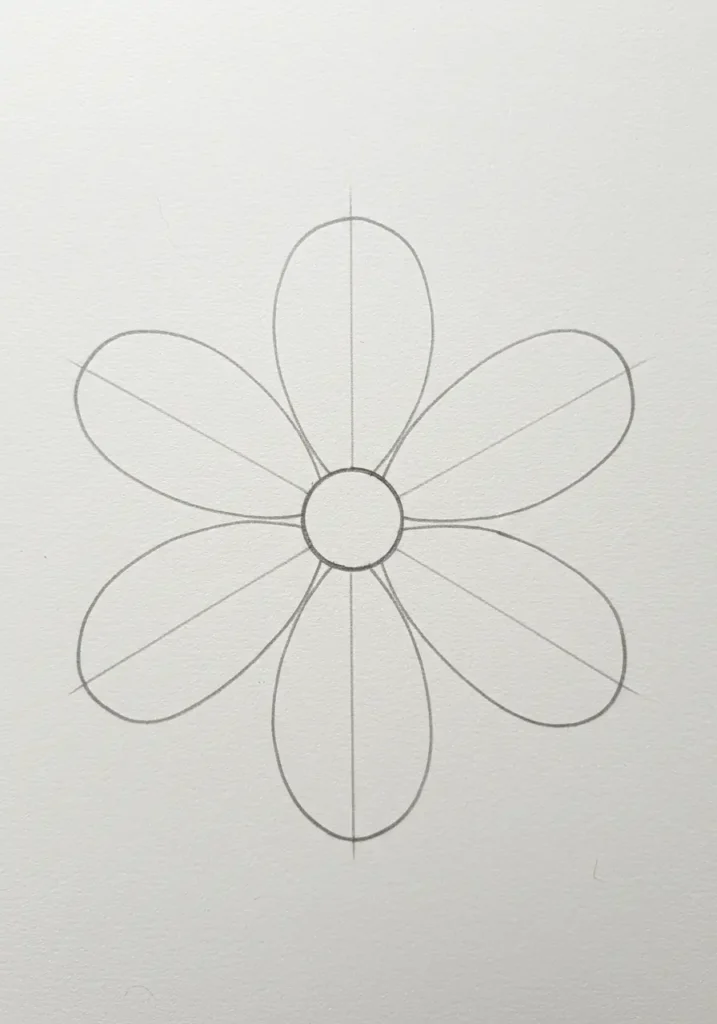
Draw a small circle in your paper’s center for the flower’s reproductive center. The circle should measure about 1 inch in diameter for a medium-sized flower. Add 8–12 light guidelines extending outward like wheel spokes, spacing them as evenly as possible. These guidelines determine petal placement and ensure radial symmetry. Keep these lines light since you’ll erase them later—press gently with your pencil.
Pro Tip: Use a compass or trace a coin for a perfect center circle. Imperfect circles create lopsided flowers that look unnatural.
Step 2: Shape the Petals
Draw elongated oval petals along each guideline, making them approximately three times longer than wide. Start each petal where your guideline meets the center circle, extending outward along the line. Vary petal sizes slight for natural irregularity—nature never creates perfectly identical petals. Some petals should be wider, others narrower, and lengths can differ by 10-15% between petals.
Pro Tip: Rotate your paper as you draw each petal to maintain consistent curves without awkward hand positions.
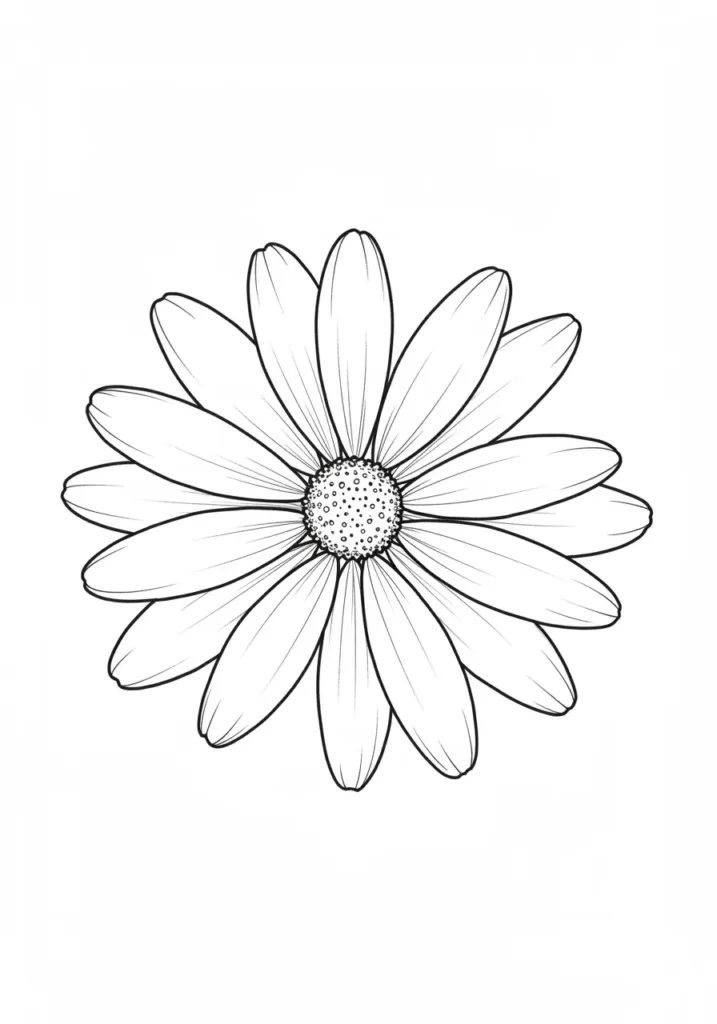
Step 3: Refine Petal Details
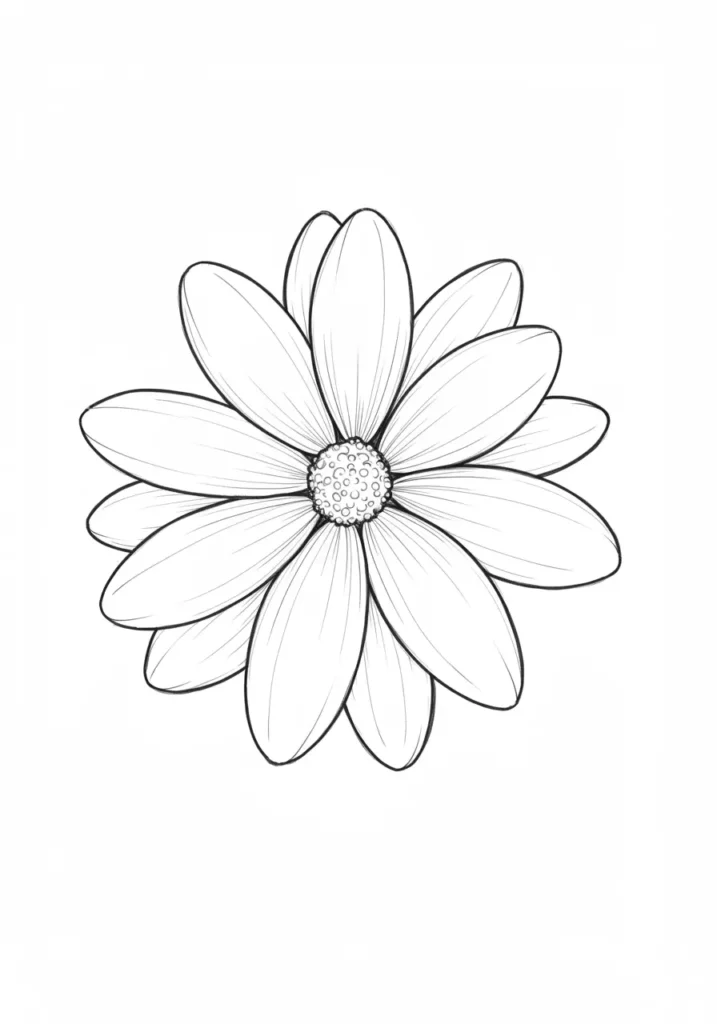
Round the tips of each petal, avoiding sharp points that look stiff and unnatural. Add gentle curves to petal sides, making them organic rather than geometric. Smooth the connections where petals meet the center circle, slightly overlapping some petals to create depth. Erase harsh guideline remnants for a clean, natural look. Add subtle imperfections like small notches or curves that mirror real flower variations.
Pro Tip: Real daisy petals often have small indentations at their tips. Adding this detail increases realism dramatically.
Step 4: Add the Center Details
Fill the center circle with small dots or short lines using a darker pencil (2B or 4B works well). Create texture by varying dot darkness—make some darker around outer edges and lighter toward the middle, suggesting a three-dimensional dome shape. Cluster dots closer together in some areas and space them wider in others for organic randomness. This stippling technique replicates the disc florets that form daisy centers.
Pro Tip: Leave a small crescent of lighter dots on one side to indicate where light hits the rounded center.
Step 5: Draw the Stem and Leaves
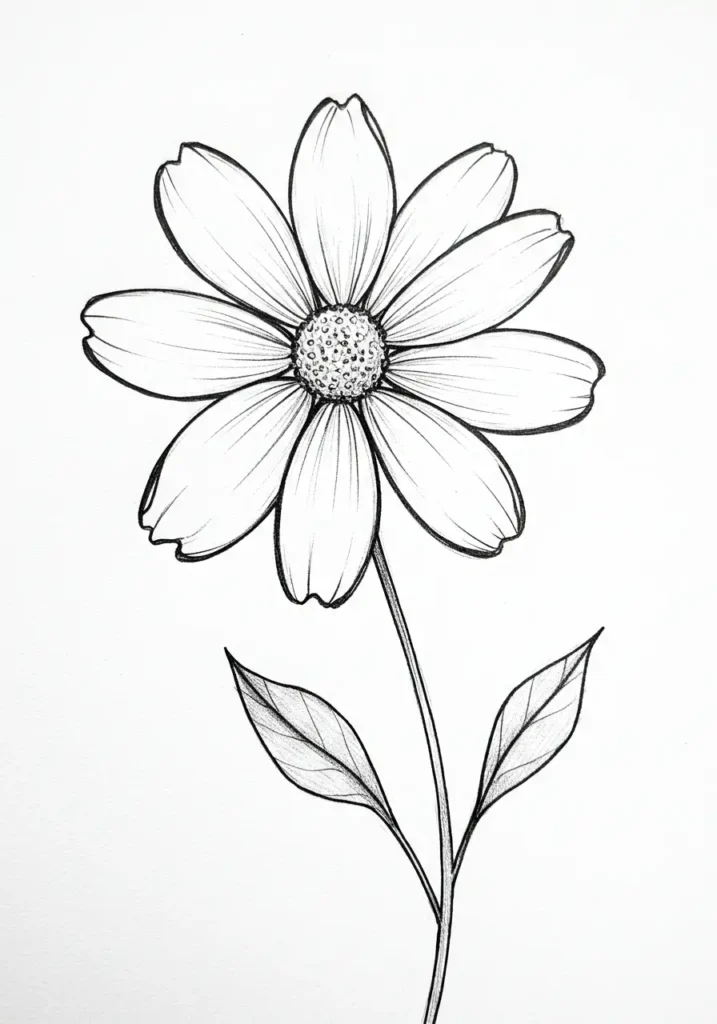
Extend two parallel lines downward from the flower base for the stem, making it thicker at the top where it connects to the flower head and gradually tapering as it descends. Add one or two oval leaves with slightly jagged or serrated edges emerging from the stem at different heights. Draw a central vein through each leaf’s middle, then add smaller branching veins extending toward leaf edges at 45-degree angles.
Pro Tip: Stems are rarely perfectly straight. Add a gentle curve to suggest natural growth and make your flower more dynamic.
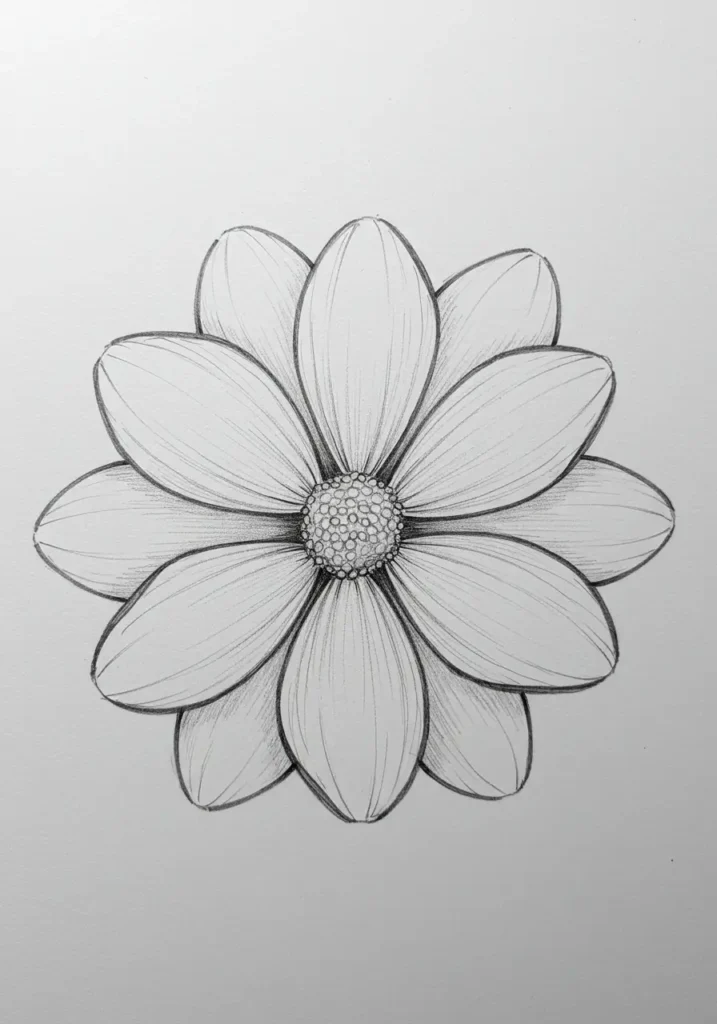
Step 6: Add Shading and Depth
Choose a light source direction (typically upper left). Add shadows on the opposite side of each petal using the side of your pencil for soft shading. Darken areas where petals overlap and where they meet the center. Shade one side of the stem to create roundness. Add subtle shading to leaf undersides and along veins. Leave highlights on petal tips where light hits directly. Blend shading with a stump or tissue for smooth transitions.
Pro Tip: Squinting at your drawing helps you see value relationships more clearly and identify areas needing more or less shading.
This six-step process builds your skills progressive, from basic shapes to refined details. Each daisy you draw improves your hand control and observational abilities. Practice this exercise multiple times before moving to more complex flowers—mastery of simple forms provides the foundation for advanced work.
What challenges do you face when drawing flower petals—getting the shapes right, making them look three-dimensional, or keeping them symmetrical? Share your specific struggles in the comments so we can help you overcome them!
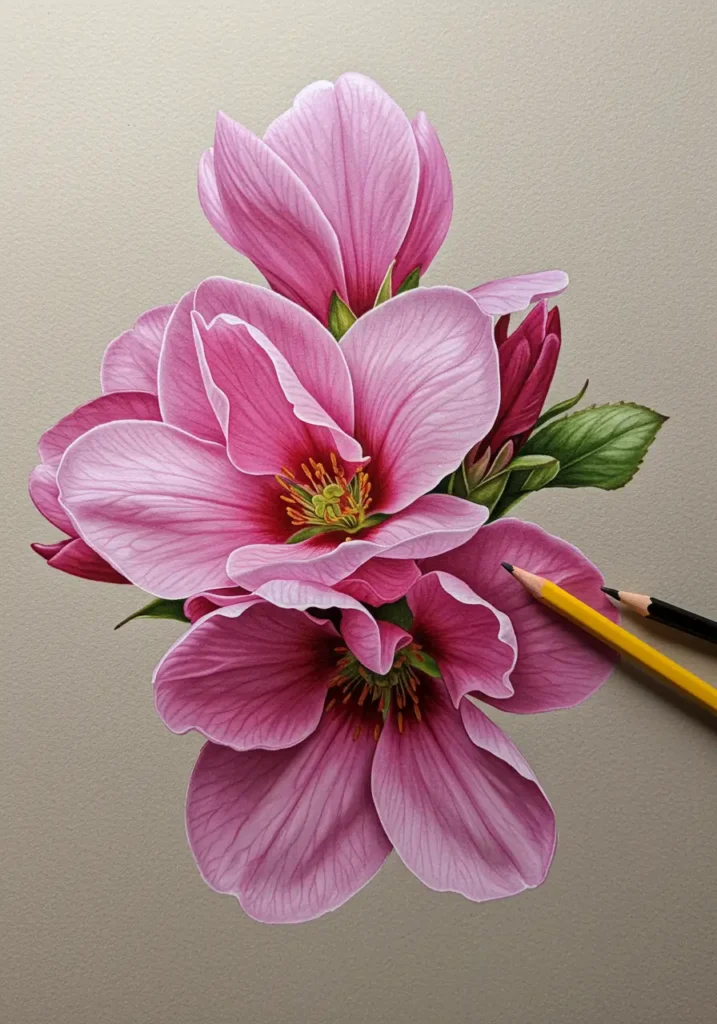
Advanced Flower Drawing Techniques
Once you master basic flower structures, advanced techniques elevate your artwork from simple sketches to professional-quality botanical illustrations. These methods require practice but transform flat drawings into convincing three-dimensional representations that capture flowers’ delicate beauty and complex structures.
Creating Depth and Dimension
To make your flower drawings pop off the page with convincing three-dimensionality, use these proven techniques:
- Strategic Petal Overlapping: Place some petals clearly behind others to create natural layering that suggests depth. Front petals should have complete outlines, while back petals show only partial edges where they emerge from behind forward elements. This overlap immediately signals to viewers’ brains that forms exist in three-dimensional space rather than on a flat plane.
- Directional Shading Methods: Use the flat side of your pencil for soft, gradual shadows under curving petal edges and in recessed areas. Keep your imagined light source consistent throughout the entire drawing—if light comes from upper left, all shadows fall to lower right. Vary pressure to create value scales from light gray to deep black, building up darkness through multiple layers rather than pressing hard immediately.
- Strategic Highlight Placement: Leave white paper areas completely untouched on petal tips and edges where imagined light hits most directly. These bright highlights create the illusion of glossy or translucent petal surfaces catching light. Resist the temptation to fill every space with graphite—strategic emptiness creates powerful visual impact.
- Atmospheric Perspective: Make back petals or distant flowers slightly lighter and less detailed than foreground elements. This mimics how human vision perceives depth, with closer objects appearing sharper and more contrasted while distant forms fade and soften.
- Cast Shadows: Add shadows that petals cast onto other petals or onto the flower center. These secondary shadows anchor elements in space and reinforce three-dimensional form. Cast shadows are typically darker and have harder edges than form shadows that describe rounded surfaces.
Depth creation transforms amateur work into professional illustrations. Study how real flowers reveal their three-dimensional forms through light and shadow. Photograph flowers under single light sources to see how shadows define structures, then replicate these natural lighting effects in your drawings.
Texture and Surface Details
Surface texture separates species and adds crucial realism when you learn how to draw a flower step by step:
- Realistic Petal Veins: Draw thin lines radiating from petal bases toward tips, following natural vein patterns you observe in reference materials. These lines should be lighter than petal edges and subtly curved to follow petal contours. Veins branch occasionally, dividing into progressively finer lines as they approach petal edges. This detail adds botanical accuracy that elevates drawings from generic to species-specific.
- Surface Variation Techniques: Adjust shading application methods to suggest different petal textures. For smooth, waxy petals like tulips, blend shading until no individual pencil marks remain visible. For papery textures like poppies, leave subtle pencil strokes visible in a consistent direction. For velvety surfaces like pansies, use circular motions with soft pencils to create subtle granular texture.
- Edge Treatment Variation: Replicate smooth rolled edges by darkening the very edge line then adding a parallel lighter line just inside, suggesting thickness and curl. For serrated edges, add small regular indentations along petal outlines. For ruffled petal edges, draw irregular wave patterns that catch light on peaks and shadow in valleys.
- Transparent and Translucent Effects: Some petals allow light to pass through, particularly at thin edges. Create this effect by keeping these areas very light, showing hints of veins or structures behind them. Morning glories and poppies often display this quality dramatically.
Texture details require close observation of actual flowers or high-quality photographs. Different species display dramatically different surface characteristics—identifying and replicating these qualities demonstrates advanced observational and technical skills that mark professional botanical illustration.
Related Reading: Draw a Cat: Complete Step-by-Step Guide for Realistic Feline Art
Master additional drawing techniques including fur texture, proportions, and animal anatomy that complement your flower drawing skills for comprehensive artistic development.
Drawing Different Flower Types
Each flower species presents unique structural challenges and learning opportunities. Mastering various flower types expands your botanical art repertoire while teaching transferable skills applicable across subjects. Start with simpler flowers before attempting complex varieties with numerous petals or intricate structures.
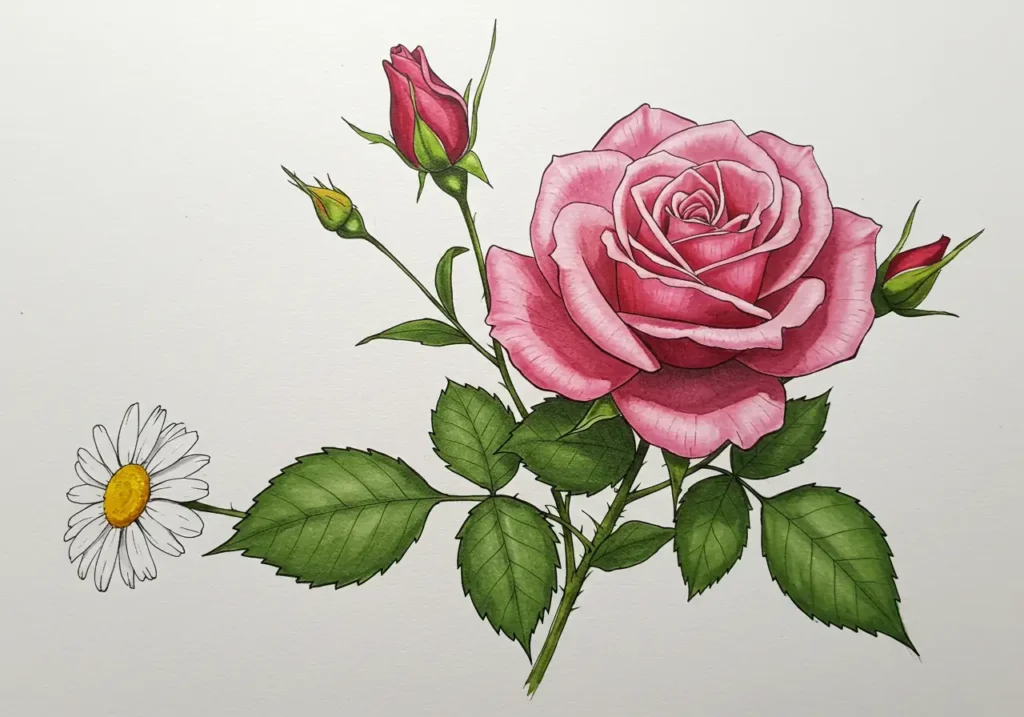
How to Draw a Rose
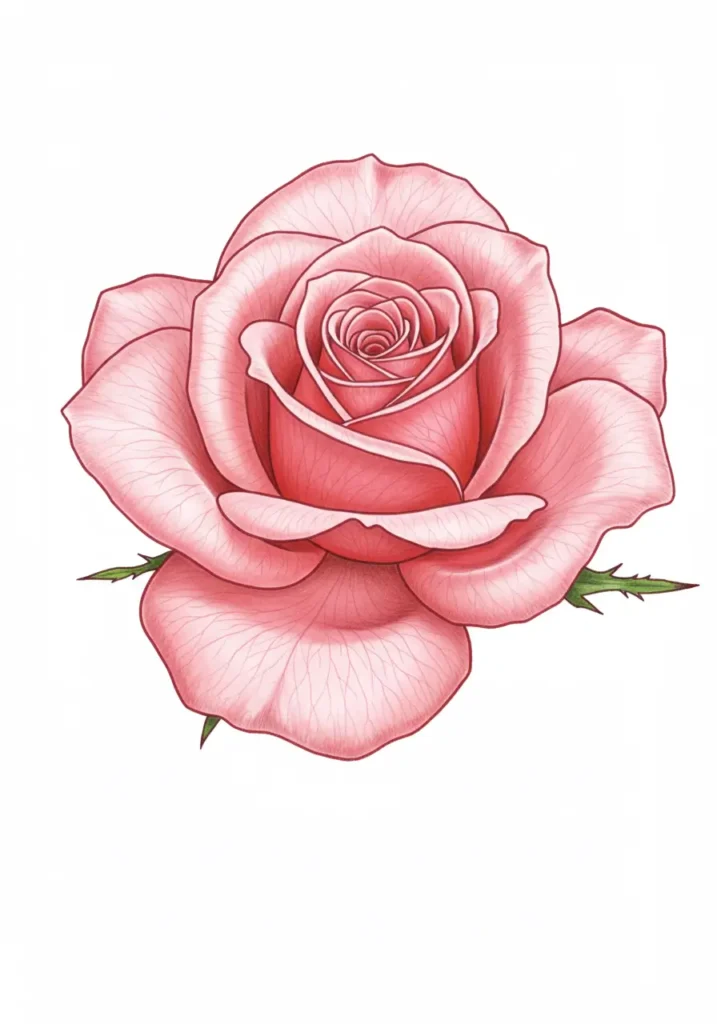
Roses present unique challenges due to their complex layered petal structures that spiral from tight centers outward into progressively larger, more open forms. Begin with a small oval shape for the rose center, representing the tightly furled inner bud. Draw inner petals as curved lines wrapping around this center oval, each petal tucked behind the previous one in a spiral pattern. These inner petals remain upright and compact.
Add a middle layer of petals that are larger, more open, and curve outward gent. These petals begin to show their individual forms rather than wrapping tight around the center. Each middle petal should overlap the ones behind it while tucking under petals in front, creating the characteristic layered rose appearance. Finish with large, fully opened outer petals that curve back dramatically, sometimes folding or even pointing downward at their tips. These outer petals should be significantly larger than inner ones, with visible veins and soft, organic edges.
Add thorns as small triangular protrusions along a thick stem, spacing them irregularly for natural appearance. Rose stems appear thicker than most flowers due to their woody structure. Include compound leaves with 5-7 leaflets arranged along a central stem, each leaflet showing serrated edges. Shade rose petals carefully, making inner petals darkest since they receive less light, with progressive lightening toward outer petals. The complexity of rose drawing rewards patience—each layer you add brings the flower closer to photorealistic representation.
Drawing Tulips
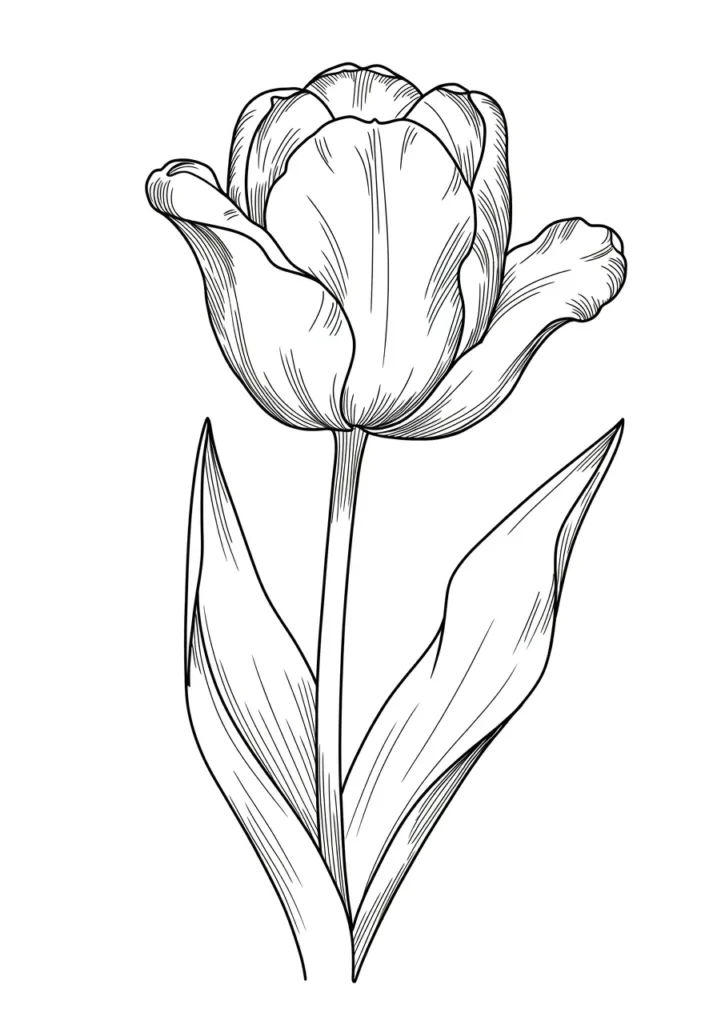
Tulips display a distinctive cup or goblet shape created by six petals arranged in two layers of three petals each. Begin your tulip drawing with a slightly tilted oval representing the cup’s opening when viewed from a three-quarter angle. This oval should be wider at the top and narrower at the bottom, following the natural taper of tulip flower heads.
Divide this oval into three visible front petals and suggest three back petals with partial outlines. Each petal should be elongated and curved, flowing from the tulip base to its rim where edges often point outward slight. Tulip petals overlap at their bases but separate at their tips, creating characteristic gaps between petal edges. Draw smooth curves along petal sides, avoiding straight lines that make flowers look stiff.
Connect petals smooth at the base where they meet the stem—this junction point should show subtle shading suggesting depth where the flower head narrows to meet the stem. Draw a thick, sturdy stem since tulips have substantial support structures. Add broad, lance-shaped leaves wrapping partially around the stem base, with smooth edges and parallel veins running lengthwise. Tulip leaves often curve graceful, so avoid drawing them perfectly straight. Shade the cup interior darkest, with lighter values on outer petal surfaces that catch light. Tulips’ smooth, waxy petal texture requires well-blended shading without visible pencil marks.
Creating Sunflowers
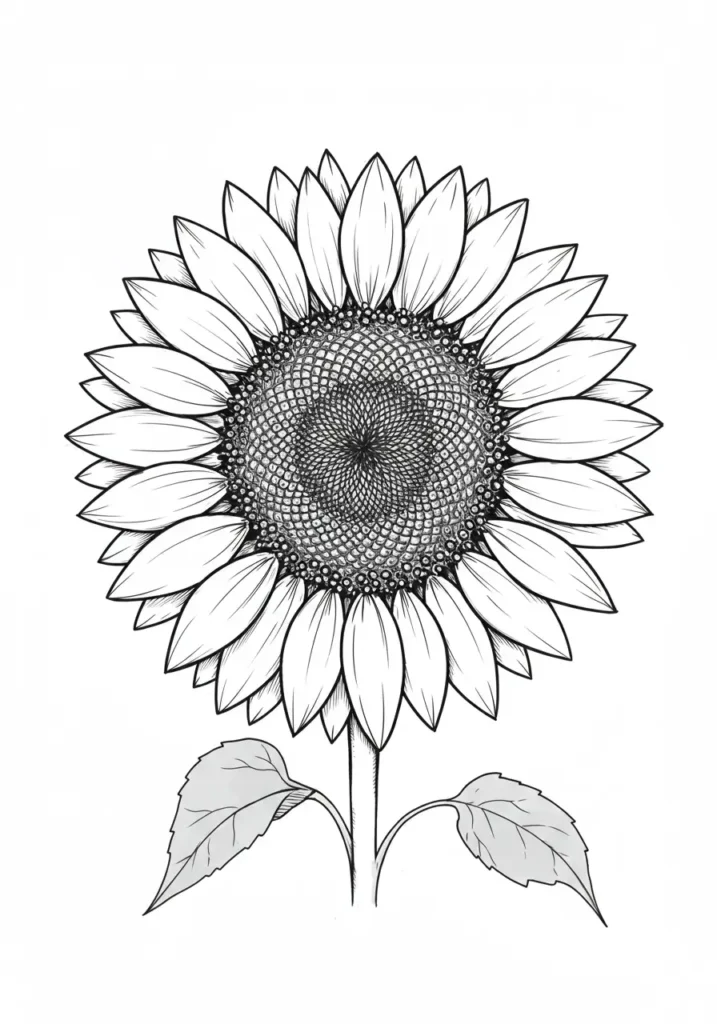
Sunflowers require particular attention to their large, detailed centers composed of hundreds of tiny disc florets arranged in mathematical spiral patterns. Draw a large circle for the flower center—sunflower centers are disproportionate large compared to most flowers, sometimes comprising 40-50% of the total flower head diameter.
Fill this center circle with small oval shapes arranged in spiral curves radiating from the center outward, mimicking the Fibonacci spiral patterns found in nature. These ovals represent individual florets that create the seed head. Make ovals smaller toward the center and gradually larger toward the outer edges. Vary shading on each oval to create three-dimensional appearance—darker on one side, lighter on the other. This detailed center work requires patience but defines sunflower character.
Add numerous pointed, lance-shaped petals around the center’s perimeter, arranging them in overlapping clusters rather than perfectly spaced intervals. Sunflower petals vary in size and shape, with some longer than others and many showing slight twists or curves. Make petals approximately the same length as the center’s radius, with slightly curved edges and pointed tips. Petals often angle outward and curve back gent rather than lying flat.
Draw a very thick stem (often 1-2 inches in diameter on mature plants) to support the massive flower head. Add large, heart-shaped leaves with serrated edges and prominent veins. Sunflower leaves feel rough to touch—suggest this texture through slightly uneven shading and visible surface irregularities. The bold, graphic quality of sunflowers makes them popular subjects for both realistic and stylized botanical art.
Which flower type interests you most for your next drawing project—the romantic layered petals of roses, the elegant simplicity of tulips, or the bold graphic impact of sunflowers? Tell us which flower you’ll tackle next and what draws you to that species!
Common Mistakes and How to Avoid Them
Recognizing common flower drawing mistakes helps you avoid frustrating setbacks and progress faster toward professional results. Most beginners make similar errors when learning how to draw a flower step by step—understanding these pitfalls before they derail your work saves time and prevents discouragement.
| Common Mistake | Why It Happens | Effective Solution |
|---|---|---|
| Oversized Centers | Drawing center first without planning total flower size. | Study real flowers to match center-to-petal proportions; lightly sketch total size first. |
| Uniform Identical Petals | Attempting perfect symmetry that doesn’t exist in nature. | Deliberately vary petal sizes and shapes by 10-20% for natural irregularity. |
| Inconsistent Light Source | Adding shadows randomly without planning lighting direction. | Choose one light direction before shading; draw arrow reminder on paper edge. |
| Flat, Lifeless Petals | Skipping shading or using uniform values throughout. | Create value scales from white to black; use full range in drawings. |
| Stiff, Geometric Stems | Drawing perfectly straight parallel lines with rulers. | Add gentle curves and slight irregularities; vary stem thickness along length. |
| Missing Leaf Veins | Focusing only on flower head and ignoring leaf details. | Always add central vein plus branching secondary veins for botanical accuracy. |
| Poor Petal Overlap | Drawing all petals side-by-side without depth relationships. | Decide which petals are front-most; draw complete, then add back petals partially hidden. |
Additional common mistakes include pressing too hard with initial sketches (making erasing difficult), rushing through observation to start drawing before understanding structure, and giving up after first attempts instead of treating early drawings as essential practice. Remember that even professional botanical illustrators create multiple preliminary sketches before final renderings. Mistakes are learning opportunities that reveal areas needing focused practice rather than indicators of inadequate talent.
Tips for Drawing Flowers from Life
Drawing from real flowers rather than photographs provides unmatched opportunities to understand three-dimensional forms, observe subtle color variations, and study how light interacts with organic surfaces. Living specimens reveal details that photographs compress or lose entirely. Cultivate these practices to improve accuracy when drawing from life:
Study flowers before drawing. Observe petal arrangements from multiple angles, noting how forms change as you move around the specimen. Touch petals gently to understand their texture—waxy, papery, velvety, or silky surfaces require different shading approaches. Count stamens and examine how they attach to flower centers. Notice color variations across single petals, from darker bases to lighter tips, or color shifts between front and back surfaces.
Use your pencil as a measuring tool. Hold your pencil at arm’s length, closing one eye to establish consistent viewing distance. Measure the flower center’s size, then compare petal lengths against this baseline measurement. Calculate ratios (petals are 2.5 times longer than the center width, for example) then apply these proportions to your drawing. This sight-sizing technique ensures accurate proportions regardless of drawing size.
Work under consistent lighting conditions. North-facing window light provides steady, indirect illumination without harsh shadows or color temperature shifts throughout the day. Position your flower specimen between your viewing position and the light source, allowing forms to reveal themselves through shadow patterns. Avoid multiple light sources that create confusing, conflicting shadows that flatten forms rather than describing them.
Take reference photos from multiple angles before flowers wilt or petals drop. Photograph flowers in consistent lighting, capturing close-ups of centers, individual petals, leaf attachments, and overall forms. These photos serve as backups when flowers deteriorate but also document details you might miss during live observation. Date photos and note flower species for future reference when planning new drawings.
Draw quickly to capture overall impression before obsessing over details. Flowers wilt, petals droop, and forms change as hours pass. Make quick gesture sketches capturing basic shapes and proportions first, then refine details from photographs or memory after the immediate session. This approach balances life observation benefits with practical reality of working with perishable subjects. Consider the excellent observational drawing advice available through Artists Network resources covering botanical subjects specifically.
Developing Your Personal Style
As you master technical skills for how to draw a flower step by step, explore different artistic approaches that reflect your personal aesthetic preferences and intended uses for your artwork. Style develops naturally over time through experimentation and repetition, but conscious exploration accelerates this process by exposing you to various possibilities.
Realistic Botanical Style emphasizes scientific accuracy, showing flowers exactly as they appear in nature with precise proportions, accurate colors, and authentic details. This approach requires patient observation and technical skill but produces timeless artwork suitable for field guides, educational materials, and traditional botanical collections. Focus on accurate representation over artistic interpretation.
Stylized Illustration simplifies flowers into decorative designs using bold outlines, flat colors, and pattern elements. This approach works beautifully for graphic design applications, textile patterns, greeting cards, and modern home decor. Experiment with reducing flowers to essential shapes, emphasizing decorative qualities over botanical accuracy. Art Nouveau and Mid-Century Modern movements provide excellent stylized flower examples worth studying.
Expressive Sketching captures flowers’ energy and character through loose, gestural marks that suggest rather than precisely define forms. This spontaneous approach emphasizes artistic interpretation and emotional response over technical perfection. Use varied line weights, energetic mark-making, and selective detail placement to create dynamic flower drawings with personality and movement.
Practice daily flower drawing sessions lasting 15–30 minutes to build skills consistent. Draw various species to prevent boredom and expand your botanical knowledge. Start each practice session with simple flowers like daisies or morning glories, then progress to increasingly complex subjects like roses, peonies, or orchids as your confidence grows. Keep a dedicated sketchbook for flower studies, dating each entry to track progress over months and years. This visual record motivates continued practice by showing dramatic improvement over time.
Building Your Flower Drawing Portfolio
Create intentional themed collections that demonstrate your range and attract specific audiences. Seasonal flower series showcase blooms associated with particular times of year—spring daffodils and tulips, summer roses and sunflowers, fall chrysanthemums and dahlias. These collections work beautifully as calendar artwork, greeting card series, or seasonal home decor prints.
Garden study collections document specific growing spaces over time, showing how gardens evolve through seasons and years. This narrative approach creates meaningful work for garden enthusiasts and provides unique gift options for gardeners featuring their own cultivated flowers. Wildflower field guides tailored to specific regions serve both artistic and educational purposes, potentially appealing to nature centers, schools, and outdoor recreation organizations.
Share your flower drawings on visual platforms like Instagram using relevant hashtags like #botanicalart, #flowerdrawing, #botanicalillustration, and #floralart to connect with communities of botanical artists and potential customers. Post consistently with thoughtful captions describing your process, materials, or interesting facts about featured flowers. Engage genuinely with other artists’ work to build relationships within the botanical art community.
Sell original drawings or high-quality prints through platforms like Etsy, where botanical art maintains steady demand. Price work appropriately based on time invested, materials costs, and market research showing what similar artists charge. Offer various sizes and price points to accommodate different customer budgets. Consider print-on-demand services that handle production and shipping, letting you focus on creating new artwork.
Display finished works at local art shows, botanical gardens, farmers markets, and community centers. These venues connect you directly with potential buyers while providing valuable feedback about which styles and subjects resonate most with audiences. Many communities host seasonal arts and crafts shows specifically seeking botanical artists—research opportunities in your area and plan submissions around show schedules.
Have you started building a flower drawing portfolio or sharing your work online yet? What successes or challenges have you experienced, and what goals are you working toward with your botanical art? Share your journey and let’s celebrate your progress together in the comments!
Moving Forward with Your Flower Drawing Journey
Learning how to draw a flower step by step provides endless opportunities for artistic growth and personal satisfaction. The fundamental skills you develop through flower drawing—careful observation, proportional accuracy, and shading techniques—transfer seamlessly to all other drawing subjects from portraits to landscapes to architecture. Every hour spent practicing botanical forms builds your overall artistic capabilities in ways that compound over time.
Start with simple varieties like daisies that build confidence through achievable success. Master the basic flower structure principles before attempting complex multi-petaled specimens. Challenge yourself progressive with increasingly difficult subjects as your skills improve—move from single flowers to small arrangements, then to full bouquet compositions that demonstrate your growing abilities.
Remember that artistic development happens through consistent practice rather than occasional marathon sessions. Short daily practice beats irregular long sessions every time. Even 15 minutes spent sketching petals or studying flower centers contributes to skill building that accumulates into mastery over months and years. Be patient with yourself during the learning process—every artist struggles initially before breakthrough moments arrive.
Enjoy the meditative, stress-reducing benefits of focused flower drawing that provides welcome breaks from digital screens and daily pressures. The simple act of observing natural forms and translating them onto paper offers therapeutic value beyond artistic skill development. Many people discover that flower drawing becomes a favorite mindfulness practice that centers thoughts and calms anxious minds.
Ready to create your first beautiful flower drawing?
Gather your pencils, find a simple flower to sketch, and begin your botanical art journey today. Start with the daisy tutorial in this guide, then gradually explore more complex varieties as your confidence grows. Which flower will you draw first—a cheerful daisy, an elegant tulip, or perhaps a sunflower to brighten someone’s day? What draws you most to flower drawing—the meditative practice, the beauty you create, or the skills you’re building? Share your first attempts, ask questions, and connect with fellow flower drawing enthusiasts in the comments below. Your artistic journey starts with a single petal—let’s begin together!
Frequently Asked Questions About Drawing Flowers
What’s the easiest flower to start drawing as a complete beginner?
Daisies make the absolute best starting flowers for beginners due to their simple radial petal structure, clear circular center, and symmetrical design that uses fundamental shapes mastered quickly. Their straightforward anatomy consists of a round center surrounded by elongated oval petals arranged like wheel spokes—a pattern that teaches essential flower drawing principles without overwhelming complexity. Morning glories and simple five-petal wildflowers also work well as early subjects. Avoid roses, peonies, or orchids initially since these complex flowers feature intricate petal layers and unusual structures that challenge even experienced artists. Success with simpler flowers builds confidence and foundational skills needed for tackling advanced subjects later. Practice three to five daisy sketches before moving to slightly more complex varieties like tulips or cosmos flowers.
How can I make my flower drawings look three-dimensional and realistic instead of flat?
Create convincing three-dimensionality through strategic overlapping petals that establish clear depth relationships, consistent shading from a single imagined light source that creates realistic shadow patterns, and careful value variation from pure white highlights to deep black shadows. Focus on overlapping petals correctly by drawing front petals completely first, then adding back petals with only their visible portions showing where they emerge from behind forward elements. Choose one light direction (typically upper left) and maintain it consistently throughout your entire drawing—all shadows must fall on opposite sides from your light source. Use the full value range from your pencils, creating gradual transitions from light to dark using the pencil side for soft blending rather than just outlines. Leave white paper areas completely untouched where light hits most directly on petal tips and curved edges—these bright highlights create the illusion of glossy or translucent surfaces. Add cast shadows where petals overlay each other or rest on backgrounds, using darker values with harder edges than the softer form shadows describing rounded surfaces. Practice value scales (gradients from white to black) separately before applying shading to flowers, developing smooth blending skills that translate forms from two dimensions into convincing three-dimensional representations.
What pencil grades work best for drawing flowers and achieving different effects?
Use 2H or H pencils for initial light sketches and layout guidelines that you’ll erase later—these harder pencils create precise, barely-visible lines perfect for planning proportions and placement without committing to permanent marks. HB pencils work perfectly for general outlines, medium-value shading, and most linework since they balance darkness with control beautifully. Switch to 2B, 4B, or 6B pencils for rich shadows, dark flower centers, and deep values that create dramatic contrast and depth. Harder pencils (H grades) maintain sharp points longer and create lighter marks ideal for delicate details like petal veins or fine texture work. Softer pencils (B grades) smudge more easily, making them excellent for blending and creating smooth gradients across petal surfaces. Most professional botanical illustrators keep at least five pencil grades readily available during drawing sessions: one hard pencil for layout (2H), one medium for general work (HB), and three soft pencils for progressive shading depths (2B, 4B, 6B). This range provides complete value control from lightest grays to deepest blacks. Avoid pressing hard with any pencil grade—build darkness through multiple light layers rather than single heavy applications that damage paper and create shiny graphite surfaces that won’t accept additional layers.
How do I choose good reference photos when I can’t draw from real flowers?
Select reference photographs showing clear, directional lighting that reveals petal texture and three-dimensional form through distinct shadows and highlights rather than flat, evenly-lit images that obscure structure. Avoid photos with harsh direct sunlight creating extreme contrasts or overexposed areas that lose detail, as well as dim images with muddy shadows that hide form information you need to understand flower structure. Choose images sharp enough to show individual petal edges, stamen details, and surface textures when zoomed in—blurry photos force you to guess at details rather than observe them accurately. Look for side-angle or three-quarter views that show depth and petal overlap rather than completely flat frontal shots that compress three-dimensional forms into two-dimensional patterns. Take your own reference photos of fresh flowers before they wilt, shooting from multiple angles under consistent north-facing window light that provides soft, steady illumination throughout the day. Photograph close-ups of flower centers, individual petals, leaf attachments, and overall forms to document complete information unavailable in single images. Free stock photo sites like Unsplash and Pixabay offer excellent botanical images, while paid services like Adobe Stock provide professional-quality references worth the investment if you’re serious about flower drawing. Always reference multiple photos of the same flower species to understand typical characteristics versus individual specimen variations, preventing you from replicating unusual oddities as if they were normal species features.
Should I learn to draw flowers in pencil first or jump straight to colored pencils and markers?
Master graphite pencil techniques thoroughly before introducing color, since pencil drawing teaches fundamental skills including proportion, value relationships, form description through shading, and edge control that transfer directly to all other media. Pencil work focuses your attention on drawing essentials—accurate shapes, proper proportions, and convincing three-dimensional form—without the added complexity of color theory, pigment mixing, and medium-specific techniques that overwhelm beginners attempting too much simultaneously. Graphite also offers forgiving qualities that colored media lack: easy erasing for corrections, simple blending with stumps or tissues, and clear value perception unmuddied by color considerations. Once you consistently create convincing three-dimensional flower forms in pencil with accurate proportions and well-observed details, adding color becomes a natural extension of skills you’ve already developed rather than learning everything simultaneously from scratch. The transition to colored pencils, markers, or watercolors happens smoothly when you understand underlying forms and can focus attention on color-specific challenges like hue selection, saturation control, and pigment layering. Most professional botanical illustrators recommend six months to one year of regular pencil practice before introducing color media seriously. This timeline ensures strong foundational skills that support whatever color approaches you eventually explore, whether realistic botanical illustration, stylized graphic design, or expressive artistic interpretation of floral subjects.


")


